Manage Client Intake and Referrals
Learning Objectives
After completing this unit, you’ll be able to:
- Create inbound and outbound referral case records.
- Work through the client intake process.

Before You Start
Before you start this module, consider completing the following recommended content.
Understand Intakes and Referrals
Agentforce Nonprofit Case Management is a Salesforce managed package that provides custom objects and tools designed to help human service organizations provide high-quality, hands-on service. In this unit, we follow along with an example organization as they use the app to manage a client’s case from start to finish.
Case Management intake and referral records help you collect the necessary information to place a client into the right program or make sure they’re connected to the right external organization.
Intakes track everything you need to qualify a client for a program, from basic contact information to assessments, and can guide your team with customizable checklists for each program or process. You can create intakes directly from the Intakes tab or from an inbound referral.
A referral is a type of case record that tracks recommendations for clients to receive services from your organization or another group. There are two types of referrals.
-
Inbound referrals are for services at your organization. These referrals can come from other organizations or another department within your own organization, such as a helpline.
-
Outbound referrals are for services at another organization, such as when you recommend a client to enroll in a program at another organization.
Create Inbound Referral Case Records
In this badge we follow a case at the (fictional) organization No More Homelessness (NMH), which helps its clients find safe and stable housing. NMH prioritizes getting clients into short-term housing before helping them establish long-term housing and economic stability.
Tim Hill could use NMH’s help. He first contacts NMH for emergency services on a referral from another organization.

Rosa Sanchez, an NMH case manager, receives the email and creates an inbound referral. Let’s follow along.
- Navigate to the App Launcher (
 ), then find and select Case Management.
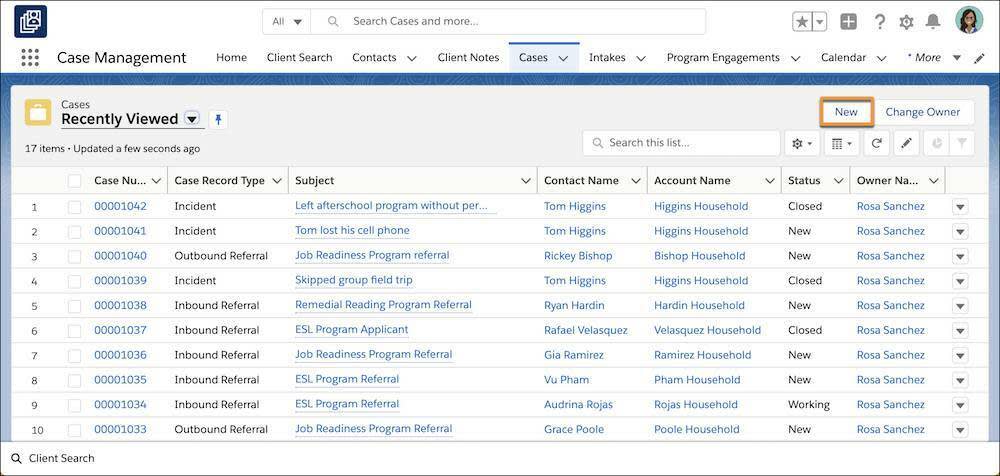
- Select Cases in the navigation bar.
- Click New on the Cases list view.
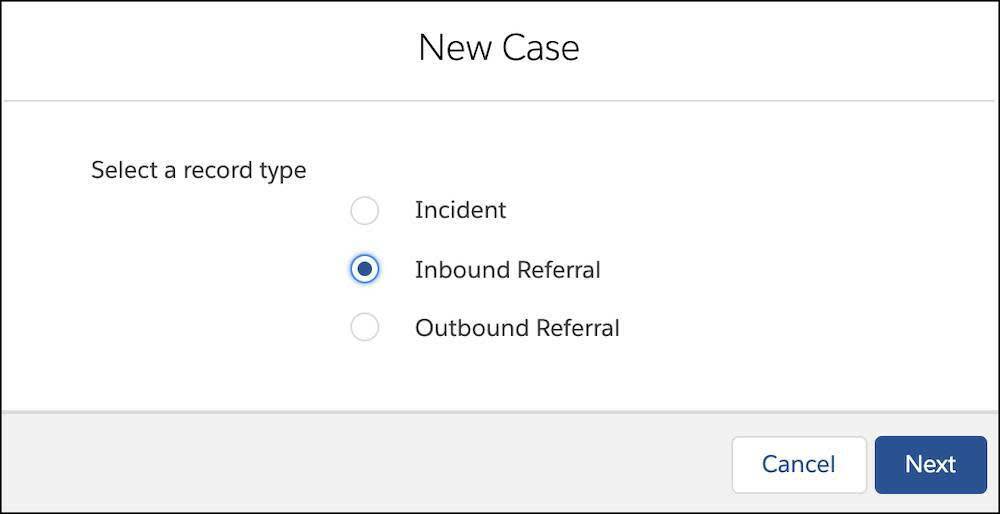
- In the New Case popup, select Inbound Referral and click Next.
- In the Subject field, type
Short-term housing candidate.
- Click into the Contact Name search box to check if Tim is already an NMH client—your first step whenever you create an intake or referral. Tim doesn’t have a contact record yet, so we need to create one. Click + New Contact, enter Tim’s information, and click Save.
- In Case Origin, select Email.
- In the Referral Organization field, find and select the referring organization. Rosa finds and selects the local veterans’ organization that referred Tim, then adds a Referral Organization Contact, too.
- In the Program field, find and select the Emergency Services (Short-term Housing) program.
- Set the Status to New.
- Set the Priority to Medium.
- Enter a few details to the Description field.
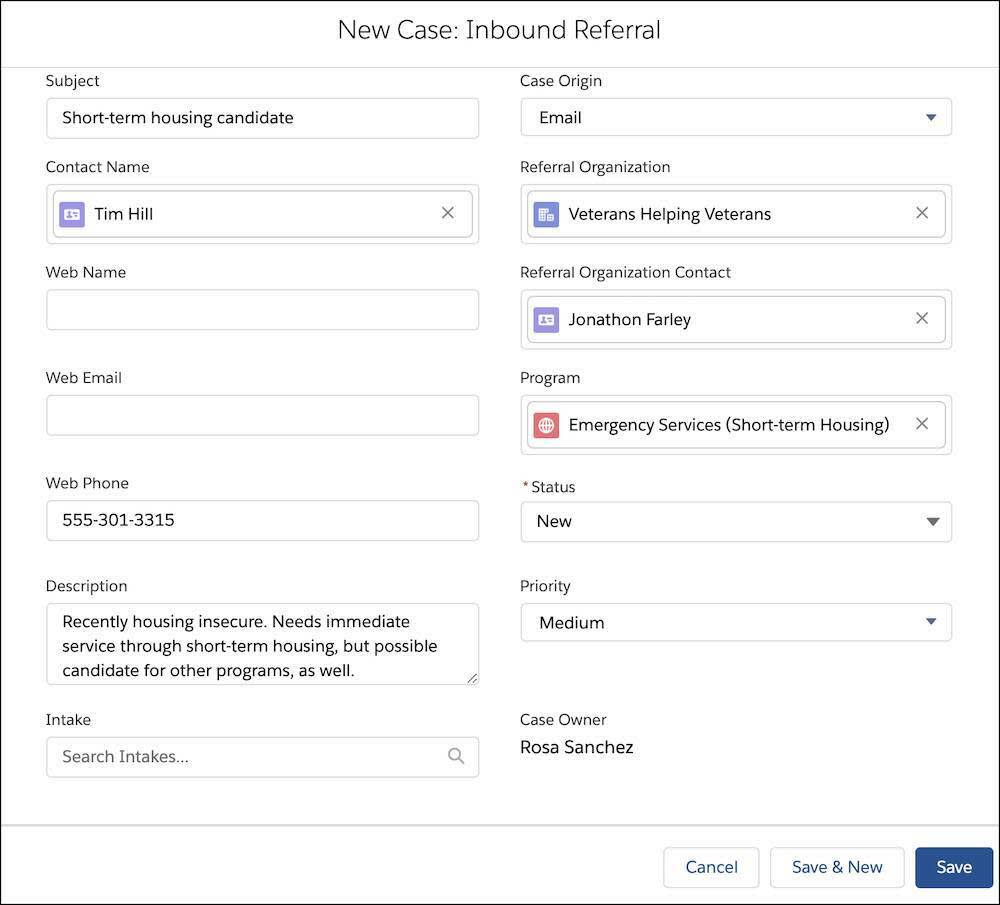
- Click Save.
Rosa calls Tim and invites him to the short-term housing facility to go through the intake process. When Tim arrives, Rosa opens the referral record, sets the status to Working, and clicks Create Intake.

Get to Know the Intake Page
Let’s pause to review the details of an intake record.

The status bar (1) shows your progress. While this intake only takes a few minutes, the process for other NMH programs could take longer and require more information. For now, Rosa clicks In Progress and then Mark as Current Stage.
The checklist template (2) allows you to add a preconfigured checklist for each intake process. NMH set up checklist templates for each of its programs, so Rosa selects the short-term housing template and clicks Create Checklist. The checklist is pinned to the screen in an intake record, so it’s always visible as you scroll. Plus, if your admin has configured the checklist to serve as navigation, you can click a checklist item to automatically move to the corresponding section of the record.
If the checklist tells you what needs to be done, the related lists and details areas (3) are where you do it. These sections include everything you need to review inbound referrals, record basic client information, upload documents, create and view assessments, record an intake decision, create program engagements, and create outbound referrals. After you complete each step, you can select it on the checklist to mark it complete.
The Intake Process
With a checklist template selected, Rosa knows what she needs to do to make sure Tim is a good fit for the program.
First, Rosa asks Tim for a few details that didn’t come with the referral, like his legal name, pronouns, birthdate, and age category, plus some contact details. This information can be stored on the intake record by clicking Edit (  ) on any field. As you edit, changed fields are highlighted in yellow until you click Save.

Rosa takes Tim’s picture and attaches it to his contact record.

When Rosa has completed every task required in the first group of the intake checklist, it’s time to select the next group and move on.

Next up are intake criteria questions and some paperwork. Rosa goes through a few NMH-standard questionnaires and asks Tim to fill out some forms and provide additional information.
Rosa can scan and upload these documents to Tim’s intake record or contact record. Completed forms for this program (like an intake-specific form) are uploaded to the Files list, while documents NMH needs to keep with Tim’s contact record (like a copy of his photo ID) go in the Files for Parent Contact list.

Two of the questionnaires give Rosa the information she needs for assessment scores, which she can create from the intake record. (We cover assessments later in this badge, so stick around.)

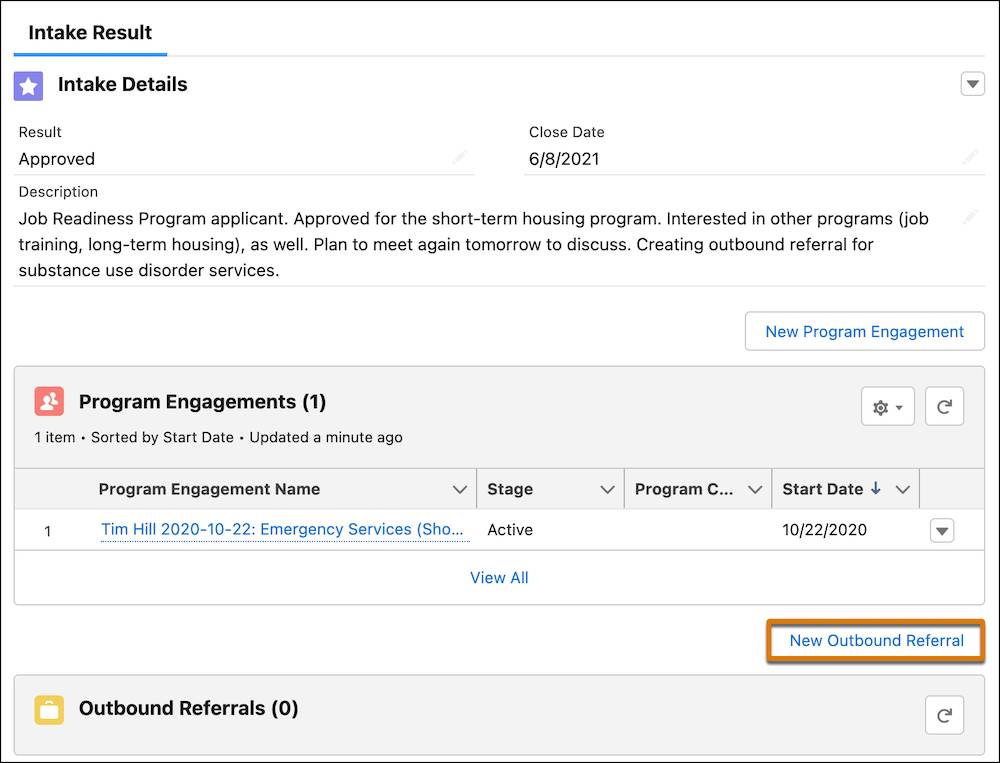
The checklist is complete! Tim meets the requirements, so he’s approved for the short-term housing program.
Complete an Intake
Rosa now needs to do two things: record that Tim is approved, and create a program engagement record that shows his enrollment in an NMH program. While it’s optional for intake, she also wants to create an outbound referral for another program, because Tim has other needs that NMH is not able to help with.
First, let’s update the intake results.
- In the Intake Results area in the Intake Details panel, click Edit (
 ) on any field.
- Mark the Result as Approved.
- Select a Close Date.
- Enter a few notes in the Description field.
- Click Save.

Create a Program Engagement Record
Now, let’s create a program engagement for Tim’s involvement in the short-term housing program. (If you want to learn more about program engagements and other record types in Case Management, check out the Program Management Module (PMM) Basics module linked in Resources.)
- Click New Program Engagement in the Intake Result section.

- Search and select the Emergency Services (Short-term Housing) program. (You could also search and select a program cohort, but NMH isn’t using cohorts for this program.)
- Select a Role of Client.
- Select a Stage of Active.
- Choose a Start Date.
- Click Save.

Create an Outbound Referral from Intake
And, finally, the outbound referral. Tim has a substance use disorder. NMH doesn’t offer addiction-specific services, but has a partner organization that does.
- Click New Outbound Referral in the Intake Result area.
- The Contact Name automatically populates.
- Find and select the Referral Organization and Referral Organization Contact. NMH has both its partner organization and their intake manager in the system.
- Leave the Status as New and the Referral Result as Unknown. These fields can be updated later.
- Enter some descriptive text in the Subject and Description fields.
- Click Save.
Rosa clicks Refresh ( ) on the Outbound Referrals panel to see the new referral in the related list.

Rosa could also create an inbound referral for another program at NMH. These types of internal requests are always marked as inbound referrals so they’re successfully added to other teams’ referrals queues.
This process is the beginning of Rosa’s plan for Tim. In the next unit, we follow along as they work together to create a case plan using Case Management.
Resources
- Salesforce Help: Work with Intakes
- Salesforce Help: Configure Intakes
- Salesforce Help: Work with Referrals
- Salesforce Help: Manage the Referral Pipeline
- Trailhead: Program Management Module (PMM) Basics
- Trailhead: Manage Programs with Agentforce Nonprofit