Get Started with Application Approvals
Learning Objectives
After completing this unit, you’ll be able to:
- Describe the advantages of using Public Sector for your application approval processes.
- Explain how to create a dynamic application form with Omnistudio.
- Use Omniscript to help ensure that constituents submit complete applications.

Discover Application Approvals
Governments worldwide are striving to operate more efficiently and serve people better, and one area that's ripe for improvement is application approval. Constituents need to submit applications to government agencies for a variety of reasons, from requesting food and medical assistance to applying for licenses and permits.

Many government agencies still review and approve applications manually. Not only are manual processes tedious, time-consuming, and error-prone, but they can be obtuse. Also, when employees don’t know the right process, compliance issues can arise.
Enter Agentforce Public Sector (formerly Public Sector Solutions). It gives you power, automation, and flexibility in approval processes for all kinds of applications, from food stamps, child care, and unemployment insurance, to driver's licenses, business licenses, and financial assistance.
With Public Sector, government agencies and other organizations can create custom approval processes to ensure applications are reviewed and approved consistently and accurately. Employees can respond to applications quickly thanks to in-app and email notifications. Checklists and next steps guide reviewers and approvers through required tasks. Everyone knows what to do, applications don't get stuck in someone's inbox, and compliance is ensured.
Sign Up for a Developer Edition org with Public Sector
We don’t have any hands-on challenges in this module, but if you want to practice and try out the steps, you need a special Developer Edition org that contains Public Sector and our sample data. A regular Trailhead Playground doesn’t have Public Sector or our sample data. Here’s how to get the free Developer Edition now.
- Sign up for a free Developer Edition org with Public Sector.
- Fill out the form.
- For Email, enter an active email address.
- For Username, enter a username that looks like an email address and is unique. It doesn’t need to be a valid email account (for example, yourname@hc4evah.com is fine).
- Click Sign me up. A confirmation message appears.
- When you receive the activation email (this might take a few minutes), open it and click Verify Account.
- Complete your registration by setting your password and challenge question.
Tip: Write down your username, password, and login URL for easy access later.
Create Dynamic Applications Using Omniscript
Ready to streamline your application approval processes with Public Sector? Let’s follow along as Tishon Nichols, Cosville’s Public Sector admin, sets up an approval workflow for business license applications.

Before she can set up an approval workflow for constituents, what needs to be in place? The business license application form, of course!
With Omnistudio, the digital engagement suite that comes with Public Sector, you can create dynamic application forms and deploy them on the Cosville public portal for constituents to fill in and submit. Omnistudio includes a drag-and-drop visual designer called Omniscript Designer, which you can use to define all the form elements on a canvas, without code.
The first step is to use Omniscript Designer to create the dynamic business application form. You may be wondering, what’s a dynamic form anyway? It’s a clever type of form that uses conditional logic to present questions based on answers and data the applicant provides in other parts of the form. This makes it even faster and easier for constituents to apply for licenses, permits, and other programs.
You can design the form to handle a number of variables, such as the location of the business. Depending on whether the business is situated in a commercial establishment or in the applicant’s home, Omniscript creates conditional logic to quickly determine the next steps for the applicant.
Create the Omniscript Form
Follow these steps to create the form.
- From the App Launcher, find and select the Omnistudio app.
- From the App navigation menu, select Omniscripts, and then click New.
- Enter these details:
- Name:
Business License Application
- Language: English
- Type:
LicensingandPermitting
- SubType:
Salon
- Name:
- Save your work.
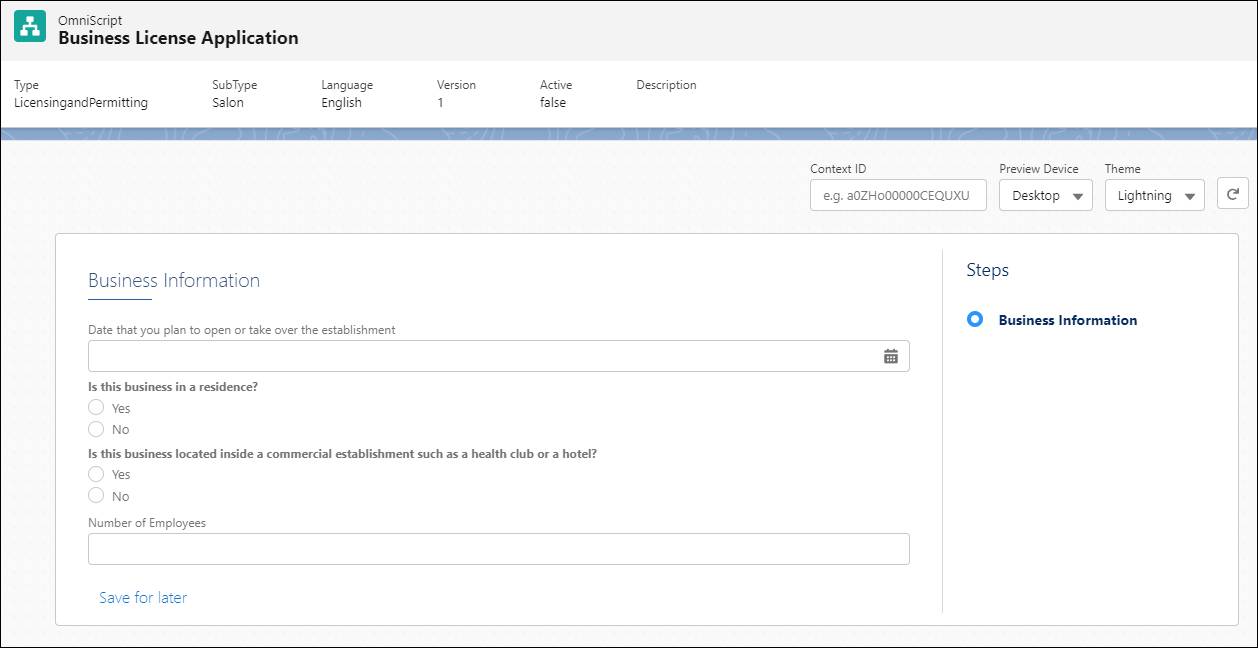
Configure the Omniscript Form
Now, configure the form to capture information about the business.
- In Omniscript Designer, click Step1 and, in Step Properties, change the Name and Field Label to
Business Information.
- Create a date element.
- From the Inputs section of the Build panel, drag a Date element onto the step.
- In Date Properties, name the element
StartDate.
- For Field Label, enter
Date that you plan to open or take over the establishment.
- From the Inputs section of the Build panel, drag a Date element onto the step.
- Create a radio button.
- From the Build panel, drag a Radio element under the Date element, and name it
BusinessatHome.
- For Field Label, enter
Is this business located inside a residence?.
- Under Options, select Add New Option.
- Enter
Truefor the Value, and enterYesfor the Label.
- Select Save & New. Add another option with Value of
Falseand Label ofNo.
- Save your work. Those who open a salon in their own residence must adhere to certain business and professional codes. So next, you add a form input to display a message that allows applicants to view these codes.
- From the Build panel, drag a Radio element under the Date element, and name it
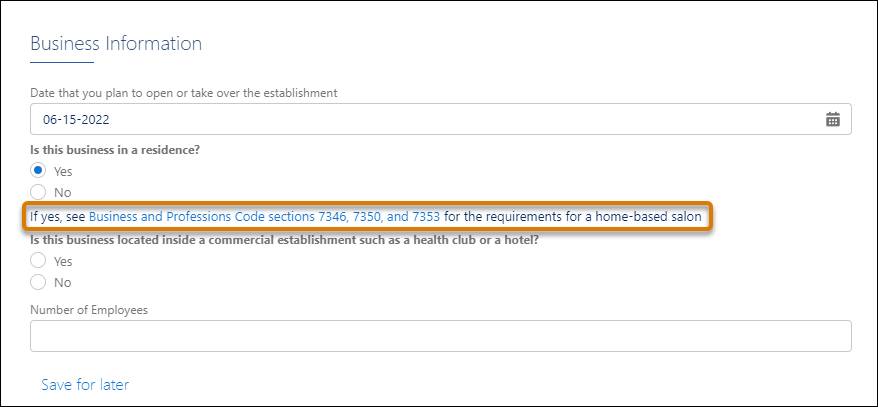
- Create a conditional text block.
- From the Display section of the Build panel, drag a Text Block element under the Radio element, and name it
Regulatory Codes.
- In the rich text editor, enter
If yes, see Business and Professions Code sections 7346, 7350, and 7353 for the requirements for a home-based salon. - Select Save.
- Expand the Conditional View section of the panel, select Show Element if True, and add the condition
BusinessatHomeis equal toTrue.
- Save your work.
- From the Display section of the Build panel, drag a Text Block element under the Radio element, and name it
- Create a radio button.
- Drag a Radio element onto the step.
- For Name, enter
CommercialLocation.
- For Field Label, enter
Is this business located inside a commercial establishment, such as a health club or a hotel?
- Create an option with a Value of
Trueand Label ofYes.
- Create another option with a Value of
Falseand a Label ofNo.
- Drag a Radio element onto the step.
- Create another conditional text block.
- Drag a Text element below the last elements.
- For Name, enter
BusinessLocation.
- For the Field Label, enter
If Yes, enter the type of commercial establishment.
- For Conditional View, select Show Element if True, and add the condition
CommercialLocationis equal toTrue.
- Save your work.
- Drag a Text element below the last elements.
- Create a field.
- Drag a Number element onto the step.
- For Name, enter
EmployeeCount.
- For Field Label, enter
Number of Employees.
- Drag a Number element onto the step.
- To view how the form looks, click Preview.
Now Tishon has a business license application form that dynamically changes based on the applicant’s input. If the applicant answers Yes to the question, “Is this business in a residence?”, then the form directs them to the business and professional codes for the establishment.
If the applicant answers Yes to the question, “Is this business located inside a commercial establishment, such as a health club or hotel?”, then the form asks for the type of commercial establishment.

Validate Applications Using Omniscripts
Tishon wants applicants to only submit applications that are complete. Incomplete applications extend processing time and mean more work for approval teams. Using Omniscripts and the advanced data validation elements, she can prevent the submission of incomplete applications. So what are we waiting for? Let’s learn some of the data validation elements that Omniscripts offer.
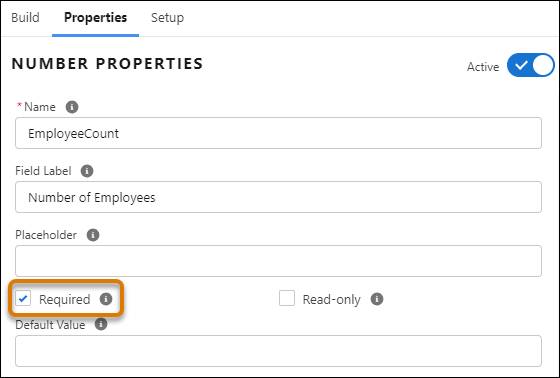
Required Fields
To make certain fields compulsory so that applicants can only submit the application if those fields are complete, Tishon makes the fields required. For example, she wants to make the EmployeeCount field mandatory on the business license application. To achieve this, Tishon selects the EmployeeCount field in Omniscript Designer, and then selects the Required checkbox, under the Properties tab.
Set Values
Set Values is another data validation element in Omniscript that helps prevent applicants from submitting incorrect information online. Say, for example, you're creating a form for constituents to request a duplicate driver's license. You can use the Set Values element to add a formula to the Omniscript that checks if the applicant’s current driver’s license is valid. You can also use Set Values to define prerequisites and populate field elements with data.
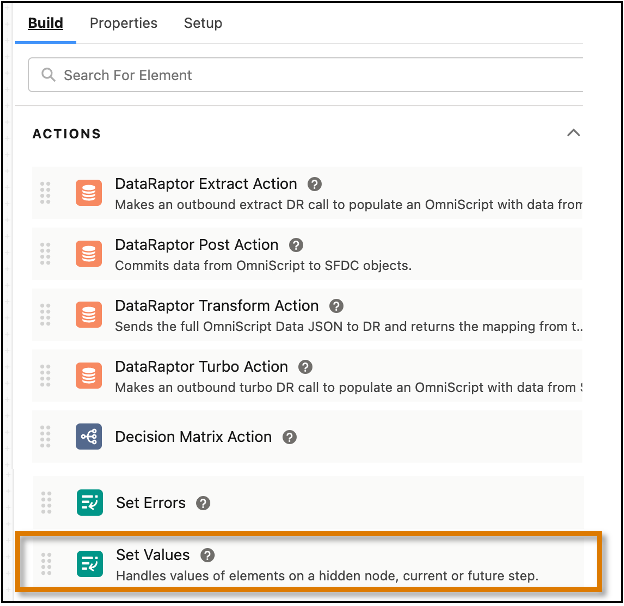
To find the Set Values element in Omniscript Designer, go to the Build tab and then the Actions section.
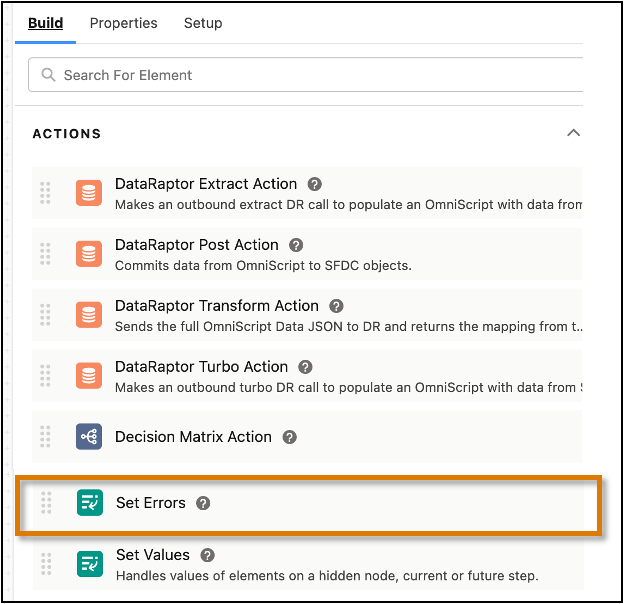
Set Errors
Omniscript also provides the Set Errors element for data validation. Required fields and Formula/Messaging elements only work on the current step. The Set Errors element, on the other hand, works across steps to help ensure that the data is complete.
For example, uploading a project plan may not be required at the intake step of a business establishment application, but the final submission requires a project plan. You can use the Set Errors element and a custom error message on the final step to take the applicant back to the page where they can upload the approved project plan for their business.
Find the Set Errors element in the Actions section of the Build tab.
To learn more about creating and validating applications using Omniscript, see the Omnistudio documentation and Trailhead modules in the Resources section.
The next unit introduces you to Business Rules Engine, which you can use to automate complex policy decisions and efficiently determine the program eligibility of constituents. You also learn how to build the approvals workflow by creating an entitlement process and a milestone tracker.
Resources
- Trailhead: Omnistudio Basics
- Salesforce Help: Create and Customize Omniscript Application Forms
- Salesforce Help: Licensing and Permitting Guided Flow Components
- Salesforce Help: Intelligent Form Reader