Create an Agent-Ready Flow
Learning Objectives
After completing this unit, you’ll be able to:
- Select the correct flow type for an agent-ready flow.
- Create the variables required for an agent-ready flow.
- Configure a Get Records element to send the correct data to an agent.
- Configure a flow to send an error message to an agent only if it’s needed.

Sign Up for a Custom Developer Edition Org for Agentforce
To complete this module, you need a special Developer Edition org that has Agentforce enabled. Get this free Developer Edition org and connect it to Trailhead now so you can complete the challenges in this badge. Note that this Developer Edition is designed to work with the challenges in this badge, and might not work for other badges. Always check that you’re using the Trailhead Playground or special Developer Edition org that we recommend.
- Sign up for this free, customized Developer Edition org with Agentforce by clicking the link.
- Fill out the form.
- For Email, enter an active email address.
- For Username, enter a username that looks like an email address and is unique, but it doesn’t need to be a valid email account.
- For Email, enter an active email address.
- After you fill out the form, click Sign me up. A confirmation message appears.
- When you receive the activation email (this might take a few minutes), open it and click Verify Account.
- Complete your registration by setting your password and challenge question.
- You’re logged in to your Developer Edition.
Now connect your new Developer Edition org to Trailhead.
- Make sure you’re logged in to your Trailhead account.
- In the Challenge section at the bottom of this page, click the playground name and then click Connect Org.
- On the login screen, enter the username (the username is listed in the email you just received) and password for the Developer Edition you just set up.
- On the Allow Access? screen, click Allow.
On the Want to connect this org for hands-on challenges? screen, click Yes! Save it. You are redirected back to the challenge page and ready to use your new Developer Edition to earn this badge.
Plan Your Agent’s Needs
As always, you need a plan before you start creating automation. This fact is especially true for creating agents! Here’s the general rundown:
- Decide what you want your agent to do.
- Create the automation (in this case, flows) that your agent will run.
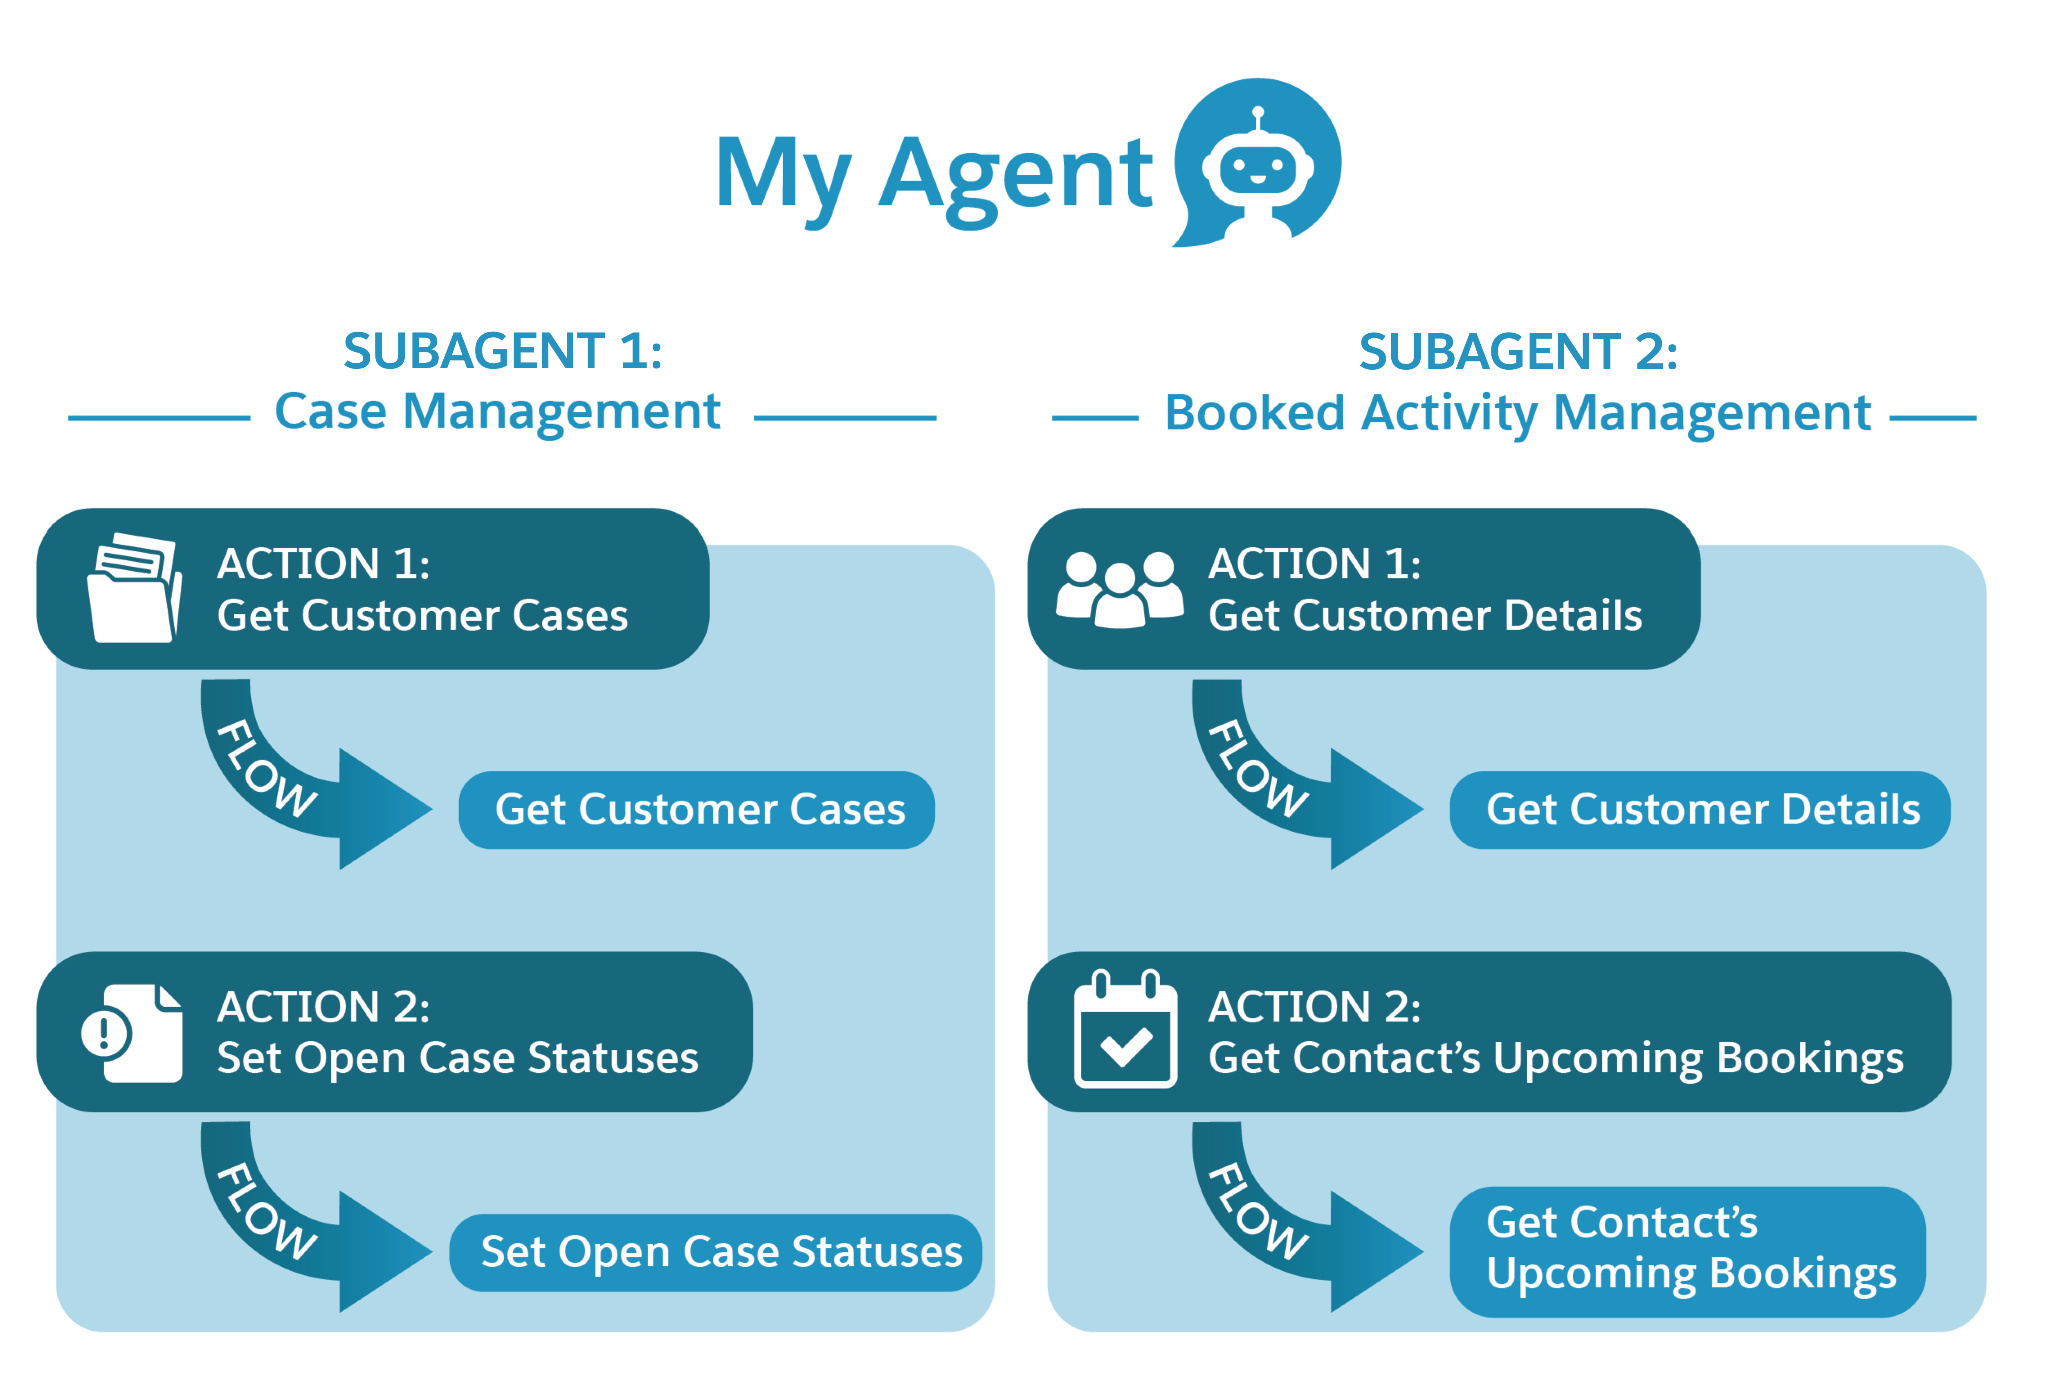
- In an agent, create a subagent that handles a group of related tasks.
- On that subagent, you create an agent action that references the flows.
Let’s look at a scenario where you build a flow to add to an existing agent. In this example, you’re building an agent for Coral Cloud Resorts to help customers manage their own booked activities. These booked activities are stored in Coral Cloud’s Salesforce org in the Bookings object.
One of the tasks that the agent needs to perform is to retrieve a customer’s upcoming booked activities and list them out for the customer. To guarantee that the agent pulls the correct information, create a flow that retrieves all of the customer’s Booking records. Retrieve only booked activities that aren’t canceled and haven’t occurred yet. Then send the retrieved booked activities back to the agent via an output variable.
When the flow is ready, you assign it to an agent. But you don’t assign flows directly to an agent. Instead, you create a subagent that handles a group of related tasks. Then, on that subagent, you create an agent action that references the flow.
Before you start making anything, think through what data the agent needs and how to get it. Your agent shouldn’t give out a customer’s information to anyone who asks for it, so the agent needs to verify who it’s talking to. To retrieve that customer’s booked activities, a flow needs the ID of that customer’s Contact record. Then a flow can retrieve the booked activities from the Bookings object and pass it to the agent.
Fortunately, Coral Cloud’s org already has the Get Customer Details flow, which receives a customer’s email and member number as input, and returns their contact ID. Let’s map out this interaction, using the Get Customer Details flow and a new flow that retrieves those Booking records.
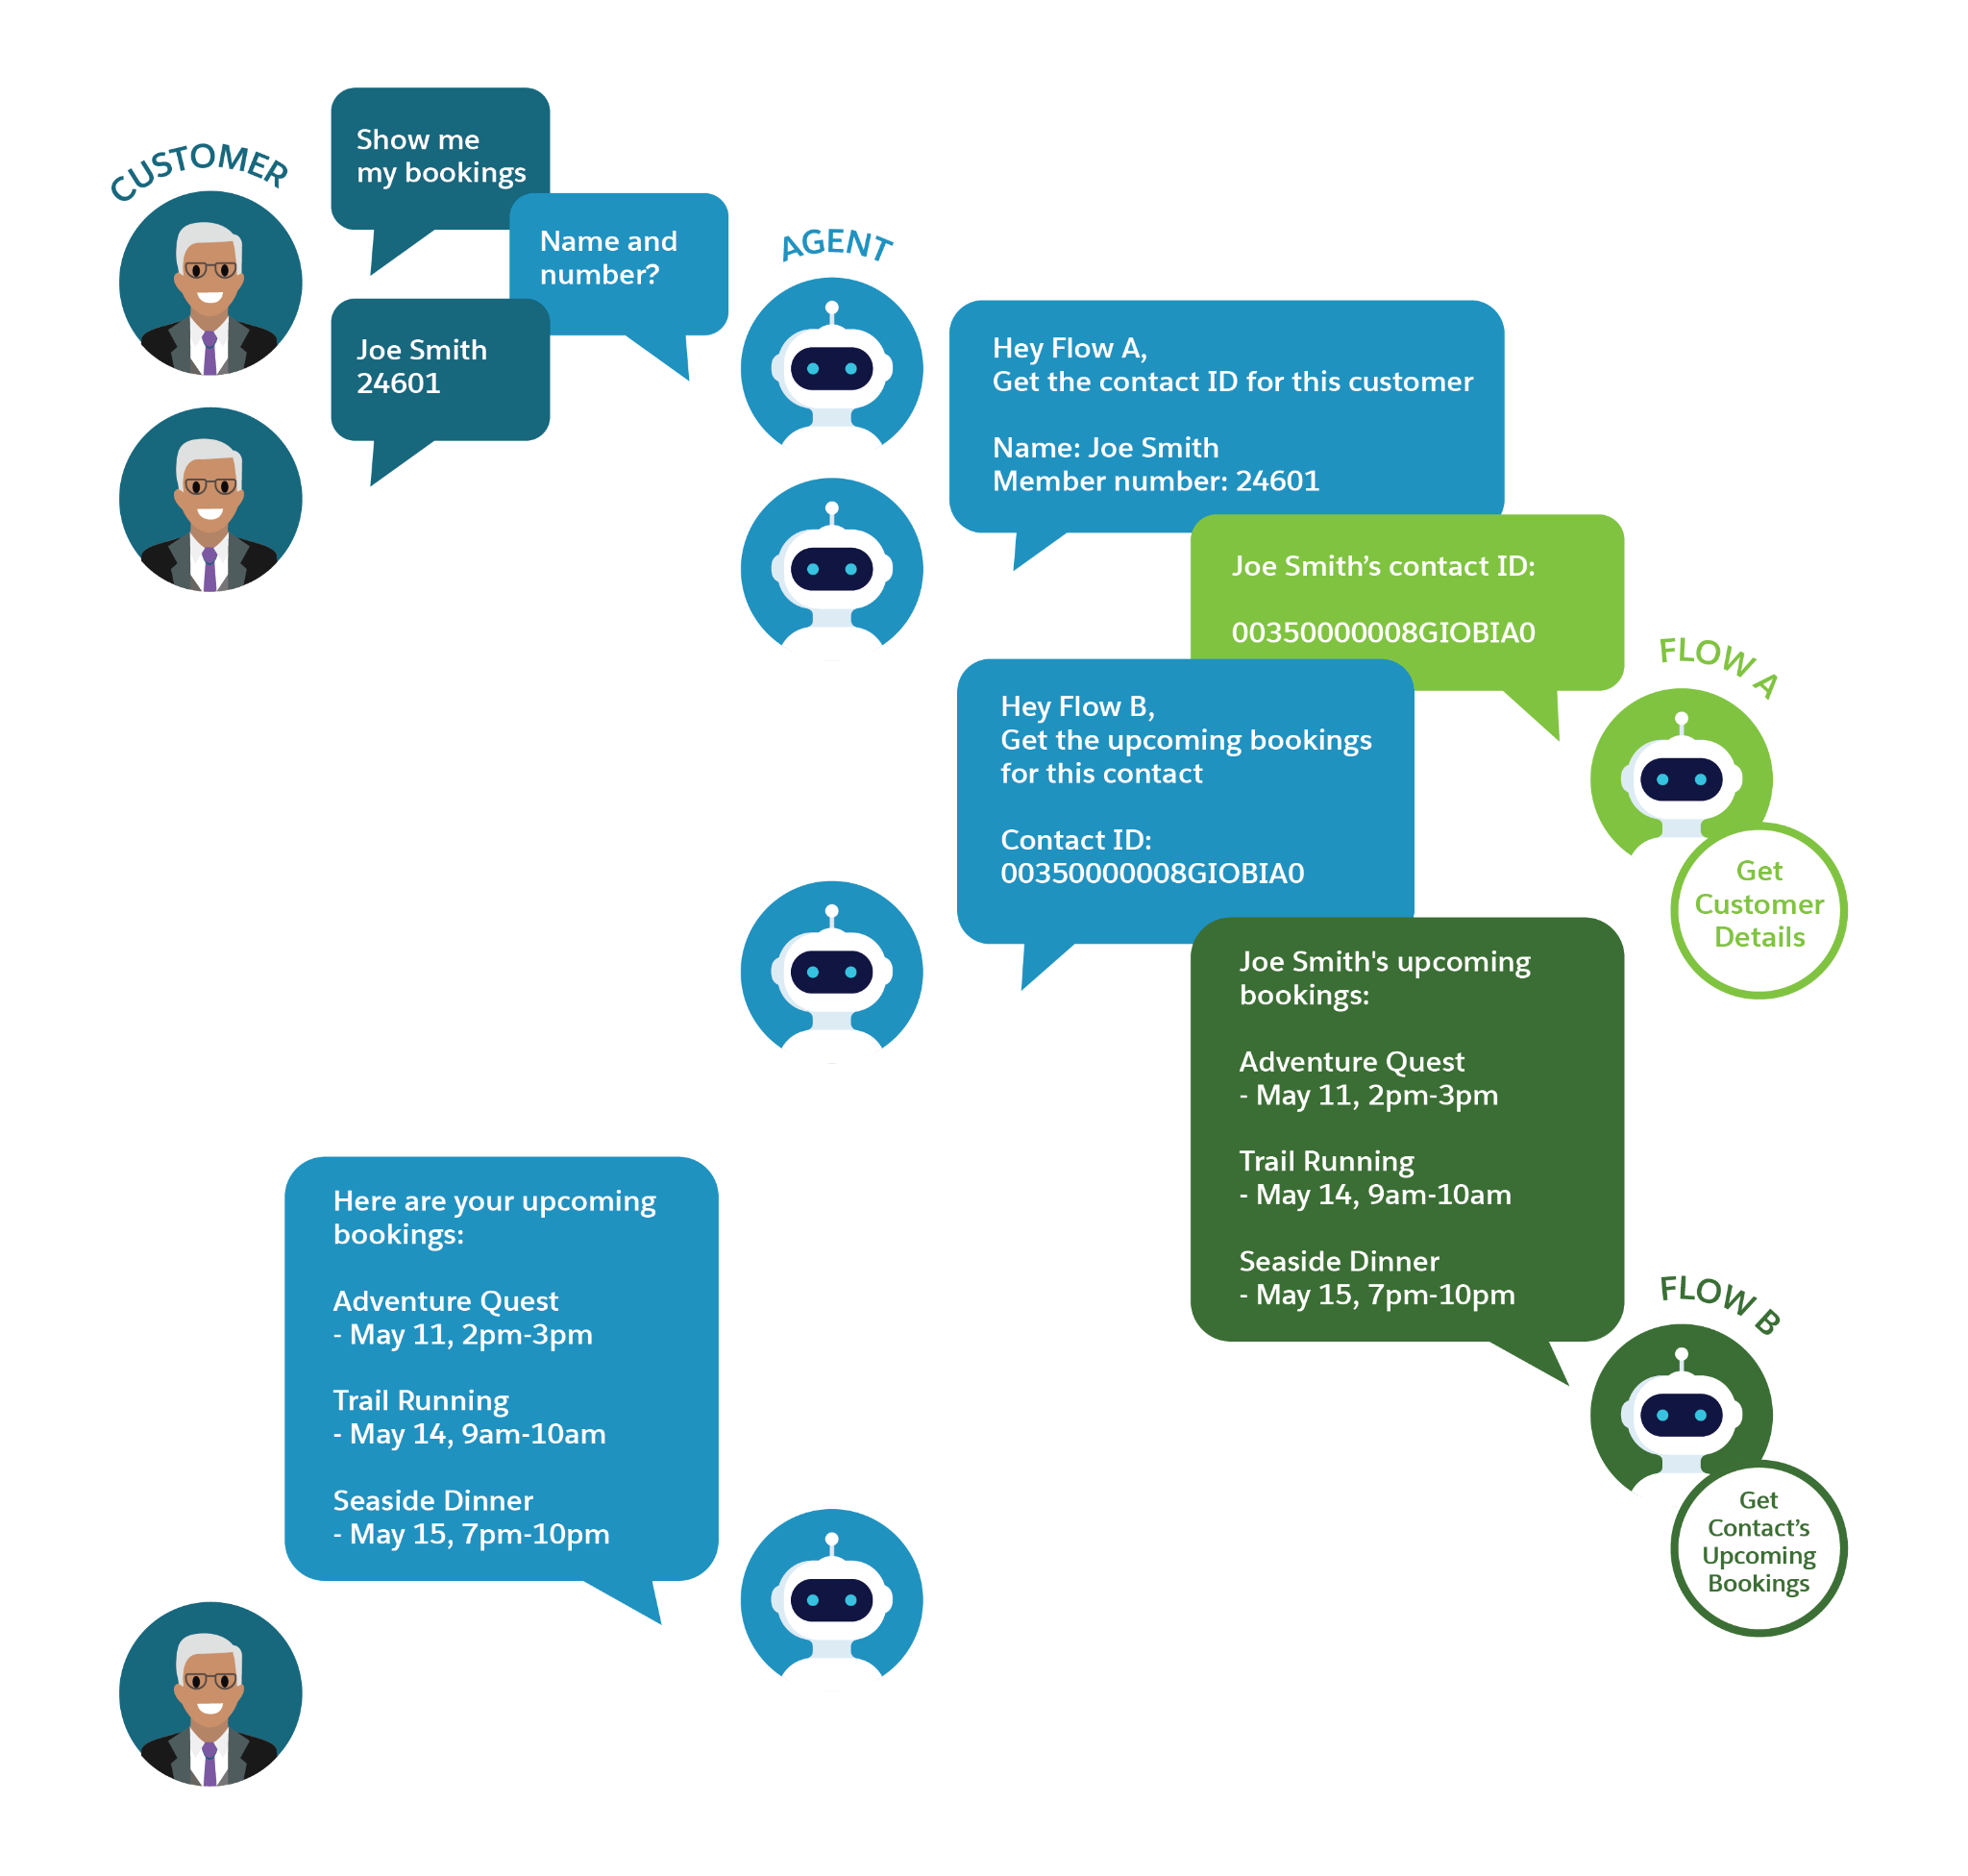
- When the customer asks to see their booked activities, the agent responds by asking for their name and member number as verification.
- When the customer provides those details, the agent runs the Get Customer Details flow, passing in the verification details.
- The Get Customer Details flow returns the customer’s contact ID to the agent.
- The agent then runs the new Get Contact’s Upcoming Bookings flow, passing in the contact ID it just received.
- The Get Contact’s Upcoming Bookings flow returns the customer’s upcoming, noncanceled bookings to the agent.
- The agent gives the booking information that it received to the customer.
Note that if the agent runs Get Customer Details to get the contact ID, the agent can then provide that contact ID as the input to the Get Contact’s Upcoming Bookings flow. By sequencing small, independent tasks, your agent can get all the data it needs.
You can't create flow-based actions in a subagent if the flows don't exist, so always create your flows first. Let’s create the Get Contact’s Upcoming Bookings flow now.
Create the Flow and Its Variables
First, create the flow and its input and output variables. The flow needs an input variable to receive the contact ID, and an output variable to return the booking records. You also create an output variable to provide a meaningful error message. Give each of the variables thorough descriptions of how they’re used.
- Create an autolaunched flow. Make sure you select the Autolaunched Flow (No Trigger) flow type.
- Create an input variable to hold the customer’s contact ID received from the agent. (Don’t worry, Coral Cloud already has an agent-ready flow that retrieves a customer’s contact ID. We’ll use that flow later.)
- In the Toolbox (
 ), click New Resource.
- For Resource Type, select Variable.
- For API Name, enter
Contact_ID.
- For Description, enter
The Id of a Contact record that you would like to find related Booking records for. - For Data Type, select Text.
- For Availability Outside the Flow, select Available for input.
- Click Done.
- In the Toolbox (
- Create an output variable to hold the retrieved booking records.
- In the Toolbox (
 ), click New Resource.
- For Resource Type, select Variable.
- For API Name, enter
Contact_Bookings.
- For Description, enter
The upcoming not-canceled bookings assigned to the contact whose ID matches the Contact_ID. - For Data Type, select Record.
- Select Allow multiple values (collection).
- For Object, select Booking.
- For Availability Outside the Flow, select Available for output.
- Click Done.
- In the Toolbox (
- Create an output variable to hold an error message that the agent should share if the flow fails.
- In the Toolbox (
 ), click New Resource.
- For Resource Type, select Variable.
- For API Name, enter
Error_Message_Output.
- For Description, enter
The error message to show to the customer when this flow doesn't finish successfully. - For Data Type, select Text.
- For Availability Outside the Flow, select Available for output.
- Click Done.
- In the Toolbox (
Get the Customer’s Bookings
Now create an element to retrieve the customer’s booked activities and send them to an output variable.
- On the flow canvas, create a Get Records element.
- For Label, enter
Get Contact's Upcoming Bookings.
- Make sure the API Name autofills as
Get_Contact_s_Upcoming_Bookings.
- For Description, enter
Retrieves all upcoming bookings assigned to the found contact that have not been canceled. The bookings are stored in the Contact_Bookings variable. - For Object, select Booking.
- For Label, enter
- Set the Get Records element’s condition requirements to filter which booking records are retrieved.
- For Condition Requirements, select All Conditions Are Met (AND).
- For Field, select Contact.
- For Operator, select Equals.
- For Value, select Contact_ID.
- Click Add Condition.
- For the second Field, select Date.
- For the second Operator, select Greater Than.
- For the second Value, select Running Flow Interview > CurrentDate.
- Click Add Condition one more time.
- For the third Field, select Is Canceled.
- For the third Operator, select Equals.
- For the third Value, select False.
- For Condition Requirements, select All Conditions Are Met (AND).
- Set the Get Records element’s sorting options.
These settings control how records are shown to the customer: in this case, the order in which the activities occur.- For Sort Order, select Ascending.
- For Sort By, select Date__c.
- For Sort Order, select Ascending.
- Set how the Get Records element stores its record data.
Variables automatically created by the Get Records element can't be used as output variables. When you need a Get Records element to store data in an output variable, manually create the output variable first. Then, in the Get Records element, make sure you select the option to choose fields and assign variables.
Also, remember that you should include only the fields that you want to make available to your agent and your customer.- For How Many Records to Store, select All records.
- For How to Store Record Data, select Choose fields and assign variables (advanced).
- For Record Collection, select Contact_Bookings.
- Click Add Field twice.
- Change the first selectable Field from Id to Experience_Name__c.
- For the second selectable Field, select Date__c.
- For the third selectable Field, select Start_Time__c.
- For the fourth selectable Field, select End_Time__c.
- For How Many Records to Store, select All records.
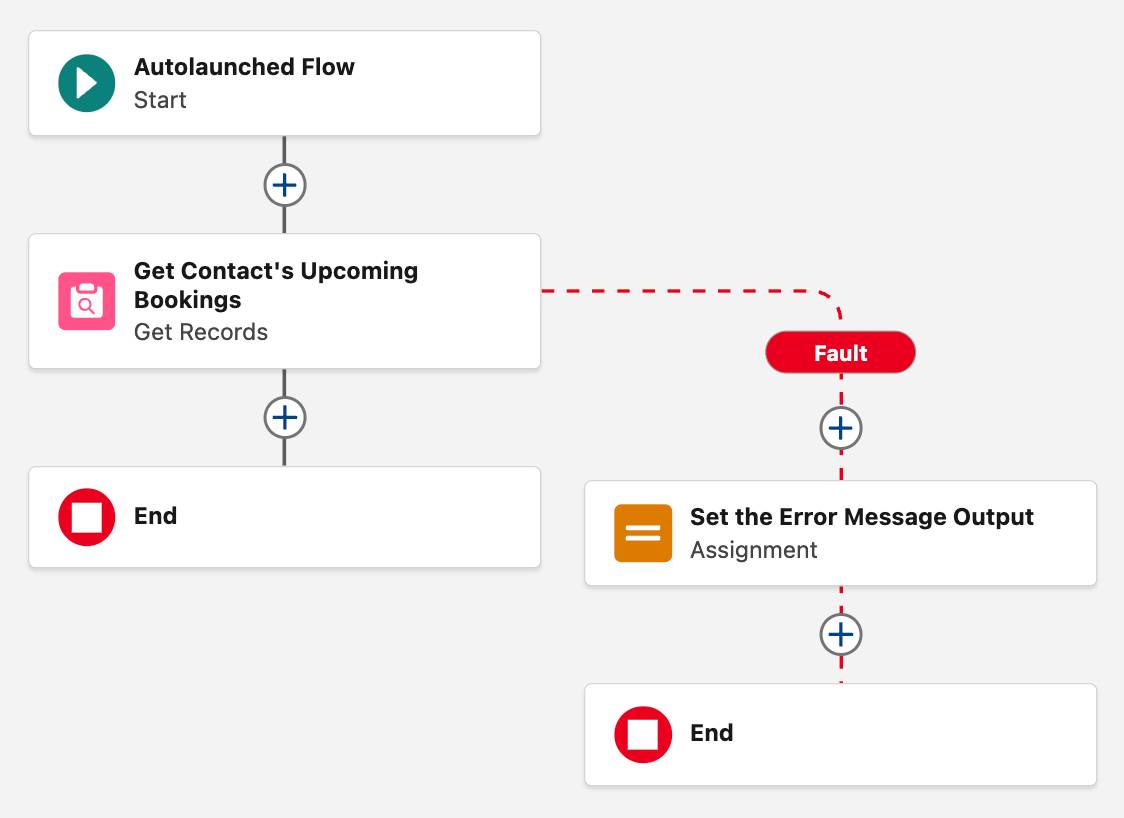
Give the Flow Some Error Handling
Finally, give this flow the ability to send an error message if the Get Records element fails.
Fault paths are special paths that run only if their attached element fails. You can create a fault path on any data element: Get Records, Create Records, Update Records, and Delete Records. Because fault paths run only when an element fails, you can place an Assignment element on a fault path. Use the Assignment element to set an error message at the time of failure, removing the risk of an agent receiving and displaying an error message inappropriately.
- Mouse over the Get Contact’s Upcoming Bookings element and click
 , then select Add Fault Path.
- On the Fault path, click
 .
.
- Select Assignment.
- For Label, enter
Set the Error Message Output.
- Make sure the API Name autofills as
Set_the_Error_Message_Output.
- For Description, enter
Gives error message text to the Error_Message_Output variable, to present to the customer if this flow fails. - For Variable, select Error_Message_Output.
- For Operator, select Equals.
- For Value, enter
I'm sorry, I'm having a problem finding your booked activities. Would you like to speak to our support team?
- For Label, enter
- Save the flow.
When the flow is used in an agent action, the flow’s description is automatically set as the agent action’s instructions. So write the description in the way you’d write an agent instruction.- For Flow Label, enter
Get Contact's Upcoming Bookings.
- Make sure the Flow API Name autofills as
Get_Contact_s_Upcoming_Bookings.
- For Description, enter
Find all the Booking records related to the guest's contact record. Only retrieve Bookings whose date hasn't occurred yet.
- For Flow Label, enter
- Activate the flow.
To assign the flow as an agent action, the flow must be active.
Your flow is now agent-ready! In the next unit, you add it to an agent along with the proper instructions.