Meet Loop Blocks
Learning Objectives
After completing this unit, you’ll be able to:
- Define a Loop Block and its features in Omnistudio for Managed Packages.
- Configure a Loop Block with a key and a merge code.
- Build a Omnistudio Data Mapper Transform to look up the specific data in a JSON object and merge it into the respective JSON node.

Before You Start
Before you start this module, make sure you complete this content. The work you do here builds on the concepts and work you do in that content.
-
Omnistudio Data Mappers in Omnistudio for Managed Packages
-
Integration Procedures in Omnistudio for Managed Packages
Also, consider completing the following recommended content.
-
Omnistudio for Managed Packages Internal Data Tools
-
Omnistudio for Managed Packages External Data Tools
Let’s Get Advanced
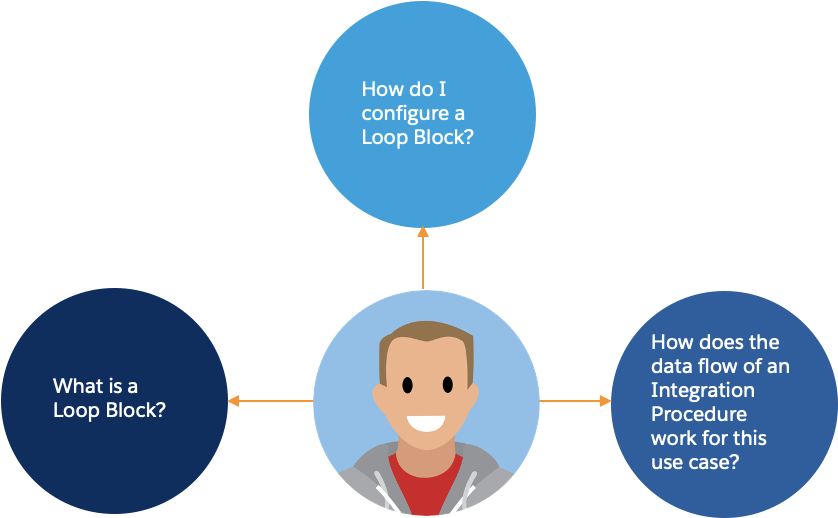
Meet Robert. He’s a technical architect at Get Cloudy Consulting who works with Omnistudio data tools.
He’s ready to learn about some advanced features he can use to build solutions without more time-consuming Apex code. In this module, you follow along with Robert to learn about these features and how they apply to a few use cases.
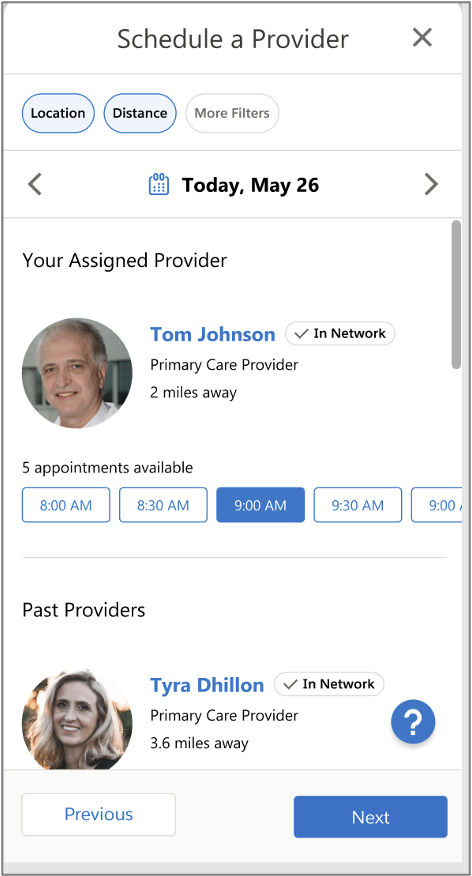
Let’s start with the requirements Robert receives from ClearLight Health, an important GetCloudy customer in the health insurance market. Today’s healthcare consumer wants to view appointment time slots and schedule appointments with their doctor quickly and easily online. ClearLight provides a portal for health plan members, but the portal lacks online booking capabilities. Robert needs to build this functionality into the ClearLight member portal.
In the Schedule a Provider screen here, an assigned primary care provider has five appointment time slots available.
Robert knows he can configure the actions and blocks in an Omnistudio Integration Procedure to retrieve the care-provider and appointment data. But which blocks and actions can he use? And how can he iterate an array to modify each node without using Apex code?
The answer is Loop Blocks.
In this unit, you follow along with Robert to learn about Loop Blocks, how they are configured, and how data flows through an Integration Procedure for this use case.
About Loop Blocks
A Loop Block iterates over the items in a data array to repeat the Actions in the Loop Block for each item.
For example, one of Robert’s colleagues at Get Cloudy used Loop Blocks in a communications solution they delivered last month. That team used a Loop Block to add four products to a shopping cart, all at once. Without a Loop Block, they would have had to run four separate Remote Actions to add the products.
Robert is loving Loop Blocks already. Before he learns how to configure them, let’s check out the available properties of this example Loop Block, named LoopBlock1.
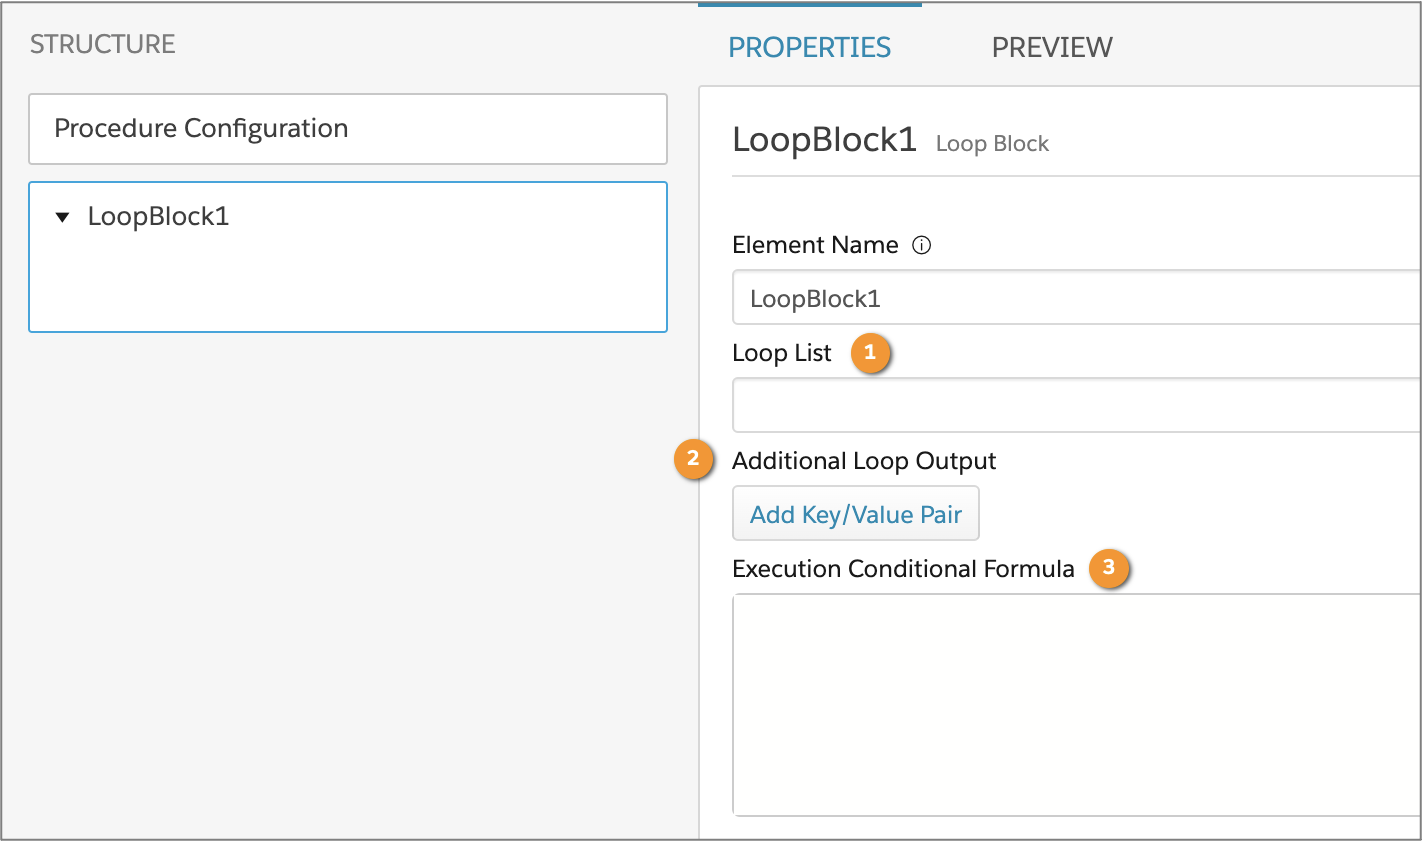
- A Loop List (1) accepts a JSON node containing an array.
- Use Additional Loop Output (2) to configure the response of an Action in the Loop Block. The key/value pairs you specify are available to the subsequent steps in the Integration Procedure.
- Use Execution Conditional Formula (3) to control when the Loop Block runs based on an expression that evaluates to true or false.
Use Additional Loop Output with care, because it can impact system performance. The reason for this is that the response returns the data you request for every iteration. For example, if the Loop Block iterates 1,000 times, it returns 1,000 responses.
Loop Blocks in the Use Case
Let’s review the structure of the Integration Procedure that Robert needs to build to show time slots for care providers.
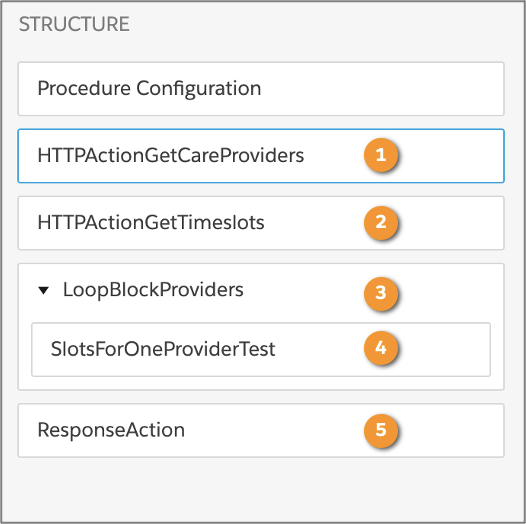
The example Integration Procedure here includes two HTTP actions: HTTPActionGetCareProviders gets the care-provider data (1), and HTTPActionGetTimeslots gets data for care providers’ available appointment times (2).
The LoopBlockProviders Loop Block (3) includes a Data Mapper Transform Action called SlotsForOneProviderTest (4), which transforms the output into JSON format. A Response Action (5) trims the JSON data.
Let’s see how the data flows in this Integration Procedure.
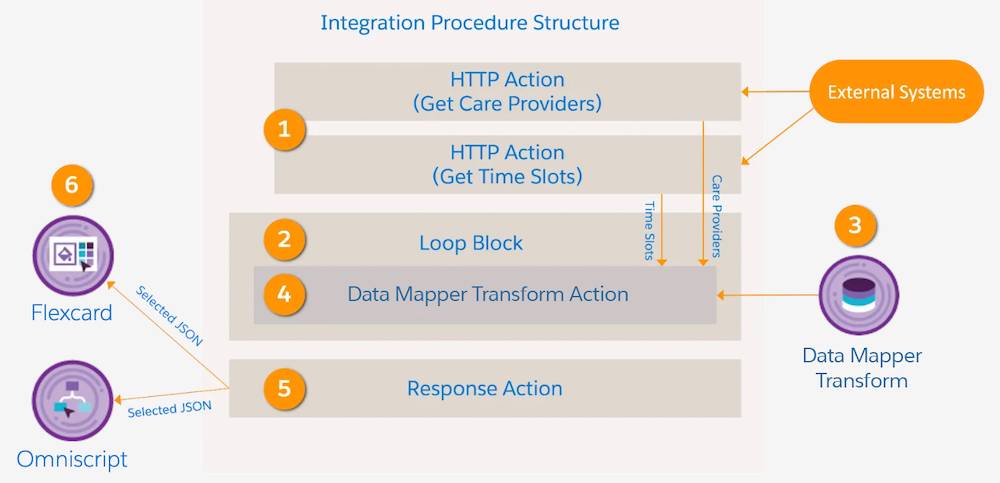
- Data flow starts with the HTTP Actions, which pulls the care provider's data from external systems.
- The Loop Block iterates over the items in the returned data array.
- The Data Mapper Transform ensures the data is modified to meet the solution’s requirements.
- The Data Mapper Transform Action calls the Data Mapper Transform.
- The Response Action filters the results according to the transformation logic.
- The Response Action then sends the data to Omnistudio Flexcards or Omniscripts. The response can also call REST APIs from the Integration Procedure.
Let’s dive deeper into a few parts of the structure.
Get Care-Provider Data
The Integration Procedure needs two HTTP Actions. The first HTTP Action gets the care provider data.
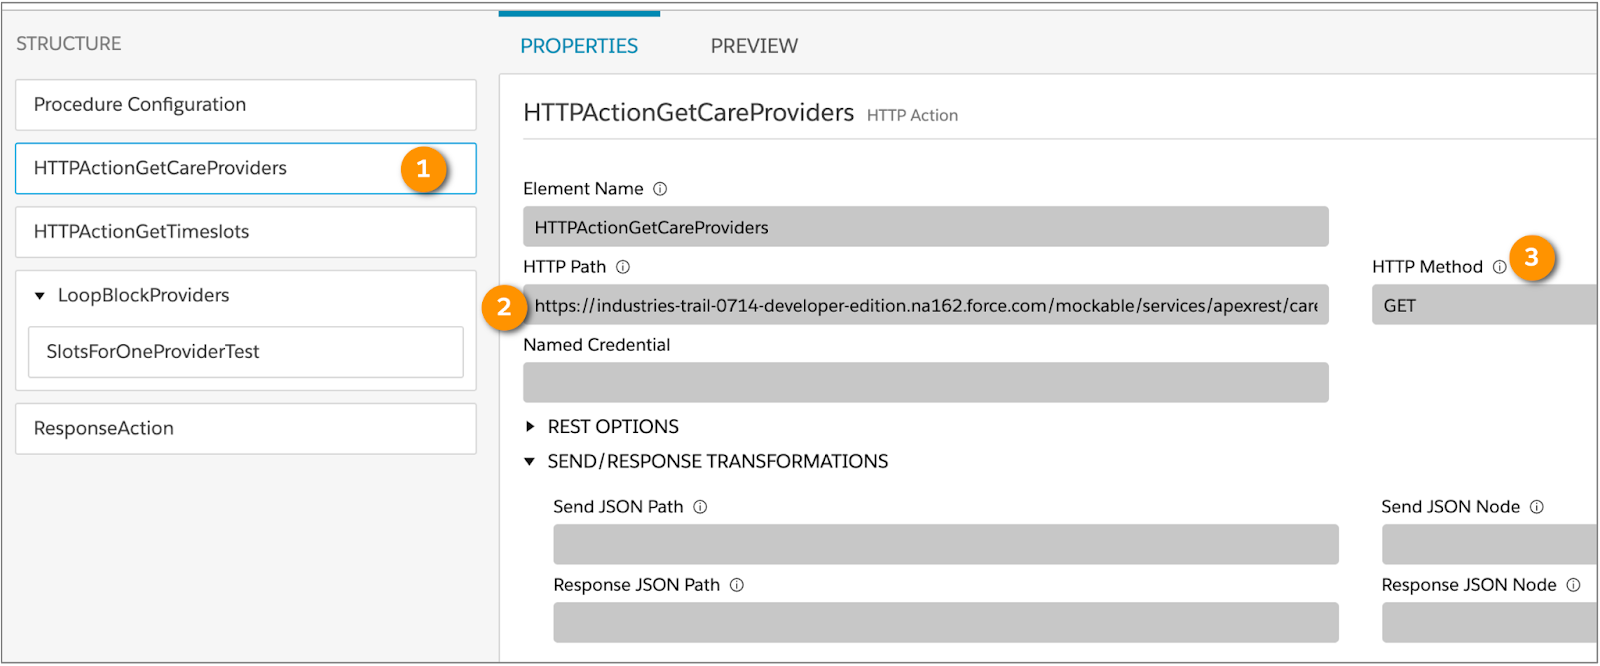
To create this action, drag an HTTP Action (1) into the Structure Panel.
Choose the HTTP method, such as GET, PUT, POST, or DELETE. In this case, you need to get the data related to care providers from the HTTP Path, so enter the URL in the HTTP Path field (2). Then set HTTP Method (3) to GET.
Get Time-Slot Data
The second HTTP Action pulls the data related to time slots.
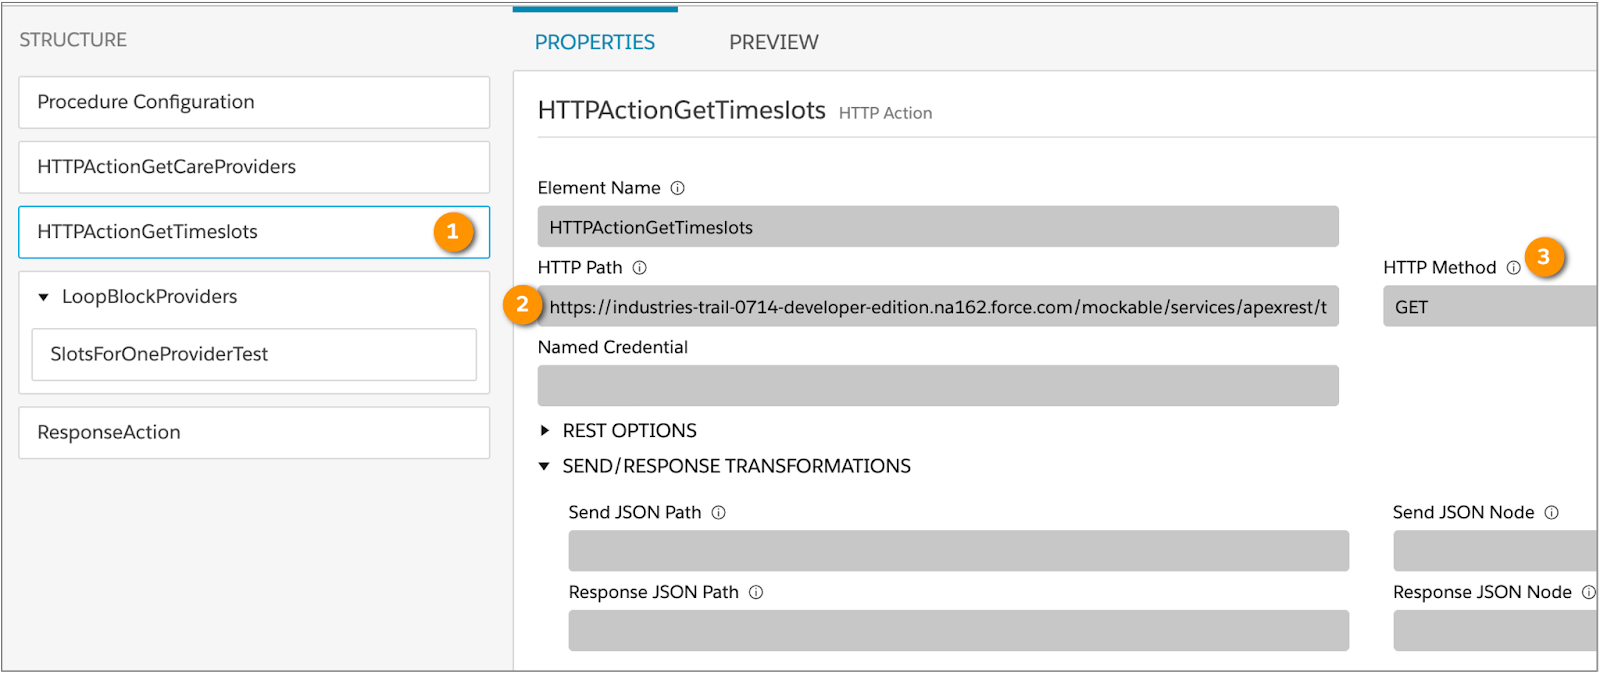
To create this action, drag another HTTP Action (1) into the Structure Panel. Enter the HTTP Path (2) for the external system, and specify the HTTP Method (3).
Configure the Loop Block
Now, Robert wants to merge the data related to care providers and time slots into the output, so he dives into the Loop Block configuration.
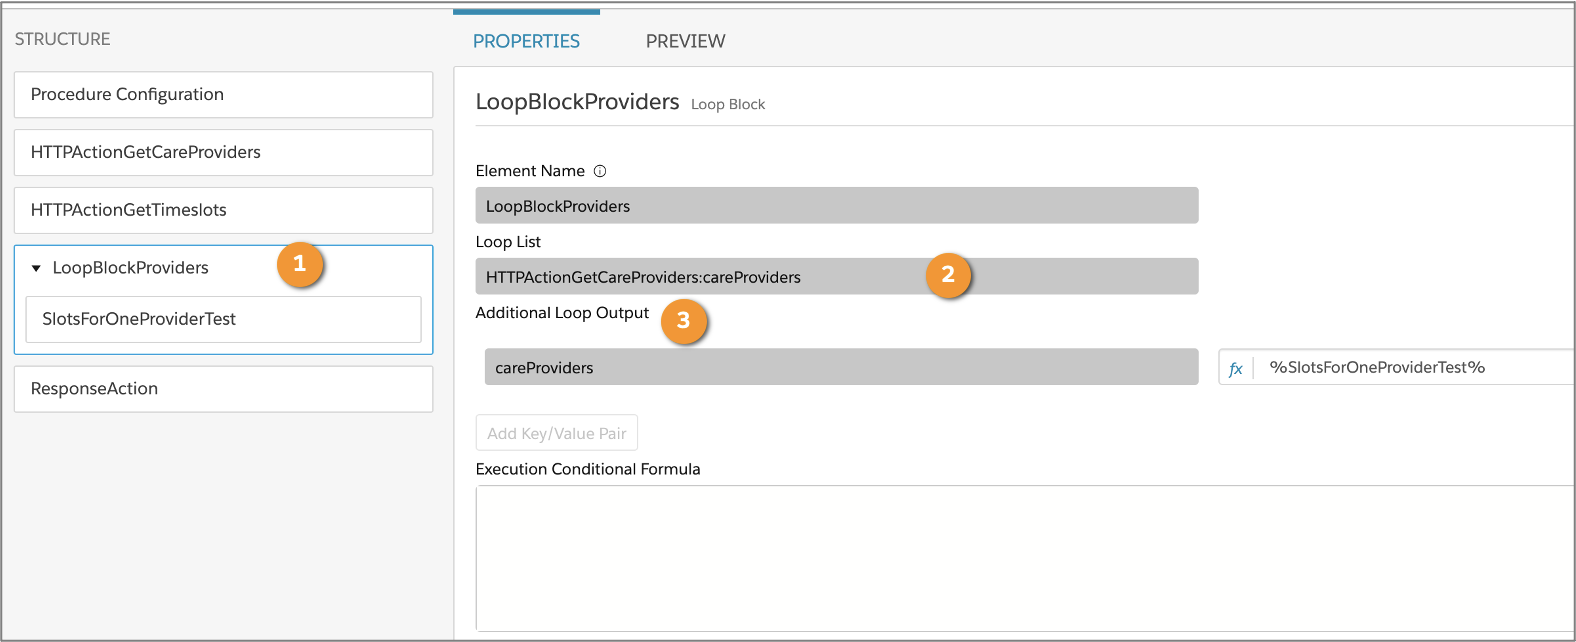
To configure the Loop Block, drag a Loop Block (1) into the Structure Panel.
Set the Loop List value (2) to HTTPActionGetCareProviders:careProviders. This creates a list for each care provider. For Additional Loop Output (3), enter careProviders as a key and the merge code value as %SlotsForOneProviderTest%.
Data Mapper Transform Configuration
Robert’s next task is to create an Omnistudio Data Mapper Transform. Let's explore why.
A Data Mapper Transform can perform intermediate data transformations between JSON, XML, and Apex data types to merge the time slot data without the need for code.
Robert’s a pro at coding, but why not save energy and have a Data Mapper Transform do the heavy lifting?

To create a Data Mapper Transform, drag a Data Mapper Transform Action component from the Structure Panel into the Loop Block, and provide an Element Name (1). For Data Mapper Interface, select + Create New Data Mapper (2) from the dropdown list.
In this case, you need a Data Mapper Transform to look up the time slots for each care provider in a JSON object and merge the time slots into the respective care provider JSON node.
Let’s understand the Formulas, Transforms, and Preview tabs.
Formulas Tab
In a Data Mapper, use the Formulas tab to add or manipulate data for output.
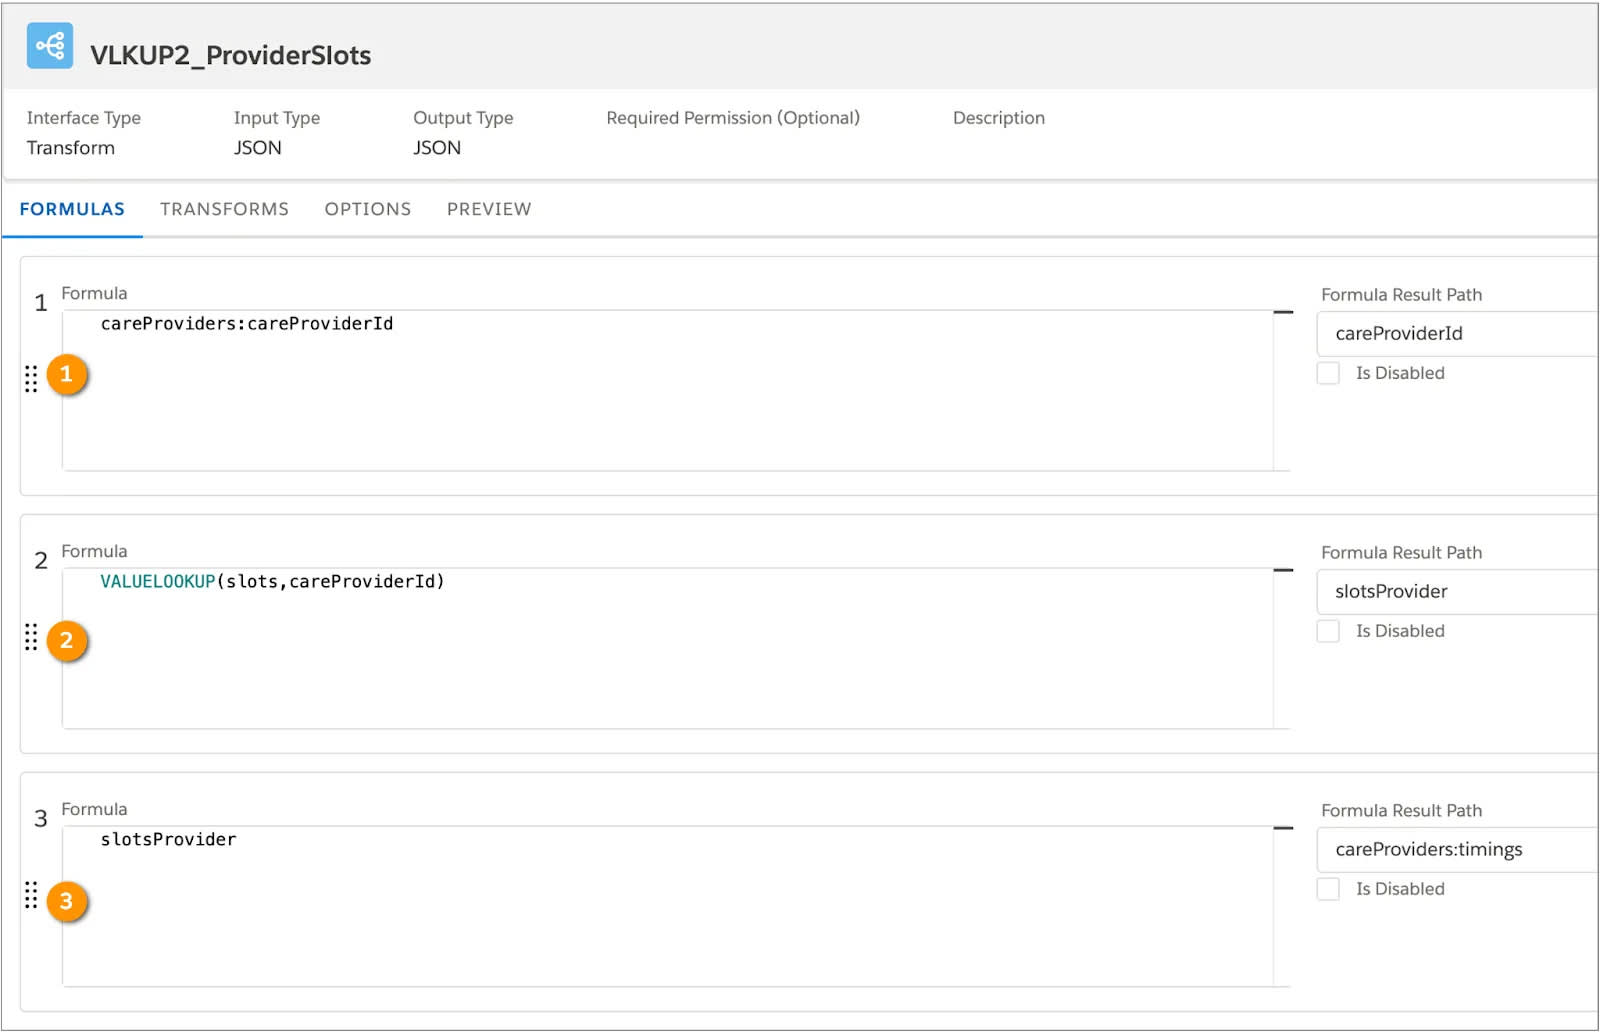
In the Formula field, add the desired logic, and in the Formula Result Path, specify a JSON node to store the formula result. In this example, you create three formulas to configure the desired Data Mapper output.
- The first Formula (1) is c
areProviders:careProviderIdwith a Formula Result Path ofcareProviderId.
- The second Formula (2) looks up the values of time slots against each careProviderId. The formula is
VALUELOOKUP (Slots, careProviderId)and the Formula Result Path isslotsProvider.
- The third Formula (3) records the appointment slots for each provider. The formula is
slotsProvider, and the Formula Result Path iscareProvider:timings.
Transforms Tab
Now let’s examine the Transforms tab (1).
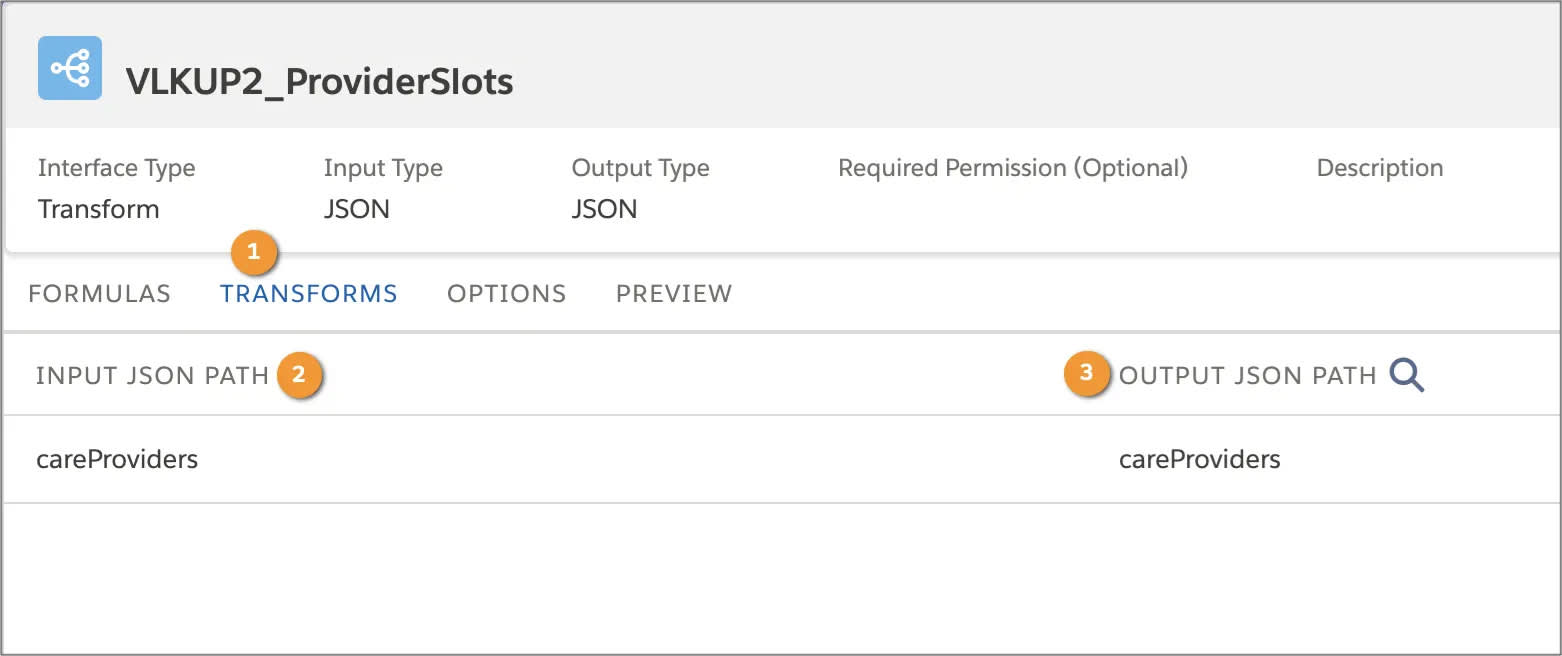
Map your data using the paths for the input and output JSON.
In the Input JSON Path field (2), specify the input path. In the Output JSON Path field (3), add the Output path. This example uses careProviders for both input and output paths.
Preview Tab
Use the Preview tab to test the Data Mapper output.
In the Input pane (1), paste the sample input, and select Execute. The Response pane (2) shows the filtered results, which include data for care providers and their available time slots. You can see how the arrays are arranged with time slots and the associated Care Provider Id.
Now that the Data Mapper Transform is ready, it’s time to add it to the Integration Procedure.
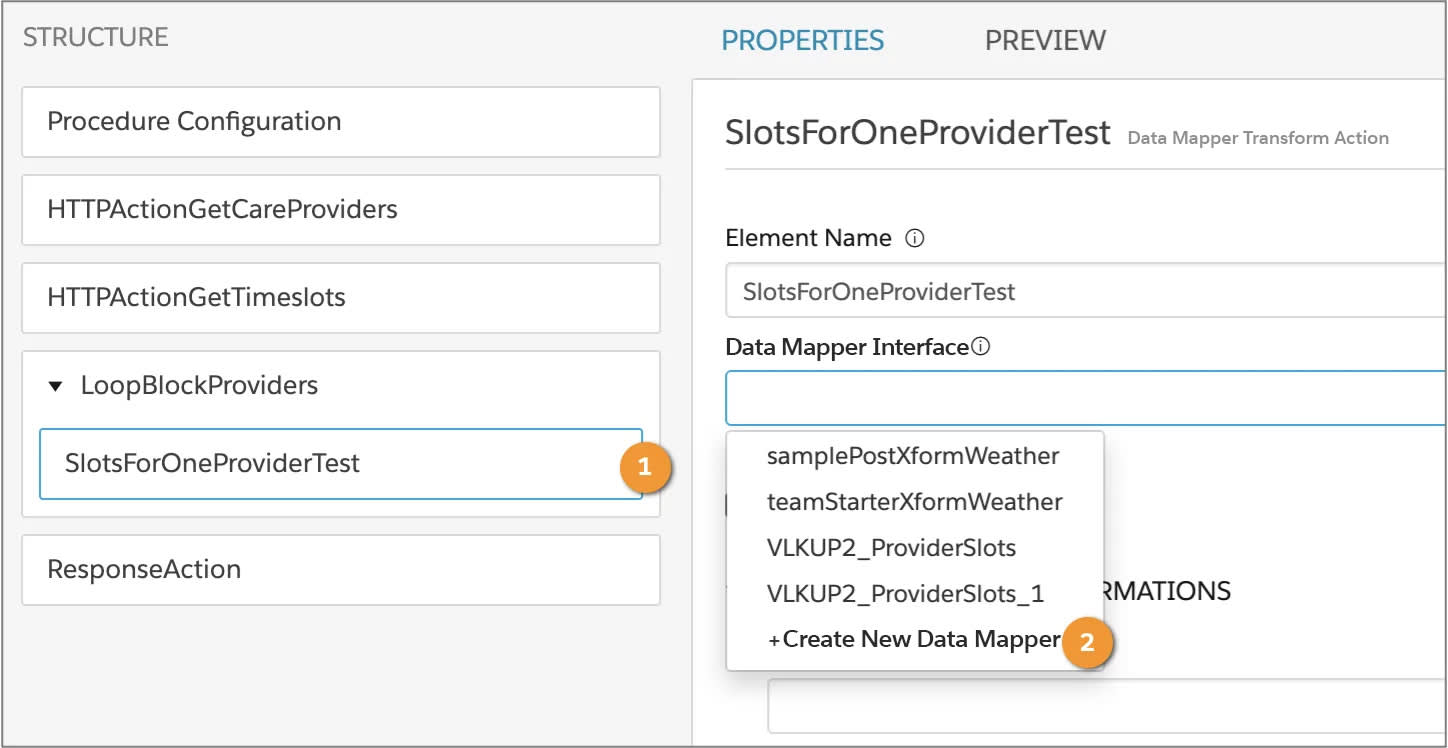
Select the Data Mapper Transform Action (1) in the Integration Procedure. In the Data Mapper Interface field, select VLKUP2_ProviderSlots (2) from the dropdown list.
Next, drag a Response Action into the Structure Panel.

Use the Response Action (1) to send the data that the Data Mapper Transform returns in JSON format. In Response Format (2), enter the appropriate format, in this case, JSON.
It’s time to preview the results.
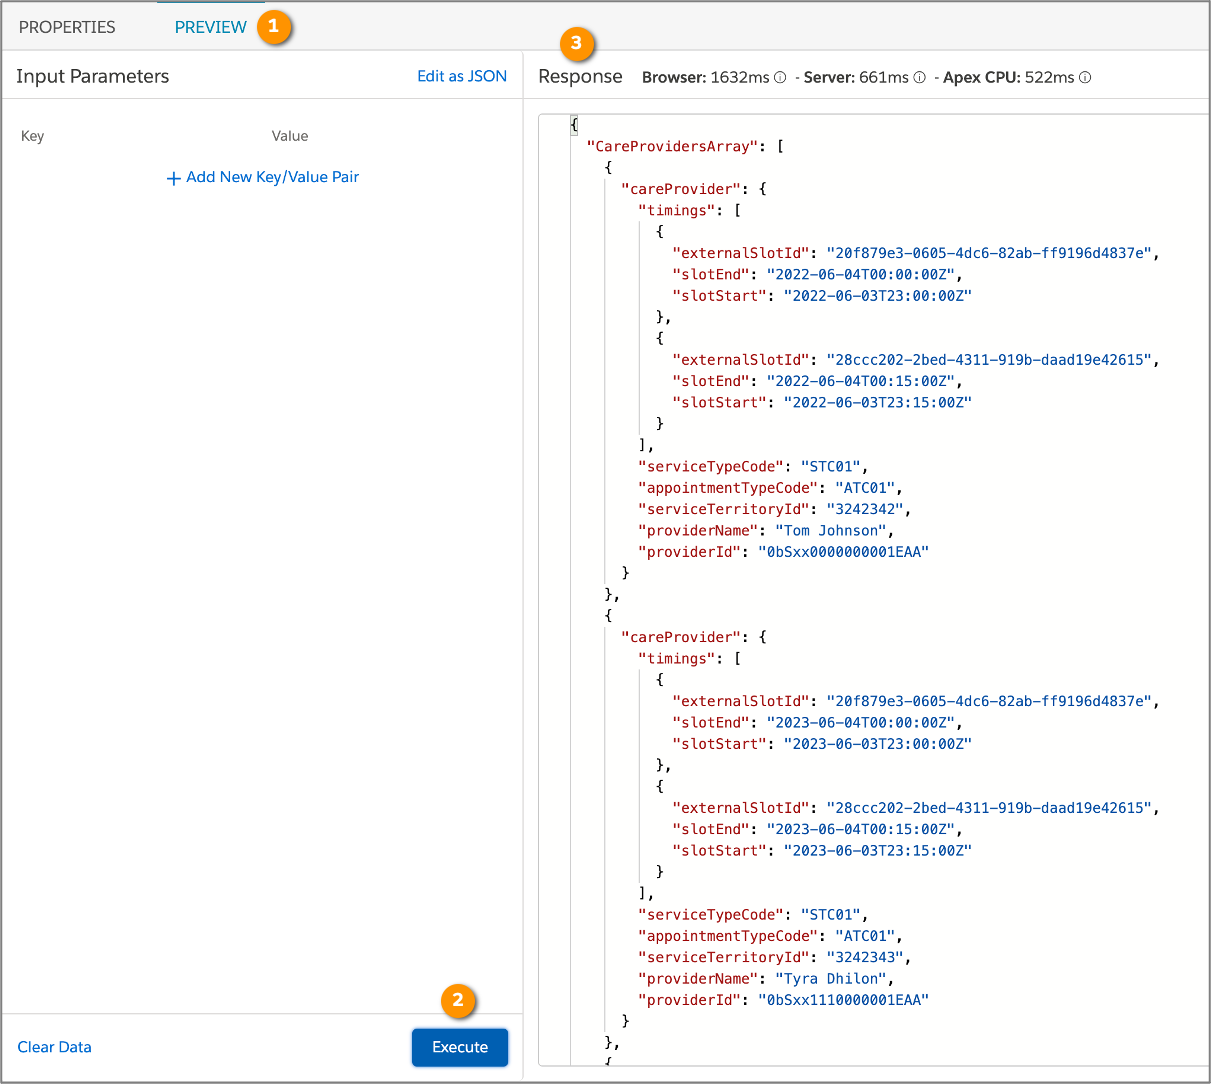
Go to the Preview tab (1), and click Execute (2). In the Response section (3), you can see the care providers array is displayed with the Care Provider IDs.
Now that Robert knows how Loop Blocks and Data Mapper Transforms work, he feels enlightened! He goes on to implement the time-slot feature in the ClearLight member portal.
But Robert’s work is never done. It’s time to move on to List Actions so he can build the next application requirement.
You learn about List Actions in the next unit.
Resources
- Salesforce Help: Process Arrays Using Loop Blocks (Omnistudio for Managed Packages)
- Salesforce Help: HTTP Action (Omnistudio for Managed Packages)