Create and Manage Gift Designations
Learning Objectives
In this project, you’ll:
- Create a gift designation.
- Create a gift batch.
- Create a gift entry.
- Verify donation entries.
Now that you’ve set up alumni record pages and created your campaigns, the next step is to set up gift designations. Understandably, many alumni want to have a say on how the institution uses their donations. With Fundraising in Agentforce Education, Delaney can create gift designations to direct how donors’ monetary gifts are spent.
For example, a graduate from Astro University’s School of Music requests that their gift be used to buy new instruments. Or a proud supporter of the volleyball team wants their gift to go into an athletic scholarship fund. By creating gift designations for each of these initiatives, you make sure that incoming gifts are appropriately allocated.
Let’s create a couple of gift designations for Astro University.
- From the App Launcher, find and select Fundraising Operations.
- Click
 and select Gift Designations.
- Change the list view to All Gift Designations and pin the list view.
- Click New.
- For Name, enter
Future Musical Scholars Fund.
- Toggle on the Active checkbox.
- Select Default.
- Click Save & New.
- For Name, enter
Athletic Scholarship Fund.
- Select Active.
- Save your changes.

Great job! You’ve now identified two “buckets” to which donations can be allocated. Next, get ready to collect and record all of the gifts from your generous alumni and supporters as they start pouring in. For example, Astro University just received an amazing gift of $2,000 from a charitable graduate, Sophia!
In Agentforce Education, you can enter gifts individually or process them as a gift batch. Start by learning how to create a gift batch.
Create a New Gift Batch
With a gift batch, you can quickly add multiple gift entries that use the same set of fields. That way, you can process the collection of gift entries together.
Here’s how you enter a gift batch that totals $2,000.
- Click
 and select Gift Batches.
- Click the Gift Batches tab to open the list view.
- Change the list view to All Gift Batches and pin the list view.
- Click New.
- Leave the Screen Template Name as Default.
- For Estimated Gift Count, enter
1.
- For Estimated Batch Value, enter
2000.
- Make sure that Total Gift Value Match is deselected.
- Save your changes.

Notice that you can check the processing status in the Processed Gift Count and Failed Gift Count fields of the gift batch record. When the processing status changes, these fields will increment accordingly.
Create a New Gift Entry
Next, enter the individual gifts to include in the batch. When setting up gift entries, you can allocate gift amounts to separate gift designations using either percentages or monetary amounts. For example, a donor who’s a music lover and also a volleyball fan wants half of their donation to be used for instrument purchase and the other half to go into the athletic scholarship fund. Agentforce Education makes it simple to correctly allocate the gift.
Follow these steps to create a gift entry and define the designations for the gift.
- From the gift batch record, click New Gift Entry.
- Expand Donor Information (if needed) and enter the following details:
- Gift Type: Individual
- Donor: Sophia Alumni
- Gift Type: Individual
- Expand Set Gift Date, and set the Gift Received Date to the first day of the previous month.
- Expand Set Gift Information and enter the following details:
- Outreach Source Code: Class Year Mailing
- Campaign: 2025 Annual Campaign
- Gift Amount:
2000
- Outreach Source Code: Class Year Mailing
- Expand Payment Information and enter the following details:
- Payment Method: Check
- Payment Identifier:
1979
- Set Check Date to the first day of the previous month.
- Payment Method: Check
- Expand Set Designation Information and modify the existing row so it contains the following details:
- Designation: Future Musical Scholars Fund
- Percentage:
50
- Click or tab over to the Amount field and ensure it changes from $2,000 to $1,000.
- Designation: Future Musical Scholars Fund
- Under Set Designation Information, click Add Row, and enter the following details:
- Designation: Athletic Scholarship Fund
- Percentage:
50
- Click or tab over to the Amount field and ensure it changes to $1,000.
- Designation: Athletic Scholarship Fund
- Expand Set Soft Credit Information, click Add Row, and enter the following details:
- Recipient: Robert Student
- Role: Influencer
- Credit Percentage:
50
- Click or tab over to the Amount field and ensure it changes to $1,000.
- Recipient: Robert Student
- Save your changes.
- Close the Manage Gift Entries modal window and return to the Gift Batch.
- Click Process Batch.
Processing a gift batch may take a few minutes. Refresh the browser and notice that the Processed Gift Count for the gift batch increments from 0 to 1. Success!
Verify Donations
It’s a good time to make sure the donation shows correctly on the account. There are a few ways that you can verify gift donations (we won’t check these).
First, find the gift on the alumni account record page.
- From the App Launcher, find and select Alumni, then select the Accounts tab.
- Select the Sophia Alumni account.
- Select the Donations tab and notice that the amount is $2,000 and the Transaction Completion Date is the first day of the previous month.
Now, check the donation from the list of gift batches.
- From the App Launcher, find and select Gift Batches.
- Locate and select the most recent gift batch entry–the one named with the highest number.
- Confirm that the Processed Gift Count is not zero, and the Failed Gift Count is zero.
- Select the most recent Gift Entry from the list.
- Confirm the Gift Processing Status is set to Success.

You can also see the gift in Gift Transactions.
- From the App Launcher, find and select Gift Transactions, and change the list view to All Gift Transactions.
- Click the transaction for $2,000 from Sophia Alumni.
- In Details, check the gift transaction and payment information.
- Click Related to see the gift transaction designations and the gift soft credit that was applied to Robert.
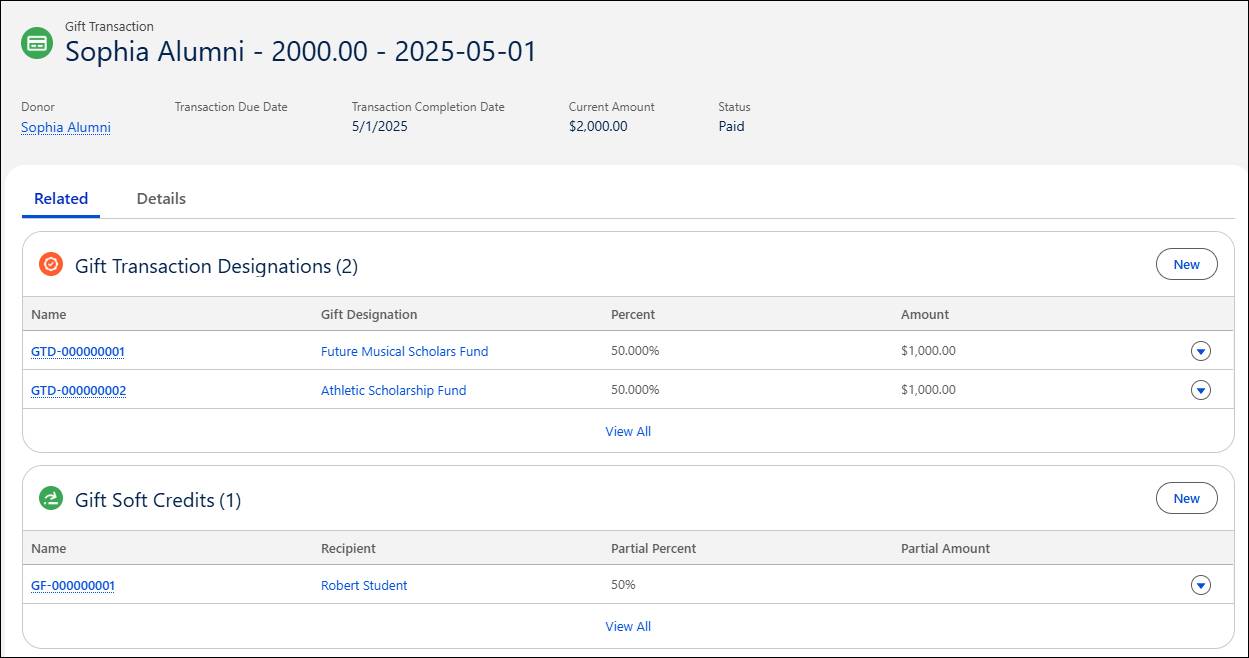
Notice the gift designations directed 50% of the $2,000 to the two separate funds you set up earlier. Thanks for your generosity, Sophia!
Over time, Agentforce Education apps such as Alumni, Donor Engagement, and Fundraising Operations help Astro University to increase donations and achieve valuable growth.
Now that Delaney and her team have streamlined their advancement operations, they set their sights on creating closer connections with even more graduates and bringing about long-term growth. The future’s looking bright!
Well done, Trailblazer! With your new skills, you’re ready to propel your fundraising efforts to new heights and maximize the gifts that fuel success for your institution.