使用智能体脚本创作智能体
学习目标
在本徽章中,您将:
- 了解智能体脚本和编写包。
- 通过智能体脚本文件预览智能体。
- 通过更新和验证智能体脚本文件来编写智能体。
- 向组织发布智能体。
- 在组织的 Agentforce 生成器 UI 中查看已发布的智能体。
对于此步骤,请使用您在步骤 1 中创建的相同 Developer Edition 组织。

了解智能体脚本,即智能体蓝图
构建智能体遵循特定的生命周期。
-
开发:编写智能体脚本文件,以定义智能体的指令和逻辑。
-
发布:将智能体脚本文件部署到开发组织中,以创建智能体元数据。
-
测试:在 Sandbox 或临时组织中验证智能体的行为。
-
部署:将智能体元数据迁移到生产环境中。
-
激活:打开智能体,使其可供客户使用。
本徽章重点介绍开发和发布步骤。
智能体脚本是新一代 Agentforce 智能体的基础。这是一种语言,既具备利用自然语言编写代码的灵活性,又兼具处理业务规则时程序化表达式的可靠性。智能体不仅让您能够充分利用大语言模型 (LLM) 的优势,还提供向智能体添加更多确定性行为的多种方法。
与 Salesforce 中的大多数内容一样,智能体的智能体脚本文件属于名为 AiAuthoringBundle(或简称为 authoring bundle(编写包))的元数据组件。您可以通过在 DX 项目中使用 CLI 命令、VS Code,或通过 vibe 编码从头开始生成编写包。或者,您可以先使用 Agentforce 生成器在组织中创建智能体,然后将编写包检索到 DX 项目中。编写包中包含扩展名为 .agent 的文件;这就是智能体脚本文件,充当智能体的蓝图。
在此 Trailhead 徽章中,您将从上一单元复制的存储库中,基于现有的编写包和智能体脚本文件开始。是否准备深入了解?
在 VS Code 中,打开名为 Local_Info_Agent.agent 的智能体脚本文件,该文件位于上一单元复制的 DX 项目中的 force-app/main/default/aiAuthoringBundles/Local_Info_Agent 目录下。

注意智能体脚本文件如何显示美观的彩色语法高亮、语法错误的视觉提示(如红色波浪线)、代码导航等。这些颜色之所以显示,是因为 Salesforce VS Code 扩展程序支持智能体脚本作为编程语言,如同支持 Apex 和 LWC 一样。
虽然学习智能体脚本语言本身已超出本徽章的范围,但花几分钟时间了解该文件还是值得的。例如,文件由多个块组成,例如 system(系统)、config(配置)和 variables(变量) 等。config(配置)块包含定义智能体的配置参数。在本徽章的后续步骤中,您将修改其中一个参数。
如需更多信息和详细说明,请参阅智能体脚本入门。
仅使用智能体脚本文件预览智能体
在编写智能体的智能体脚本文件时,定期与智能体进行对话会很有帮助。您可以实时查看在进行更改和更新时的响应情况。这些对话预览相当于交互式测试,用于确保智能体的行为符合预期。
首先使用模拟模式预览智能体,该模式仅使用智能体脚本文件进行对话和模拟所有工具。如果实施这些工具的 Apex 类、流或提示模板尚未可用,此模式将尤为有用。LLM 使用您在智能体脚本文件中添加的关于子智能体的信息,以模拟工具的功能或响应方式。您通过您的组织访问 LLM,因此即使在模拟模式下,您仍需获得组织的授权。
- 在 VS Code 中,打开 Local_Info_Agent.agent 智能体脚本文件中的上下文菜单(右键单击)。
- 选择 AFDX: Preview This Agent(AFDX:预览此智能体)。
左侧将打开 Agentforce DX 面板。
- 从 Select agent…(选择智能体…)下拉列表中,选择可能已被选中的 Local_Info_Agent。
注意其在列表中 Agent Script(智能体脚本)部分的位置。除非您已创建新的智能体,否则 Local_Info_Agent 是列表中唯一的智能体。
- 在下拉菜单中,选择 Simulation(模拟),然后单击 Start Simulation(开始模拟)以启动预览。

- 在聊天框中输入此问题,以演示智能体的功能:
What can you help me with?(能帮我什么忙?)
智能体思考片刻后,会给出回应。
- 输入此问题:
What’s the weather like?
您会收到有关天气的摘要,但您是否注意到智能体说话像海盗一样?例如,它的回复很可能以 Arrr 伙计开头。好奇怪!智能体之所以这样回应,是因为其智能体脚本文件指示它在描述当地天气时要像海盗一样说话。
虽然海盗人设是测试个性的一种有趣方式,但专业的智能体需要保持一致的品牌声音。了解如何修改智能体脚本文件,以优化智能体的对话回复。
编写智能体脚本文件
如果要更改智能体的行为方式,需编写其智能体脚本文件。编写过程中,验证文件以确保未引入任何错误。现在或许是时候让智能体停止像海盗一样回复了,是否已准备好了解具体方法?
- 在 VS Code 中,扫描智能体脚本文件,以确定是否可以找到使智能体响应像海盗一样告知当地天气的相关指令。
提示:检查 local_weather 的推理指令。还是找不到?在第 114 行附近查找以 Finally, ALWAYS give answers(最后,务必给出答案)开头的句子。
- 要编辑该文件,则移除以 Finally, ALWAYS give answers(最后,务必给出答案)开头的整行。除非您清楚自己在做什么,否则不要进行任何其他更改!
- 保存文件。
- 打开智能体脚本文件的上下文菜单(右键单击),选择 AFDX: Validate this Agent(AFDX:验证此智能体)。
在文件验证过程中,VS Code 右下角会弹出一个小窗口。如果验证失败,将打开 Problems(问题)选项卡,其中包含错误消息和提示,以帮助您解决问题。但如果您按照步骤操作,智能体脚本文件应该能验证成功。
- 单击 Restart Options(重启选项),然后在 Agentforce DX 预览窗口的右上角单击 Compile & Restart(编译并重启)。

- 在聊天框中输入相同的问题(
What’s the weather like?(天气怎么样?)。您也可以单击向上箭头以使用聊天历史记录。
这次的回复应该会更专业一些,虽然略显枯燥,但效果不错。
- 提问完毕后,单击 Stop Simulation(停止模拟)。
使用实时模式预览智能体
当您在实时模式下预览智能体时,它使用开发组织中的实际 Apex 类、流和提示模板,从而最准确地展示智能体的行为。
作为此 Trailhead 徽章初始设置的一部分,您已将所需的 Apex 类和相关资产部署到您的组织中。如果您稍后在本地 DX 项目中进行更改,则必须重新部署,以确保实时预览能够使用这些内容。
在此实时预览中,您还将使用真实的组织用户,即上一单元中创建的用户。这需要对智能体脚本文件进行更改。让我们开始吧!
- 在 VS Code 中,打开编辑器中的 Local_Info_Agent.agent 智能体脚本文件。
- 在 config(配置)部分(约第 7 行),找到 default_agent_user 属性。
- 通过使用上一单元中脚本生成的用户名更新 UPDATE_WITH_YOUR_DEFAULT_AGENT_USER 占位符来编辑智能体脚本文件。
- 例如,如果生成的用户名为 afdx-agent@testdrive.org98eca4a312-3456xyz,则更新后的属性如下所示:
default_agent_user: "afdx-agent@testdrive.org98eca4a312-3456xyz"
- 例如,如果生成的用户名为 afdx-agent@testdrive.org98eca4a312-3456xyz,则更新后的属性如下所示:
- 验证智能体——无论何时修改智能体脚本文件,这都是最佳实践。
- 如果 Agentforce DX 面板未打开,在脚本文件的任意位置选择上下文菜单(右键单击),然后选择 AFDX: Preview This Agent(AFDX:预览此智能体)。
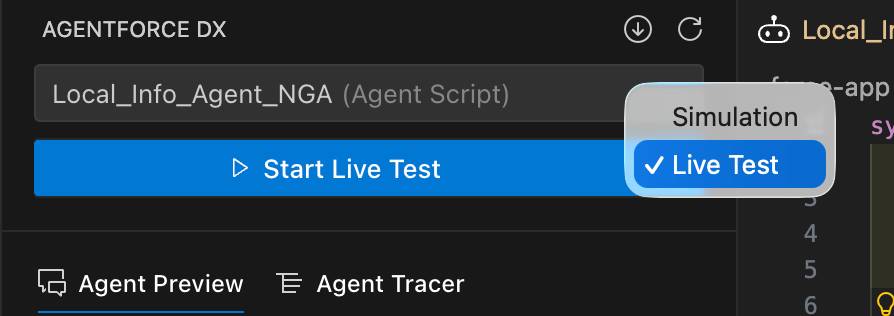
- 在下拉菜单中,选择 Live Test(实时测试),然后单击 Start Live Test(开始实时测试)以启动智能体。
- 再次提问:
What’s the weather like?(天气怎么样?)
响应与运行模拟时类似,但这次温度范围应精确介于 65.3 华氏度至 81.1 华氏度之间。这是因为智能体正在使用组织中的真实 Apex 类 (WeatherService),该类出于测试目的将温度硬编码在此范围内。想亲自查看一下吗?查看 force-app/main/default/classes/WeatherService.cls 文件。
在 Agentforce 生成器中查看和更改智能体
切换回您组织的 Agentforce 生成器 UI。在此处,您可以像在 VS Code 中一样预览和编写智能体。事实上,您会将智能体更改为像小丑一样做出响应,因为我们决定还是喜欢滑稽搞笑,而不是一本正经!
但在操作之前,请记住您已对本地智能体脚本文件进行过一些更改。为确保在使用组织内生成器时使用相同的代码,您必须将 Local_Info_Agent 编写包部署到您的组织中。在使用专业和低代码工具时,保持 DX 项目与组织之间的同步至关重要。
- 在 VS Code 中,通过在集成终端中运行此 CLI 命令,将更新的编写包部署到您的组织中。
sf project deploy start --metadata aiAuthoringBundle:Local_Info_Agent
终端显示以下部署状态。
- 要在浏览器中打开 Agentforce 生成器中的 Local_Info_Agent,请在 VS Code 的集成终端中运行以下 CLI 命令。
sf org open agent --authoring-bundle Local_Info_Agent
如果您是首次使用 Agentforce 生成器,请探索其功能。注意,Local Info Agent(本地信息智能体)的版本为 Version 1 (Draft)(版本 1(草稿)。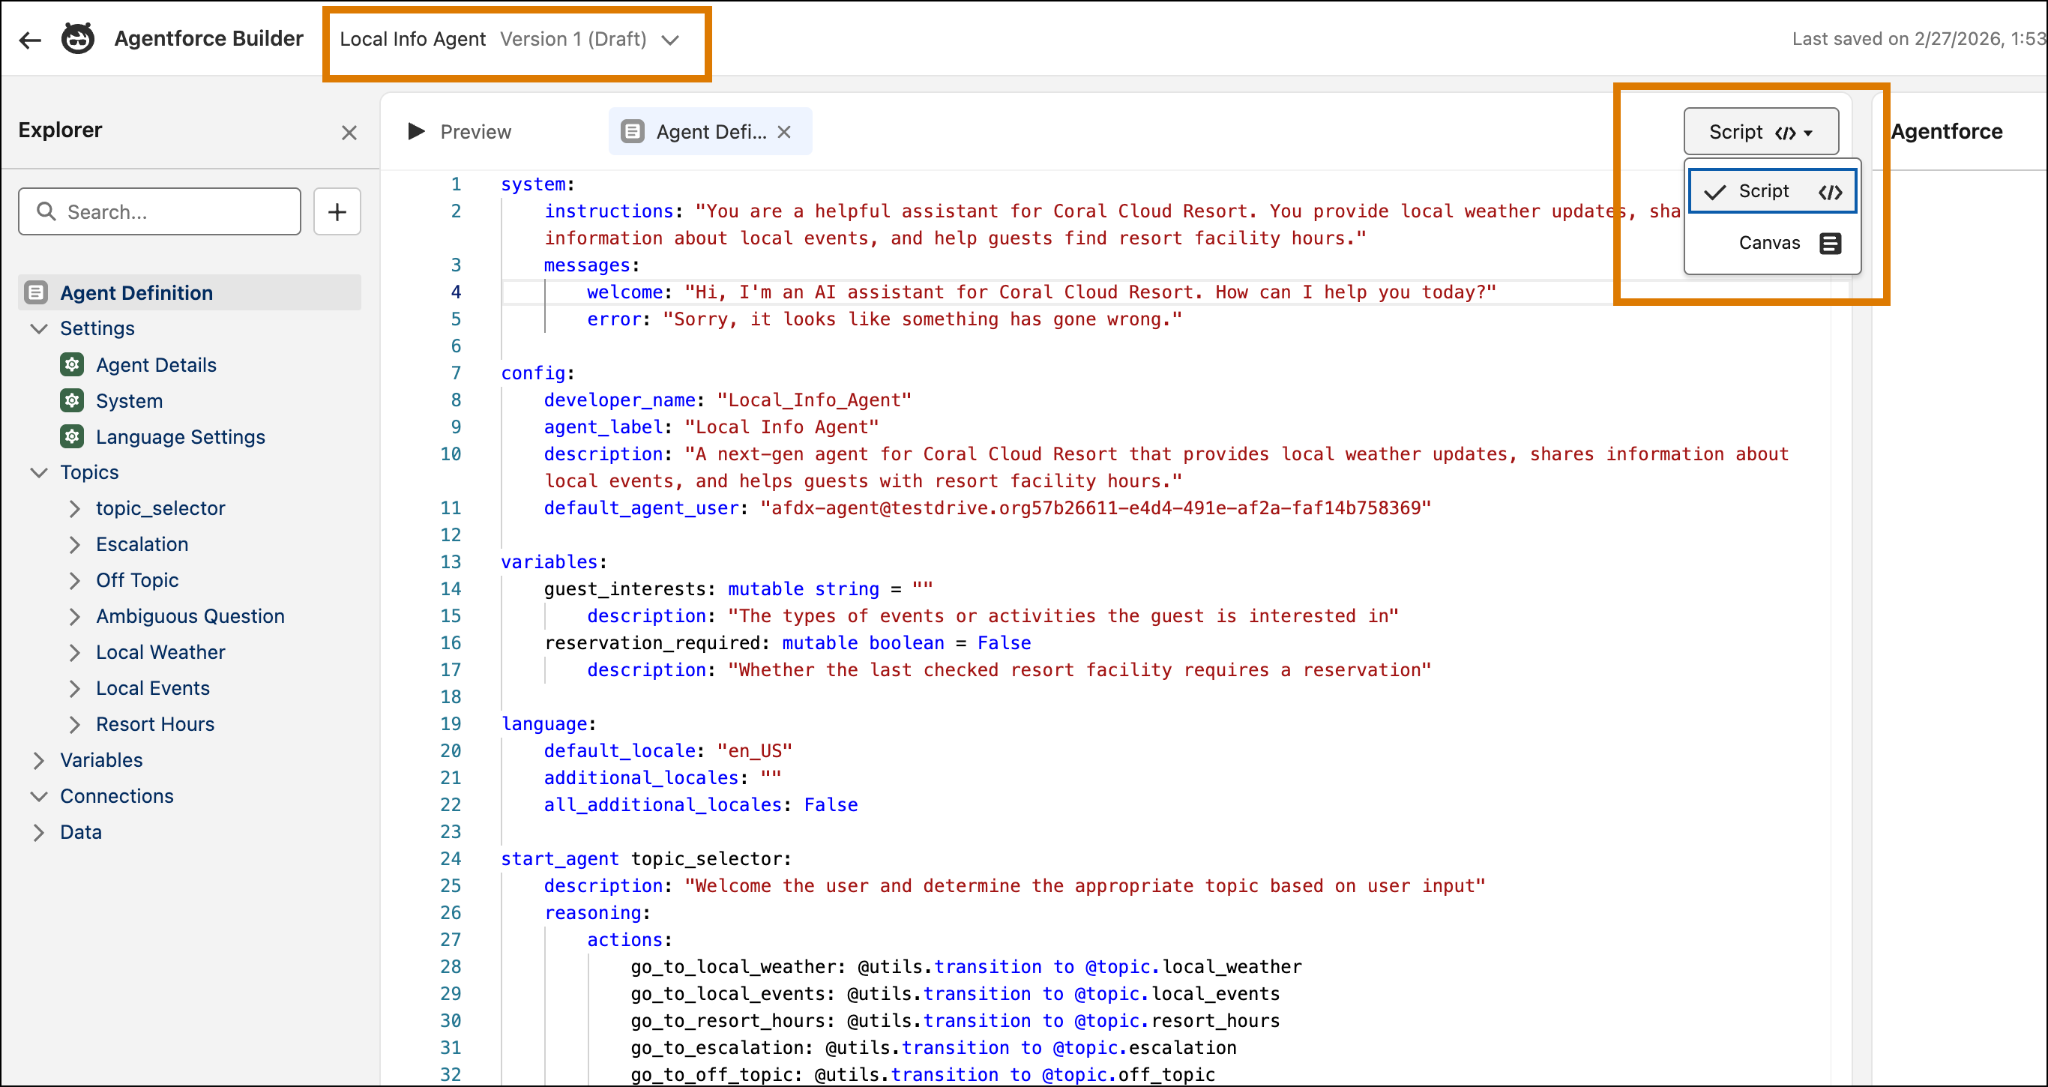
- 在 Agentforce 生成器中,选择 Script(脚本)视图,并在 ALWAYS Provide forecasts that include a temperature range(务必提供包含温度范围的预报)(约第 112 行)的下一行添加以下指令:
Finally, ALWAYS give answers like you're a clown in a circus, using clown-themed language and expressions to make the interaction more engaging and fun for the user.
- 单击 Save(保存)。
- 可以选择使用 Preview(预览)按钮,直接在组织内预览智能体。
- 在 VS Code 中,通过在终端中运行此 CLI 命令,将更新的编写包从您的组织检索到您的 DX 项目中。
sf project retrieve start --metadata AiAuthoringBundle:Local_Info_Agent
- 编译并重启实时模式预览,然后再次询问天气。智能体应该会像小丑一样进行响应!
发布编写包
当您将编写包发布到组织时,组织会使用智能体脚本文件生成关联的智能体元数据,即该元数据的初始版本或新版本。智能体元数据包含 Bot、BotVersion、GenAiPlannerBundle、GenAiFunction 等组件。这些智能体元数据会在您的组织中生成新的智能体或现有智能体的新版本。随后,您可以测试此已发布的智能体,并将其部署到生产组织中,以便激活改智能体并使其可供您的用户使用。最后,您的 DX 项目将从组织中检索所有新的元数据或已更新的元数据。
- 在 VS Code 中,打开编辑器中的 Local_Info_Agent.agent 智能体脚本文件。
- 打开智能体脚本文件的上下文菜单(右键单击),选择 AFDX: Publish This Agent(AFDX:发布此智能体)。
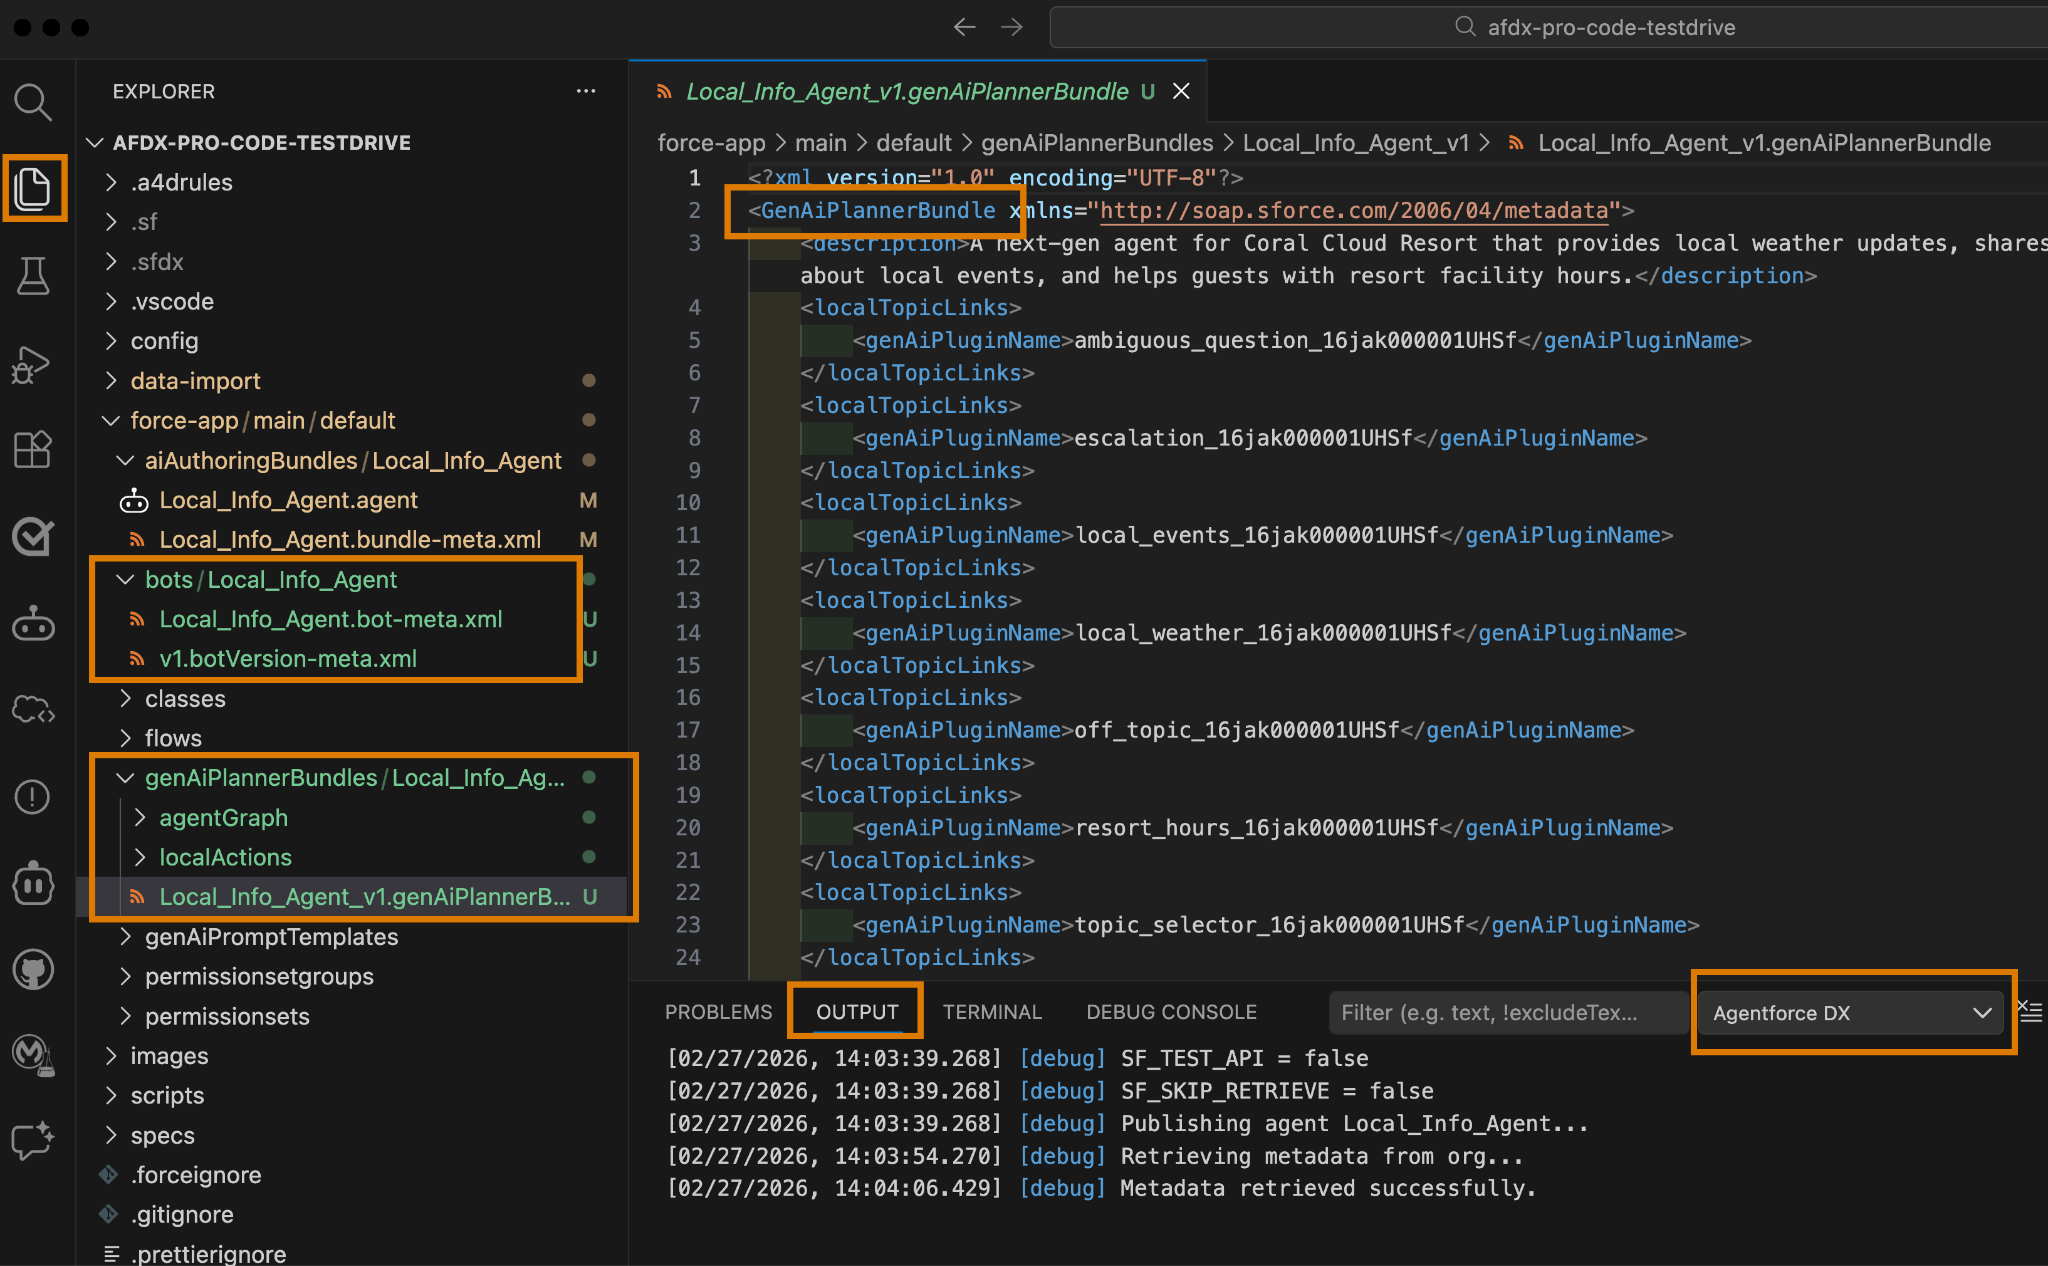
在 Output(输出)选项卡中查看正在进行的发布步骤。确保使用下拉菜单筛选 Agentforce DX 信息。
- 使用 Explorer 查看已检索到 DX 项目 force-app/main/default 包目录中的元数据。此示例展示在编辑器中打开的 GenAiPlannerBundle 元数据组件 XML 文件。
- 返回组织中的 Agentforce 生成器并刷新页面。现在,您应已拥有 Local Info Agent(本地信息智能体):Version 1 (Committed)(版本 1(已提交)的已提交版本。
发布编写包会生成智能体元数据的新版本,包括 BotVersion 和 GenAiPlannerBundle。在前面的图像中,您可以将这些标识为 v1。
激活智能体
使 Local Info agent(本地信息智能体)可供 Coral Clouds 度假村的访客使用。在 VS Code 中,您可以使用其 BotVersion 元数据文件激活智能体。
- 在 VS Code 中,使用 Explorer 导航至 force-app/main/default/bots/Local_Info_Agent 目录。
- 从 Local_Info_Agent.bot-meta.xml 文件打开上下文菜单(右键单击),然后选择 AFDX: Activate Agent(AFDX:激活智能体)。

- 单击 VS Code 顶部下拉菜单中的 Version 1(版本 1)。
- 转到组织中的 Agentforce 生成器,并刷新 Local Info agent(本地信息智能体)页面。现在,您应该拥有活动的智能体版本,例如 Version 1 (Active)(版本 1(活动))。
祝贺您!您已成功使用 Agentforce DX 编写智能体的智能体脚本文件,预览智能体,并将其发布到您的组织中。使用工具箱中的这些专业代码工具,您现在即可开始创建自己的智能体。在发布生产智能体之前,请记住调整其声音,以确保其适合您的具体用例。