显示确认屏幕

您已有用于创建和更新联系人的工作流,但您是否希望该流在执行更改时不告知发起请求的用户?优秀的用户体验设计能向用户传达更改信息。因此,让我们用一对包含相关信息的屏幕结束此流,这些屏幕会链接到已创建或已更新的记录。
创建 URL 公式
为增强屏幕的链接,请创建文本工时。
- 在工具箱 (
 ) 中,单击 New Resource(新建资源)。
- 在 Resource Type(资源类型)处选择 Formula(公式)。
- 在 API Name(API 名称)处,输入
contactURL。
- 在 Data Type(数据类型)处选择 Text(文本)。
- 在 Formula(公式)处,输入以下文本。
"/lightning/r/Contact/" & {!contact.Id} & "/view"
此公式使用 & 运算符将多个文本字符串连接成一个动态 URL。字符串{!contact.Id}会插入已更新或已创建联系人的 ID。
- 单击 Check Syntax(检查语法),以验证公式的结构是否正确。
- 单击 Done(完成)。
- 保存流。
添加已更新联系人屏幕
现在创建在联系人更新时显示的屏幕。
- 在 Update Contact(更新联系人)之后的 Update Existing(更新现有)路径中,单击
 。
。
- 选择 Screen(屏幕)。
- 在 Label(标签)处,输入
Contact Updated(已更新联系人)。
API Name(API 名称)自动设置为Contact_Updated。
向已更新联系人屏幕添加显示文本组件
添加用于告知用户联系人已更新的组件,并为用户提供指向已更新记录的链接。
- 在 Components(组件)选项卡的 Search components(搜索组件)框中,输入
Display(显示)。
- 单击 Display Text(显示文本)组件,以将其添加到屏幕画布。
- 在 Display Text(显示文本)组件的属性窗格中,在 API Name(API 名称)处输入
contactUpdatedText。
- 在文本编辑器中,输入以下文本。
The contact has been updated.
{!contact.FirstName} {!contact.LastName}- 单击并拖动以突出显示
{!contact.FirstName} {!contact.LastName}。
- 单击
 打开链接编辑器。
Link Title(链接标题)字段应包含{!contact.FirstName} {!contact.LastName}。
- 在 Link URL(链接 URL)处,输入
{!contactURL}。
此文本引用 contactURL 公式,因此链接会打开该公式中的动态 URL。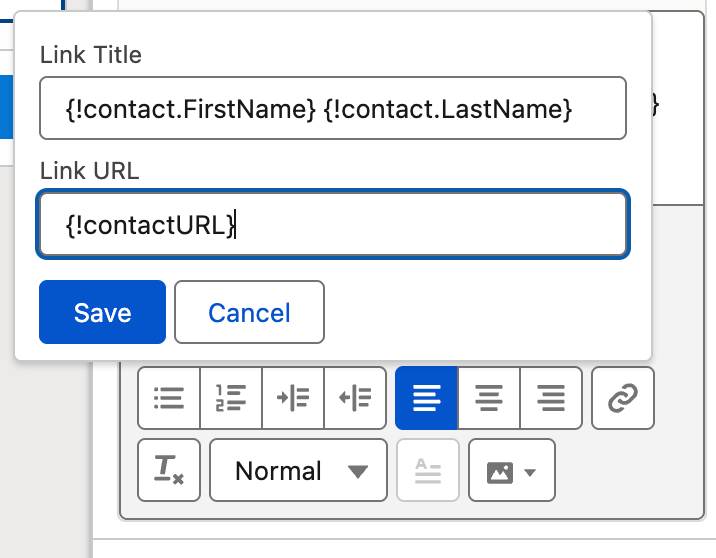 [替换文本:与前面步骤相对应的链接编辑器。]
- 单击链接编辑器中的 Save(保存)。

当此屏幕运行时,流会将已更新的联系人名和姓显示为可单击的链接,单击后可直接跳转至已更新的联系人。
- 单击 Done(完成)以关闭 Edit Screen(编辑屏幕)窗口。
- 保存流。
添加已创建联系人屏幕
要创建的最后一个元素:创建联系人时显示的屏幕。因为该元素应与 Contact Updated(已更新联系人)屏幕元素极为相似,我们不妨采取一种更快捷的方法:复制粘贴该元素,然后修改副本。
- 将鼠标悬停在 Contact Updated(已更新联系人)元素上并单击
 。
。
- 选择 Copy Element(复制元素)。
- 在 Create Contact(创建联系人)之后的 Not Found(未找到)路径中,单击
 。
。
- 选择 Paste 1 Element(粘贴 1 元素)。
此复制粘贴会创建一个元素:Copy 1 of Contact Updated(已更新联系人的副本 1)。
让我们对其进行调整,以满足此路径的需求。
- 单击 Copy 1 of Contact Updated(已更新联系人的副本 1) 元素。
- 更新 Screen Properties(屏幕属性)面板中的值。
- 在 Label(标签)处,输入
Contact Created(已创建联系人)。
- 在 API Name(API 名称)处,输入
Contact_Created。
- 在 Label(标签)处,输入
- 在屏幕画布上,单击 Display Text(显示文本)组件(即显示“The contact has been updated(联系人已更新)”的区域。)
- 更新 Display Text(显示文本)配置面板中的值。
- 在 API Name(API 名称)处,将现有值更改为
contactCreatedText。
更改此值是因为流中的每个 API 名称必须唯一。
- 在文本编辑器中,将
updated(已更新)替换为created(已创建)。
- 在 API Name(API 名称)处,将现有值更改为
- 单击 Done(完成)。
- 保存流。

构建流的过程您已经全部完成了!您可以单击 Run(运行)以运行流,确认组织中的联系人得以创建或更新。要获取有关流在运行时所执行操作的更多详细信息,请单击 Debug(调试),然后单击 Run(运行)。