Discover the Applicant Portal and Dynamic Applications
Learning Objectives
After completing this unit, you’ll be able to:
- Discuss the common application tasks that students perform and associated challenges.
- Describe the applicant portal and related features.
- Explain how dynamic applications work in Agentforce Education.
- Describe how students can request and manage recommendations.
The Application Experience
After your prospective students have chosen your institution and programs, they’re ready for the next phase of enrollment: the dreaded application process.
Candidates navigate a vast amount of requirements and documentation to support their application. They also request recommendation letters from multiple parties, and send reminders repeatedly. After submitting their application, they often wait weeks or months for an enrollment decision and without any updates from the institution. In many cases, they apply to more than one program, so it’s easy to see why the application process is a source of frustration and anxiety.
Fortunately, Recruitment and Admissions gives potential students all the tools they need to fast-track the application process. This reimagined experience begins on the applicant portal.
The Applicant Portal
So far, you’ve learned about components on the applicant portal such as Student Recruitment Agent and Inquiry Management, but there’s so much more to explore about this intuitive website. Prospective learners can browse learning and support programs, engage with the community, and access all their information requests, appointments with staff, and other interactions.

Along with being an all-in-one hub for resources and support, the applicant portal is built to help candidates understand every step of the application process and complete each step with streamlined efficiency. Applicants can complete dynamic application forms, request recommendation letters, and monitor their application status.
To help you quickly build out your applicant portal, your Agentforce Education org comes with an Experience Cloud site template with preconfigured pages and components. You can customize your site so it matches your institution's branding by changing the logos, colors, and themes. You can also customize pages based on your needs and tailor the included components, such as knowledge articles and the Inquiry Management forms you discovered earlier.

Visitors to your portal can create user profiles to store their contact information and other personal details. The site uses this profile information to prefill fields in application and inquiry forms for easier submission.
To learn more about setting up your applicant portal, view the Set Up Your Portal for Applications article in Salesforce Help.
Dynamic Applications
Dynamic applications are a flexible and efficient way to collect necessary information from candidates, without the usual roadblocks. Candidates can create and manage all their applications from the Applications tab of the portal.

Unlike static forms, dynamic applications combine reusable Omnistudio components and Agentforce Education objects for faster and more modular form development.
You can create both single-stage and multi-stage applications.
- A single-stage application is a single form that students fill out and submit all at once.
- A multi-stage application breaks the application form into sections, helping students to complete the form nonlinearly and return to the form later.
Here’s an example of a multi-stage application form that Sophia completes to apply for the Environmental Studies program.

The Profile task lists all the required tasks to apply for the program. The nested forms include a variety of field formats that you can configure in Omnistudio, including text, multi-select, and dropdowns.

You can mark fields as required and conditionally show or hide fields based on certain criteria. For example, when Sophia indicates that she wants to report her academic honors, a follow-up section appears so she can enter that information.
Sophia can view her application progress by quickly seeing her completed tasks.

If Sophia needs assistance, she uses the quick links to contact support or launch the inquiry submission forms, or she can ask the Student Recruitment Agent for help.
In the Files task in the application, she attaches a personal essay, and additional files such as her resume, test scores, and transcripts.

Dynamic applications are modular, so you can quickly create forms to align with certain degree types, such as undergraduate or graduate degrees, or specific programs or departments. To set them up, first define the purpose of each application form and decide whether to use the single-stage or multi-stage format. For multi-stage applications, define the types of information you want to collect at each stage, such as personal information, education history, and other categories. You can also configure each application to support third-party submissions so that parents, guardians, or international agents can apply on behalf of students.
For either single-stage or multi-stage applications:
- Create the form using the customizable Omniscripts and Flexcards included with your Education org.
- Configure the render methods, which control how the application appears.
- Connect the render methods to application stage definition records.
- Add these records to an action plan template and assign it to the applicable program term application timeline.
This action plan template includes the individual application tasks for the student to complete on the applicant portal.

In the action plan template, you can mark each task as required or optional, and control the order in which tasks appear.
The program term application timeline record is a central record that joins all the related objects for a specific learning program, the term when the program is offered, and the application submission window for the program. This way, you can connect learning programs, academic terms, and application timelines, and automatically assign the correct action plan to each applicant.
Next, Sophia completes the Recommendation task.
The Recommender Experience
During the application process, students often request recommendation letters from teachers, coaches, or community leaders who can speak to their qualifications and potential. Coordinating these letters can be complex. Recommenders are often overwhelmed during peak season, and students can feel uncomfortable sending repeated reminders.
In Agentforce Education, applicants can easily nominate recommenders directly from their application form. For example, Sophia begins the Recommendation task and enters the contact information for one of her high school teachers.
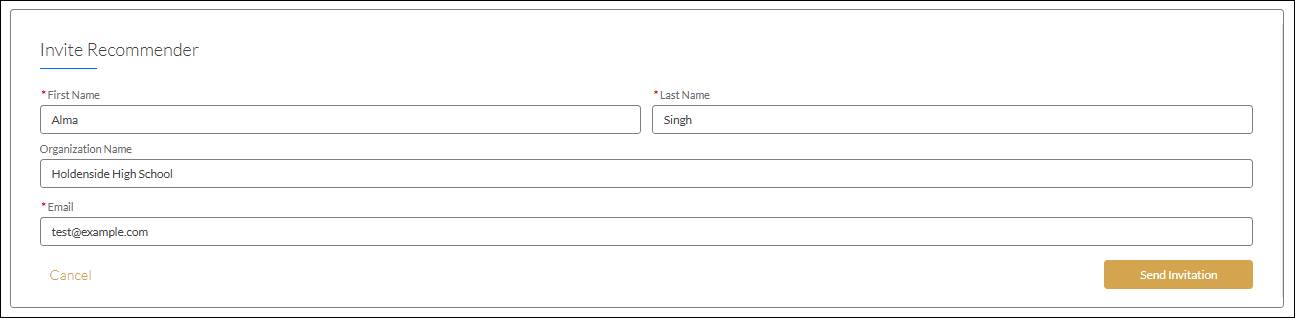
The system automatically emails each recommender with a link to complete a short survey and upload any supporting documents. Automated reminders go out to those who haven’t submitted, saving students time and awkward follow-ups.
Behind the scenes, a set of tools work together to simplify configuration and ensure consistency. The Recommender Experience uses Salesforce Feedback Management, Omnistudio, and flows to automate the survey process. You can customize survey questions, define when the recommendation task appears in the application, and configure how responses are submitted.
Omniscript forms capture information submitted by recommenders, and Flexcards display the responses alongside each application record. This gives reviewers a clear, consistent view of recommendation content during the review process.
To learn more about setting up dynamic applications and the Recommender Experience, view the Help articles in the Resources section.
In this unit, you explored how Agentforce Education provides a straightforward application experience for students. Applicants can keep track of all the steps, and use dynamic forms and intuitive tools to quickly submit the required information.
After submitting all her materials, Sophia receives an email confirmation that her application to the Environmental Studies program is complete. Now, she eagerly awaits a decision. Luckily, she doesn’t need to wait long: Agentforce Education also streamlines the application review process, which you learn about next.