Explore the Workspace
Learning Objectives
After completing this unit, you’ll be able to:
- Explain what’s offered on the Sales Engagement Home page.
- List the benefits of using the split view.
- Describe how to add records to the Work Queue.
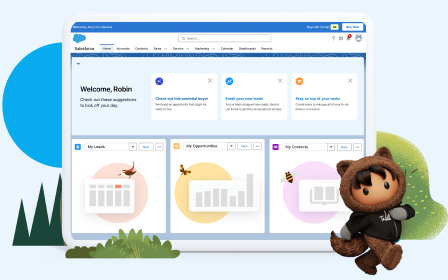
Welcome Home
After navigating to the Sales Engagement app, you find yourself on the Home page. You see that it includes a link to the Work Queue that Jose mentioned before. (You can always access the Work Queue by selecting the dropdown menu by “Home.”)

Linda shares a useful tip. You can pin the Home page to your workspace by selecting Ctrl (or Cmd) and clicking Home from the navigation menu and then pinning the tab to your workspace. Or you can easily pin the Home tab (or any other record) by clicking the dropdown arrow and selecting Pin Tab.

Basic Navigation
You click around the different tabs at the top. It’s easy to access all the record details that you’re used to seeing. You notice something else in the corner of some records: a score about how likely a lead is to convert.
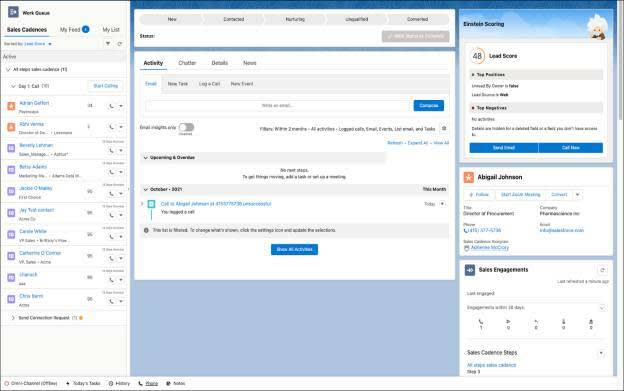
This must be the Lead Scoring feature that Linda was talking about. Having this information will definitely make it easier for you to prioritize your leads.
You remember from Jose’s tour that one useful feature is switching between different views.

You can use the different display options for different purposes. For example, you’re already familiar with how the Table view allows you to have full control over different list views for different objects. On the other hand, Split View allows you to access these same list views while still seeing record details in the main workspace.
And some components, like the Work Queue, are only available in Split View. It definitely seems like Sales Engagement is designed to maximize your productivity in a single view.
Exploring the Navigation Menu a bit more, you spot Sales Cadences as an available option. It looks like you can easily access details about the different sales cadences that Jose’s created.

Those with admin access can create cadences for your team, but you can use the cadences to get your daily outreach done in a way that aligns with the rest of your team.
Add to Your Work Queue
You select the Work Queue from the navigation menu. Just like Jose described, there are three tabs: Sales Cadences, My Feed, and My List. But the lists are empty.
You figure that you should be able to add records to sales cadences from record detail pages. So you bring up the record of one of your contacts. Sure enough, there’s an Add to Sales Cadence option available from the record.
You’re curious about seeing the contacts in a list. You switch over to the Table view for your contacts. Just like you suspected, there are options for adding records, everything from lead to prospect, opportunity contact, and sales cadences (and My List!) from the action dropdown.

Looks like this is the best way to add multiple records at the same time.
It’s time to roll up your sleeves and get started working through your prospects for the day.
Resources