Join the Agentforce Virtual Hackathon to build innovative solutions and compete for a $50k Grand Prize. Sign up now. Terms apply.

在流中运行流

学习目标

完成本单元后,您将能够:

  • 使用子流元素,将工作量减至最少。
  • 创建在另一个流中运行的流。
  • 配置引用流的变量,以便将数据传回父流。
备注

备注

用中文(简体)学习?在中文(简体)Trailhead Playground 中开始挑战,用括号中提供的译文完成挑战。仅复制并粘贴英文值,因为挑战验证基于英文数据。如果在中文(简体)组织中没有成功通过挑战,我们建议您 (1) 将区域设置切换为美国,(2) 按此处说明将语言切换为英文,(3) 再次单击“检查挑战”按钮。

查看 Trailhead 本地化语言徽章详细了解如何利用 Trailhead 译文。

备注

本徽章是熟练掌握 Flow Builder 的必修课程之一。使用 Flow Builder 构建流学习路径将引导您从头到尾学习有关 Flow Builder 的所有知识。请按照这一推荐的徽章顺序来培养强大的流程自动化技能并成为 Flow Builder 专家。

懒惰的强大力量

不管您信不信,管理员最重要的品质之一就是懒惰。

您没看错!如果您需要对 Salesforce 组织进行更改,而更改会影响到四个不同的流,您更愿意更新四个流还是只更新一个?听起来很神奇,但您也可以通过懒惰的力量解决不必要的工作等障碍。

例如,Flo 的组织有四个向 Chatter 发布相同信息的流。每当 Chatter 帖子发生变化时,她就得更新所有四个流中的重复元素。一想到要做这么多重复的工作,Flo 就感到头疼。幸运的是,还有一个我们没有使用过的元素:Subflow(子流)元素。 

在流(父流)中使用子流元素,可以让您引用另一个流(子流),使其在当前(父)流中运行。只改变一个流而不是全部四个流的想法让 Flo 兴奋不已。此外,由于流减少,发生遗漏或配置错误的机会也有所降低。

Flo 要求您为 Chatter 帖子建立一个单独的流。她计划用新的子流取代四个独立流中的重复元素。这样,如果与 Chatter 帖子相关的内容发生变化,Flo 就可以更新单个子流,而不是更新所有四个独立的流。

Flo Smith 躺在一张花式躺椅上,用一张棕榈叶当扇子,正在思考着流。

输入和输出变量

子流中的变量比较特殊。创建变量时,您注意到 Available for input(可用于输入)Available for output(可用于输出)设置了吗?通过这些设置,变量可以将父流的输入传输到子流,并将子流的输出传输回父流。

在 New Resource(新建资源)窗口中,Availability Outside the Flow(在流外部可用)部分有两个选项:Available for input(可用于输入)和 Available for output(可用于输出)。

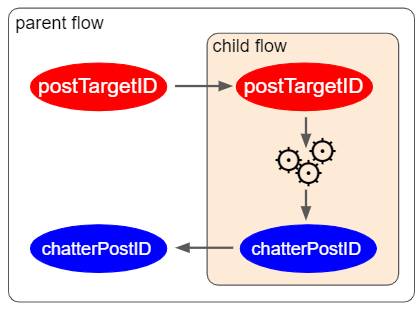
但为什么要将数据发送到子流或从子流发送数据呢?在 Flo 的例子中,子流根据父流的触发记录发布到 Chatter,因此子流需要触发记录的 Id。子流无法访问父流中的触发记录,因此父流需要将其发送给子流。如果父流需要知道子流创建的 Chatter 帖子的 ID,则子流需要将该 ID 发送回父流。

您可以在子流中将变量定义为可用于输入或可用于输出。

  • 要从父流接收数据,子流需要可用于输入的变量。
  • 要在子流结束时发送数据回父流,子流需要可用于输出的变量。
  • 如果不需要向任一方向发送数据,就不需要任何输入或输出变量。

与上述描述对应的图表

创建子流元素

要在另一个流中运行一个流,首先要创建父流和子流。然后向父流中添加一个子流元素。

创建子流

  1. 创建一个流并选择 Autolaunched Flow(自动启动流)类型。
  2. 创建文本变量:
    • API 名称:userMentionID
    • 可用于输入:选中
  1. 创建另一个文本变量:
    • API 名称:postTargetID
    • 可用于输入:选中
  1. 再创建一个文本变量:
    • API 名称:chatterPostID
    • 可用于输出:选中
  1. 创建一个文本模板:
    • API 名称:chatterBody
    • 正文:@[{!userMentionID}], please review this record.(@[{!userMentionID}],请审查此记录。)
    • 在 Body(正文)编辑器中,将 "View as Rich Text"(以富文本格式查看)改为 "View as Plain Text"(以纯文本格式查看)。
  1. 添加一个 Action(操作)元素:
    • 操作:Post to Chatter(发布至 Chatter)
    • 标签:Chatter Mention Post(Chatter 提及帖子)
    • API 名称:Chatter_Mention_Post
    • 消息:chatterBody
    • 目标名称或 ID:postTargetID
    • 在 Show advanced options(显示高级选项)下选择 Manually assign variables(手动分配变量)
    • 摘要项目 ID:chatterPostID
  1. 保存流。在 Flow Label(流标签)处输入 Post to Chatter(发布至 Chatter)。
  2. 激活流。

创建包含子流元素的父流

  1. 创建记录触发流:
    • 对象:Case(个案)
    • 何时触发流:A record is created or updated(记录已创建或已更新)
    • 条件要求:All Conditions Are Met (AND)(满足所有条件 (AND))
    • 条件:Priority(优先级)Equals(等于)High(高)
    • 何时运行更新记录的流:Only when a record is updated to meet the condition requirements(仅在更新记录以满足条件要求时)
    • 流的优化对象:Actions and Related Records(操作和相关记录)
  1. 添加一个子流元素:
    • 选择 Post to Chatter(发布至 Chatter)流。
    • 标签:Post to Chatter(发布至 Chatter)
    • API 名称:Post_to_Chatter
    • 启用 postTargetID 字段并选择 Triggering Case(触发个案) > Case ID(个案 ID)
      子流面板,在 userMentionID 字段中依次选择了 Triggering Case(触发个案)和 Owner ID(所有人 ID)。
    • 启用 userMentionID 字段,并选择 Triggering Case(触发个案) > Owner ID(所有人 ID)
      确保向下滚动并选择 Owner ID(所有人 ID),而不是 Owner ID (Group)(所有人 ID(组))或 Owner ID (User)(所有人 ID(用户))。
备注

当引用流没有将任何变量设置为可用于输入时,您将看不到 Set Input Values(设置输入值)部分。

  1. 保存流。在 Flow Label(流标签)处输入 Case Priority is High(个案优先级高)。

现在,每当记录创建需要更改时,Flo 只需更新单个子流即可。懒惰得一分,过度劳累得零分!

考虑以下内容

使用子流时,请记住这些特殊注意事项。

  • 子流元素只能引用自动启动流和屏幕流。
  • 在屏幕流中,您只能引用另一个屏幕流。
  • 如果引用了非活动流,则只有拥有 Manage Flows(管理流)权限的用户才能运行该流。
  • 如果子流有多个版本,父流会运行子流的活动版本。如果子流没有活动版本,则父流将运行最新版本。

资源

实践挑战

+500 分

准备好

您将在您自己的实践组织中完成此单元。单击启动以开始,或单击您的组织的名称以选择不同的组织。

您的挑战

Simplify and Build Upon the Opportunity Product Flow
In the opportunity product creation flow from unit 1, replace repeated elements with a subflow element that references another flow (child flow) multiple times. Also, add another product path to the parent flow. Prework: If you haven’t already completed the challenge in unit 1 (Define Multiple Paths in a Flow), do that now. Otherwise, you won't be able to complete this challenge.
  • Create an autolaunched flow
  • Create a text variable:
    • API Name: ProductKW
    • Available for input: checked

  • Create another text variable:
    • API Name: OpportunityID
    • Available for input: checked

  • Create another text variable:
    • API Name: PricebookID
    • Available for input: checked

  • Add a Get Records element:
    • Label: Get Product
    • API Name: Get_Product
    • Object: Product
    • Condition Requirements: All Conditions Are Met (AND)
      • Field: Name
      • Operator: Contains
      • Value: ProductKW
    • Keep default values for all other settings

  • Add a Get Records element after the Get Product element:
    • Label: Get PBE
    • API Name: Get_PBE
    • Object: Price Book Entry
    • Condition Requirements: All Conditions Are Met (AND)
    • Add a condition requirement:
      • Field: Pricebook2Id
      • Operator: Equals
      • Value: PricebookID
    • Add another condition requirement:
      • Field: Product2Id
      • Operator: Equals
      • Value: Product from Get_Product > Id
    • Keep default values for all other settings

  • Add a Create Records element after the Get PBE element:
    • Label: Create Opp Product
    • API Name: Create_Opp_Product
    • How to set record field values: Manually
    • Object: Opportunity Product
    • Set Field Values:
      • Field: Opportunity ID, Value: OpportunityID
      • Field: Price Book Entry ID, Value: Price Book Entry from Get PBE > Price Book Entry ID
      • Field: Quantity, Value: 1
      • Field: Total Price, Value: Price Book Entry from Get PBE > List Price

  • Save and activate the flow.
    • Label: Subflow-Create Generator Opp Product
    • API Name: Subflow_Create_Generator_Opp_Product

  • Make a new version of the Add Generator Product to Named Opps flow (Open the flow and click Save As New Version.)
  • Delete these elements:
    • Create 1500 Opp Product
    • Create 2000 Opp Product
    • Get 1500 PBE
    • Get 2000 PBE
    • Get 1500 Product
    • Get 2000 Product

  • On the 1500kW path, add a Subflow element:
    • Select the Subflow-Create Generator Opp Product flow
    • Label: Create 1500 Opp Product
    • API Name: Create_1500_Opp_Product
    • Include the OpportunityId field and select Triggering Opportunity > Opportunity ID
    • Include the PricebookID field and select Price Book from Get Pricebook > Price Book ID
    • Include the ProductKW field and enter 1500

  • On the 2000kW path, create a Subflow element:
    • Select the Subflow-Create Generator Opp Product flow
    • Label: Create 2000 Opp Product
    • API Name: Create_2000_Opp_Product
    • Include the OpportunityId field and select Triggering Opportunity > Opportunity ID
    • Include the PricebookID field and select Price Book from Get Pricebook > Price Book ID
    • Include the ProductKW field and enter 2000

  • In the Check Opp Name Decision element, add a new outcome:
    • Label: 1000kW
    • API Name: X1000kW
    • Condition Requirements: All Conditions Are Met (AND)
    • Resource: Triggering Opportunity > Name
    • Operator: Contains
    • Value: 1000

  • On the 1000kW path, create a Subflow element:
    • Select the Subflow-Create Generator Opp Product flow
    • Label: Create 1000 Opp Product
    • API Name: Create_1000_Opp_Product
    • Include the OpportunityId field and select Triggering Opportunity > Opportunity ID
    • Include the PricebookID field and select Price Book from Get Pricebook > Price Book ID
    • Include the ProductKW field and enter 1000

  • Save and activate the flow
在 Salesforce 帮助中分享 Trailhead 反馈

我们很想听听您使用 Trailhead 的经验——您现在可以随时从 Salesforce 帮助网站访问新的反馈表单。

了解更多 继续分享反馈