Deploy and Validate Your Data 360 Configurations
Learning Objectives
After completing this unit, you’ll be able to:
- Compare deployment methods, including change sets, Salesforce CLI, and DevOps tools.
- Apply a pre-deployment checklist to ensure target org readiness.
- Activate data streams and verify ingestion in a production environment.
- Validate data mapping and identity resolution processes.
The Final Push
Deployment is only half the story; activation and validation confirm that configurations perform correctly at production scale. Metadata is like an appliance—after you move it, you still have to plug it in and turn it on.
In this final unit, you learn how to choose the right deployment tool, push your DevOps data kits to production, and validate the end-to-end data pipeline. Follow along as DevOps developer Vijay Lahiri and systems architect Jamal Cooks execute the final push for the Cloud Kicks loyalty program.
Review the Pre-Deployment Checklist
Deploying a DevOps data kit at scale requires enterprise-grade governance. Before Vijay moves any metadata to production, Jamal performs a readiness check. To avoid deployment failures, Jamal ensures the target environments are prepared by following this pre-deployment checklist.
-
Dataspace consistency: Make sure the sandbox and production orgs handle dataspaces identically to avoid mapping failures. If you created a data space in your sandbox that doesn’t exist in production, you must manually create it in production before deploying.
-
Feature parity: Verify that all Data 360 features enabled in the sandbox are also active in production.
-
Cross-org deployment strategy: If you must move metadata across different production orgs, follow a strict path. Deploy the data from production org one to sandbox org one. Then, deploy those changes from sandbox org one to the sandbox linked to production org two before making the final push into production org two.
-
Deployment publishing sequence: Audit the publishing sequence on the Data Kit page to prevent missing dependency errors. For example, if a segment depends on a calculated insight, ensure the calculated insight is set to deploy before the segment.
-
Redeployment rule: If you update a component after it is deployed and want to redeploy it, always create a new data kit to deploy the updated component.
-
Change set dependencies: If you use change sets, perform a precheck to ensure you have manually added all necessary component dependencies before attempting an upload.
Choose the Right Deployment Tool
Deploying a DevOps data kit at scale requires understanding multiple deployment methods and planning for enterprise-grade governance. Migration isn't one-size-fits-all. Depending on the complexity, Vijay might use different tools to move Cloud Kicks' loyalty program configurations to production.
Tool |
Use Case |
Architect Notes |
Limitations |
|---|---|---|---|
Change Sets |
Simple moves |
Good for simple administration, but not recommended for multi-component data kits. |
Only works between connected orgs. It offers no version control and cannot deploy all metadata types. |
Salesforce CLI/Metadata API |
Version-controlled deployments. After creating a DevOps data kit in your sandbox, you use the CLI to retrieve the metadata manifest, which you then commit to your version control system. |
The Salesforce Command Line Interface (CLI) is the gold standard for repeatable metadata deployments. It treats your Data 360 configuration as code, allowing you to store your data kit manifest in a version control system like Git. |
Requires CLI knowledge and the manual setup of scripts or deployment pipelines. Because of these challenges, it might not be possible to take full advantage of the complete benefits of source control integration as of now. |
External DevOps Tools |
Enterprise CI/CD pipelines |
Tools like Copado, Gearset, or GitLab provide a visual abstraction layer over the CLI. They manage the entire pipeline, including version control integration, automated testing, and sequential promotion. |
Introduces licensing costs and a learning curve. It might also require integration setup. |
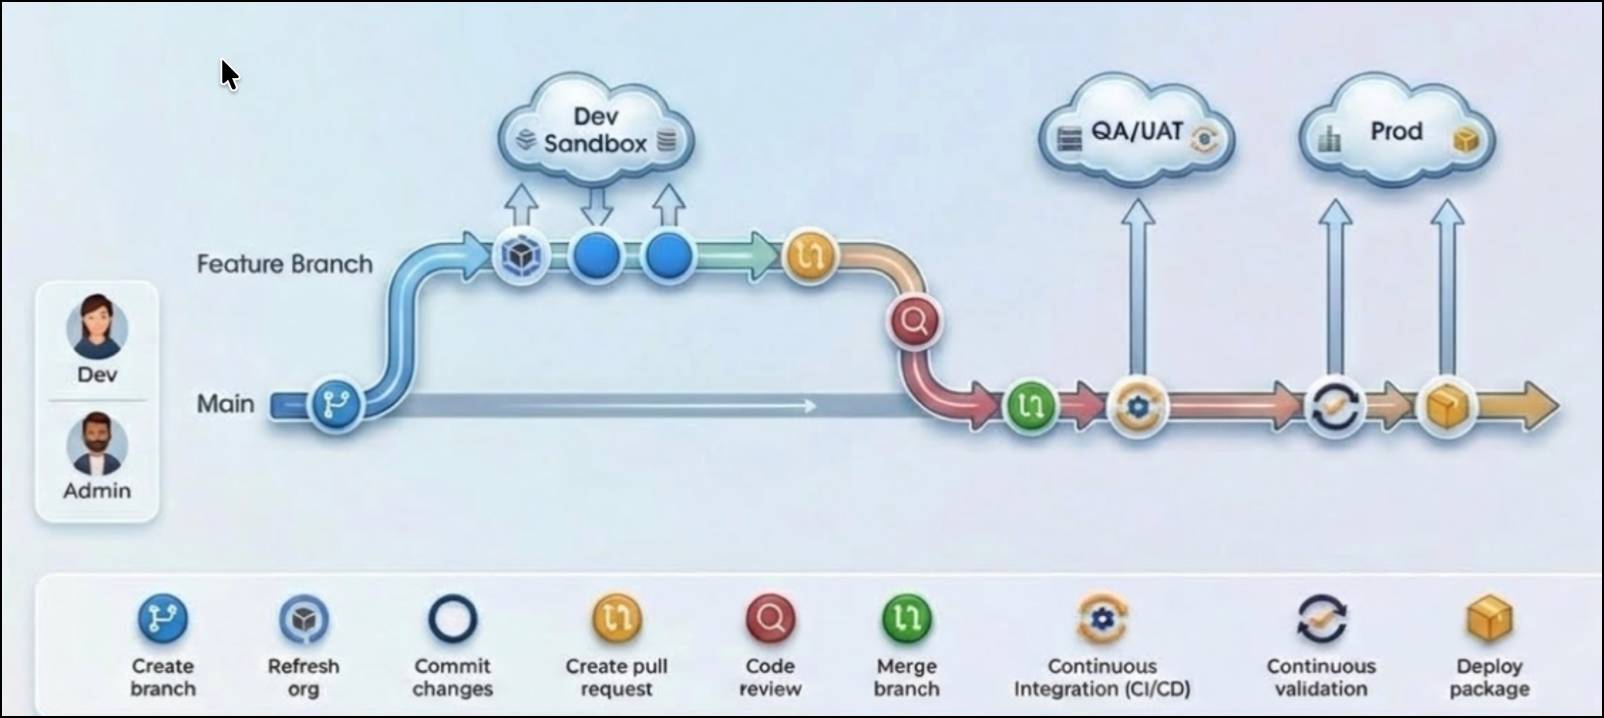
Before diving into the specific deployment commands, it is helpful to understand how these tools fit into a broader pipeline. Here is a visual example of a typical DevOps deployment pipeline. Notice how changes move from individual developer sandboxes, through integration and user acceptance testing (UAT), before finally arriving in production.
Deploy Using Change Sets
For simple migrations, you can use standard Salesforce change sets. Because Vijay already built his DevOps data kit in the previous unit, he can package it into a change set to move it to production. He follows these steps.
-
Authorize the connection: In your production (target) org, create a deployment connection to allow inbound change sets from your sandbox.
-
Create the outbound change set: In your sandbox org, go to Setup, and create an outbound change set.
-
Add your data kit: In the Component Type field, select Data Package Kit Definition and add your DevOps data kit.
-
Add dependencies: Click View/Add Dependent Components to include necessary DMO relationships. Scroll through all pages to ensure you capture everything.

-
Upload and deploy: Upload an outbound change set. Then, log in to your production org, navigate to Inbound Change Sets, and click Deploy to automatically deploy a change set and its features.
Deploy Using the Salesforce CLI
To manage the mission-critical loyalty program and its many moving parts, Vijay chooses the Salesforce CLI to integrate with Cloud Kicks' version control system. Follow these steps to deploy using the Salesforce CLI.
- In your sandbox org, go to Data Cloud Setup, and click Data Kits.
- Select the DevOps data kit, and then click Download Manifest. The package.xml file that you downloaded contains all the metadata entities related to the DevOps data kit. You use this file in your Salesforce DX project to retrieve the data kit metadata.
- To retrieve the DevOps data kit metadata into the sandbox org, run this command:
sf project retrieve start --manifest manifest/package.xml.
- After this command completes, you see new project folders that contain the data kit metadata. Consider uploading the entire project to GitHub or another source control system to help with version control and collaboration.
- To start the deployment to the production org, run this command:
sf project deploy start --manifest manifest/package.xml.
Navigate CLI and Source Control Limitations
As Vijay scales the Cloud Kicks deployment, he must carefully manage these known CLI limitations.
-
New file generation: Even if the same underlying component (such as the same data stream, calculated insight, or segment) is added to multiple data kits and retrieved multiple times, inconsistent naming leads to the generation of entirely new XML files each time.
-
Inability to track changes: Because a new file is created each time, developers cannot easily track changes to a single component over time. Instead of seeing a clean
diffon an existing file, the system creates a new one, making standard commands likegit diff,git blame, orgit mergeineffective.
-
Merge conflicts and redundancy: When multiple developers work on the same components, or when a developer creates multiple data kits, the proliferation of inconsistently named files creates severe merge challenges and clutters the repository.
-
Template name collisions: If the same calculated insight is added to more than one data kit, the generated template names might collide (appearing as CI, CI1, CI2), further complicating identification and management.
-
Merge failures: If multiple developers create a data kit with the same name in their separate sandboxes and merge their changes, the publishing sequence does not merge. Furthermore, the components within the data kit fail to merge successfully because of conflicting references to multiple templates for the same component.
Troubleshoot Deployment Errors
An architect’s job is never done. Monitoring and troubleshooting are important skills for ensuring a smooth deployment. Here are some silent failures that the Cloud Kicks team could run into, and how to fix them.
Error |
Root Cause |
Fix |
|---|---|---|
Incompatible Mapping |
DMO field types differ between orgs. |
Align field types in the source org and re-bundle the data kit. |
Missing Data Space |
The data kit refers to a data space that wasn't created. |
Manually create the data space in the target org and re-deploy. |
Null Results |
Identity resolution hasn't run yet. |
Manually trigger a run in the Identity Resolution tab. |
Complete the Post-Deployment Checklist
The metadata has arrived in production! But Vijay's job isn't done. He must follow a strict post-deployment workflow to ensure the data begins flowing correctly.
-
View the deployment history: Before checking any data, verify that the deployment successfully processed. Go to Data Cloud Setup, select Data Kits, and open your deployed kit. Check the Deployment History tab to ensure all components are successfully published in sequence.
-
Manage data stream deployment behavior: Deployed data streams arrive in a "draft" state and must be activated to process real data. However, the activation steps change based on the source system.
-
CRM data streams: During deployment, the CRM connector deploys, but the associated data streams might fail to install if the connection isn't immediately active. If your CRM data streams fail, you must first manually activate the connector in the target org, and then deploy the data kit again. Only after this second deployment do the associated data streams successfully deploy.
-
Non-CRM data streams: For external sources (like Amazon S3), both the connectors and data streams successfully deploy, but they arrive inactive. If your non-CRM data streams fail, you simply need to navigate to the connector and click activate. No redeployment is necessary.
-
Start ingestion: Once your connectors are active, navigate to the Data Streams tab, select your deployed streams, and click Start Ingestion.
Perform an Identity Resolution Audit
After a deployment, newly ingested data streams flow into your environment. However, the system does not automatically run the identity resolution process on this fresh metadata. Because unified profiles are considered operational data, they must be built from scratch in the new environment.
Jamal's identity resolution audit is a crucial checkpoint.
- Navigate to the Identity Resolution tab in Data Cloud Setup.
- Click Run Ruleset to apply the newly deployed matching and reconciliation rules.
- Monitor the Metrics section. Confirm that the number of input records processed and the resulting unified profiles are within expected tolerances.
Validate the Pipeline
The final step is to perform end-to-end validation. Jamal uses a small set of test profiles with known attributes to serve as validation checks for the loyalty program.
- Go to the Data Profile tab and search for a known profile, such as the test customer, "Cody the Bear."
-
Verify data mapping: Check that core fields, like email address or loyalty ID, are accurately populated from the source data stream.
-
Verify identity resolution: Confirm that "Cody the Bear" has been correctly unified, showing all related data records under a single profile.
-
Confirm calculated insights: Check the Calculated Insights section of the profile. For the hyper-personalized loyalty program, Jamal verifies that "Cody the Bear" correctly shows a "Gold Tier" loyalty status based on the test data.
If the validation profiles pass these checks, your deployment is successful.
Summary
With the successful deployment and validation of their new configurations, Cloud Kicks can now launch its real-time style recommendations. By adopting DevOps data kits, sandbox synchronization, and multi-tool deployments, Jamal and Vijay avoided production downtime and ensured every customer gets exactly the right recommendation at the right time. Data 360 sandboxes can do the same for you!