Create and Monitor an On-Demand Sandbox
Learning Objectives
After completing this unit, you’ll be able to:
- Authorize the Sandbox API to issue calls.
- Create a sandbox with specific resource profiles.
- Configure an operation scheduler to automate uptime.
- Monitor the status of your sandbox instances.
- Run lifecycle operations including Start, Stop, Reset, and Restart.
Take Control of Your Environment with the Commerce for B2C Sandbox API
The Commerce for B2C Sandbox API is a powerful way to develop and test Agentforce Commerce for B2C solutions in a controlled environment. You use the API to create, manage, and configure and interact with sandbox instances programmatically. The API helps you test integrations, customizations, and new features without affecting your live production systems. Use the Commerce for B2C Sandbox API for direct interaction, automation, continuous integration (CI) and continuous delivery (CD) processes, and precise resource management.
Access and Authorize the API
Before you can issue commands, you establish a secure connection by authorizing your access.
- Go to B2C Commerce Developer Sandbox REST API.
- Click Authorize to initiate the login process.
- Enter the API Client ID configured in Account Manager.
- Click Authorize and then Close to dismiss the window.
After you authorize your connection, you can issue calls directly from the interface.
Create an On-Demand Sandbox
Use the POST/sandboxes method to create an on-demand sandbox to these specifications:
-
emails: email@salesforce.com
-
TTL: 0
-
autoScheduled: True
-
Tags: environment development, team engineering, project ecommerceProj
-
Start and Stop Scheduler: Weekdays Mon - Fri
-
Start time: 08:00:00+03:00
-
Stop time: 19:00:00Z
-
analyticesEnabled: false
-
Resource profile: Medium
-
Settings OCAPI: Specify resources for products and categories respectively.
-
Settings webdav: Specify directory paths for cartridges and impex.
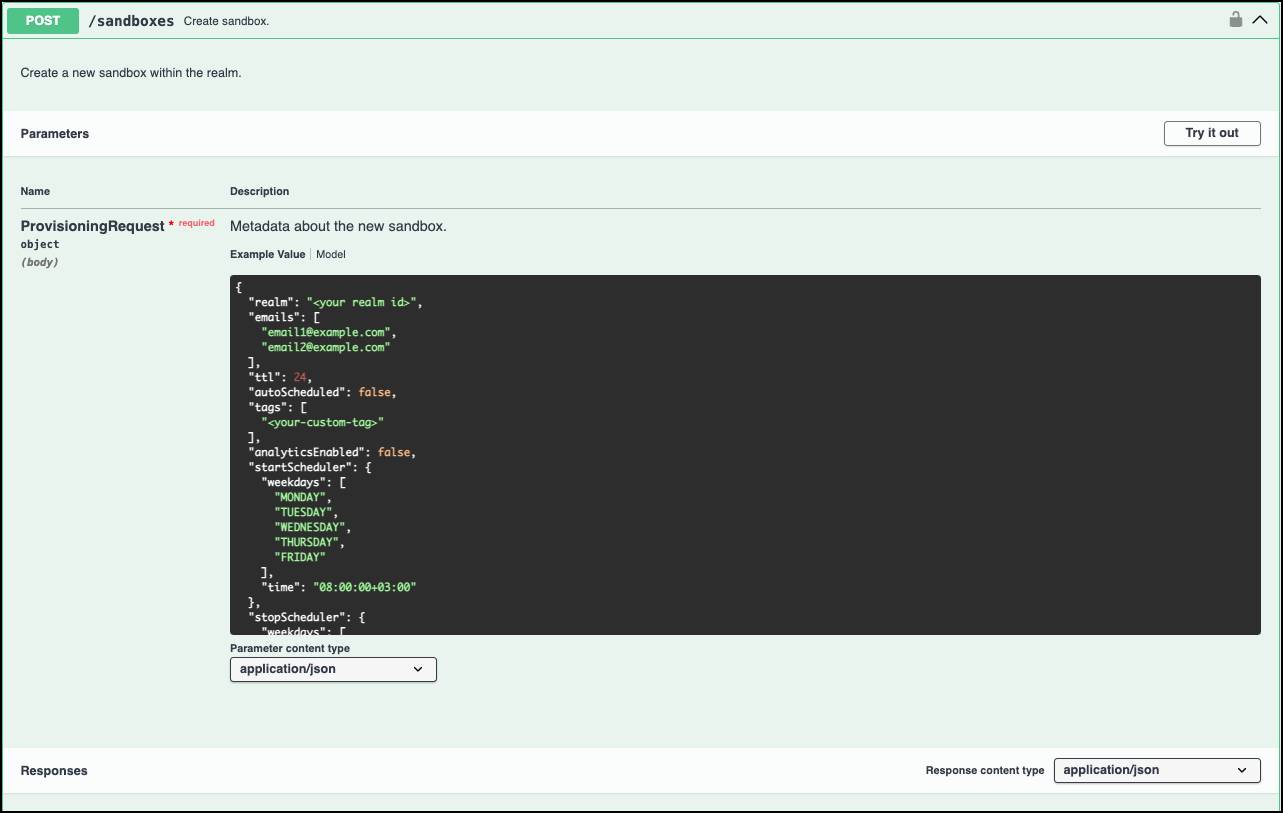
Here’s how you create an on-demand sandbox with thePOST/sandboxes method.
- From the Commerce for B2C Developer Sandbox REST API, locate and expand the
POST/Sandboxmethod.
- Expand the
POST/sandboxesmethod in the Sandboxes section.
- Complete the request body as per the sandbox specifications. Some properties are optional.
Property |
Value Type |
Description |
Sample Value |
|---|---|---|---|
Realm |
string |
The |
"abcd1234" |
Emails |
string |
||
Time to Live (TTL) |
integer |
Time to live ( |
"ttl": 160 |
autoScheduled |
boolean |
The |
"autoScheduled": true |
tags |
object (key-value pair) where:
|
The |
{
 "tags": {
   "environment": "development",
   "team": "engineering",
   "project": "ecommerceProj"
 }
} |
analyticsEnabled |
boolean |
The |
{
"analyticsEnabled": true
} |
|
startScheduler
|
object array of strings string |
The
|
"startScheduler": {
    "weekdays": [
      "MONDAY",
      "TUESDAY",
     "WEDNESDAY",
      "THURSDAY",
      "FRIDAY"
    ],
    "time": "08:00:00+03:00"
}, |
|
stopScheduler
|
object array of strings string |
The Specifies the days of the week when the scheduler stops. Indicates the time of day when the scheduler stops. The format includes the time and time zone offset. For example, 19:00:00Z. |
"stopScheduler": {
    "weekdays": [
      "MONDAY",
      "TUESDAY",
     "WEDNESDAY",
      "THURSDAY",
      "FRIDAY"
    ],
    "time": "19:00:00Z"
}, |
resourceProfile |
string |
The resourceProfile property sets the allocated resources (CPU, memory) for the sandbox. Select a profile that matches your development or testing requirements.
|
medium |
|
Settings
|
object array of objects string array of objects string array of strings string string array of objects string array of objects string array of strings |
Configuration settings for the sandbox environment, including ocapi and webdav configurations. This structure ensures secure and controlled access to resources and directories within the Commerce for B2C sandbox environment. Defines the Open Commerce API (OCAPI) settings, including client access and resource permissions. Represents the client identifier used to authenticate API requests. Specifies the resources accessible via OCAPI and their associated permissions.
Identifies the resource path. The value
Lists the HTTP methods available for the resource. Possible values include
Specifies the attributes that can be read. The value Specifies the attributes that can be written. An empty string indicates that no attributes are writable.
Defines WebDAV settings for file operations, such as managing cartridges, and importing and exporting files. Represents the client identifier used to authenticate WebDAV requests. Specifies the directories and operations that are accessible via WebDAV.
Indicates the directory path. Examples include Lists the operations permitted on the specified path. Possible values include |
json
{
"settings": {
"ocapi": [
{
"client_id": "sample-client-id-12345",
"resources": [
{
"resource_id": "/s/-/dw/data/v20_10/products",
"methods": [
"get",
"post",
"put",
"patch",
"delete"
],
"read_attributes": "(**)",
"write_attributes": "(**)"
},
{
"resource_id": "/s/-/dw/data/v20_10/categories",
"methods": [
"get",
"post",
"put",
"patch",
"delete"
],
"read_attributes": "(**)",
"write_attributes": "(**)"
}
]
}
]
}
}
{
 "settings": {
   "webdav": [
     {
       "client_id": "sample-client-id-12345",
       "permissions": [
         {
           "path": "/cartridges",
           "operations": [
             "read_write"
           ]
         },
         {
           "path": "/impex",
           "operations": [
             "read_write"
           ]
         }
       ]
     }
   ]
 }
} |

- Click Execute to create the instance.
Manage an On-Demand Sandbox
To effectively manage a Commerce for B2C on-demand sandbox (ODS), you need to perform several key operations to ensure efficient development and testing environments, efficient use of credits, and accurate troubleshooting.
Check the Status of a Sandbox
You can check the status of a sandbox by using the GET/sandboxes/{sandboxId}method, which returns the current state (started, stopped, or upgrading). You use this verification to avoid wasting time trying to access a loading system after a sandbox creation or restart.
For start, stop, reset, and restart operations, use the POST/sandboxes/{sandboxId}/operationsmethod.
-
Stop: Pauses work and conserves credits without deleting the instance.
-
Start: Starts work and resumes consuming credits.
-
Reset: Clears the database (DBINIT) for a fresh test dataset or data recovery.
-
Restart: Reboots the instance and resolves stuck processes or applies configuration changes.
You define the action in the request body. After you perform any of these actions, always check the sandbox status to confirm the state change.

Delete an On-Demand Sandbox
To lower cost and keep your realm organized, delete obsolete sandbox environments, like those that remain after a feature branch merge or a completed testing cycle, by using the DELETE/sandboxes/{sandboxId} API method. This action permanently removes the sandbox, stops credit consumption, and deletes all associated data. If you frequently need the same sandbox setup, consider automating the creation and data import process with APIs so you can quickly recreate the environment after deletion.

Check On-Demand Sandbox Credits
Project managers and admins monitor resource consumption to ensure budget compliance. Tracking credit usage helps you identify high-consumption sandboxes or unexpected spikes in realm activity over specific periods.
You can verify usage at the realm level by using the GET/realm/{realm}/usagemethod, where you specify the realm ID and the begin and end date for the report.

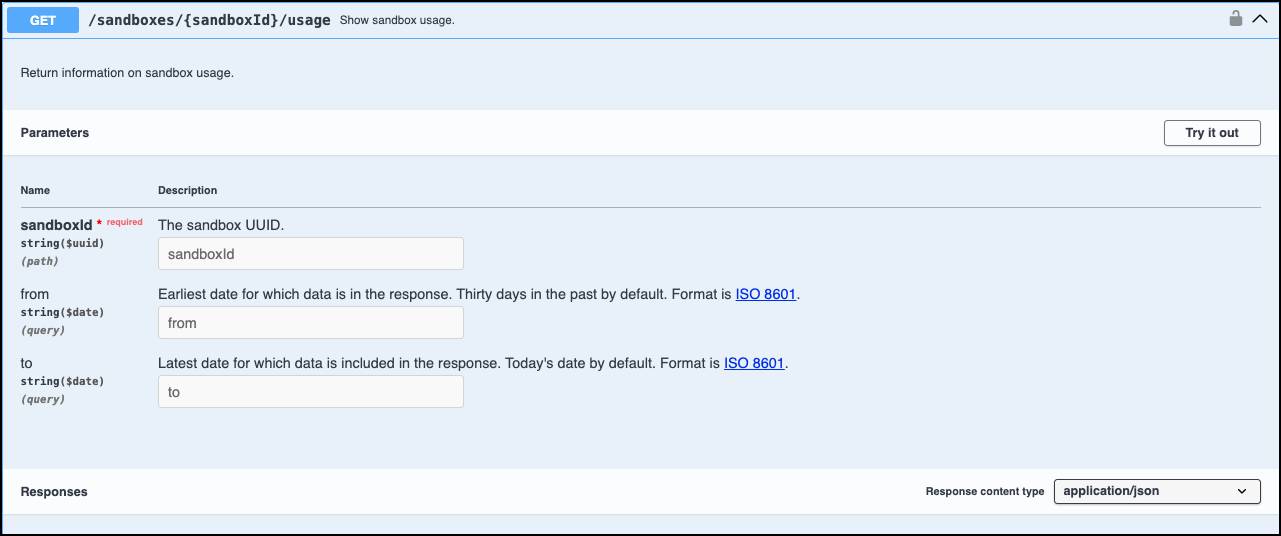
Alternatively, to isolate consumption for a single instance, use the GET/sandboxes/{sandboxId}/usagemethod, providing the sandbox ID and the begin and end date.
Access On-Demand Sandbox Logs Directly Through Control Center
To diagnose performance issues or code failures quickly, access ODS logs directly through Control Center. With Control Center, you can filter and search server events without needing separate URLs or login credentials for each sandbox.
Don’t Forget Storefront Code and Data
A new ODS doesn't contain storefront data. You can’t directly migrate code and data from a POD-based sandbox to an ODS. You can export data and code from a POD sandbox and then use the ODS API to import the data and code into an ODS.