在 Salesforce 中配置 Slack 智能体
学习目标
完成本单元后,您将能够:
- 向智能体添加 Slack 操作。
- 添加 Slack 操作指令。
- 在 Salesforce 中激活智能体。
- 将 Salesforce 中的智能体连接到 Slack。

使用 Slack 操作配置智能体
让我们跟着 Sofia,学习如何配置 Agentforce 与 Slack 操作,以便将智能体部署到 Slack。您需要按照本单元的步骤操作,才能顺利通过最后的挑战。
Sofia 是一位 Salesforce 和 Slack 管理员,她管理着 Agentforce 的产品专家智能体。她希望将这个现有智能体整合到 Slack 中。在 Sofia 所在的组织,许多员工需要产品更新,并会提出各种问题以完成工作。Slack 频道中有很多有用的产品信息,但有时会存在多个频道,或者消息容易丢失,导致员工难以快速找到所需的答案。

Sofia 已经看过产品专家智能体在 Slack 中与用户互动的示例。当她进入 Agentforce 生成器配置智能体操作时,她会使用此示例为模板,来定义智能体在 Slack 中的各项功能。

在这个示例中,产品专家智能体在一个问题中被提及,并在所有频道成员都能获益的消息列中提供即时响应。智能体在 Slack 中创建了新的画布,并将此信息添加进去以供将来参考。
启动您的 Agentforce 组织
在将 Agentforce 组织连接到 Slack项目中,您已配置了专属的 Agentforce Developer Edition 组织并将其与 Slack 集成。现在,Sofia 需要利用 Slack 操作启用该组织中的产品专家智能体。
- 向下滚动至实践挑战,打开您的专属 Agentforce 组织。
- 在 Choose your hands-on org(选择您的实践组织)下,确保已选择您在 Connect Your Agentforce Org with Slack(将 Agentforce 组织连接到 Slack)中创建的专属的 Agentforce Developer Edition 组织。
- 然后,单击 Launch(启动)。
添加 Slack 操作并测试您的智能体
这是 Sofia 在 Agentforce 生成器中为产品专家智能体添加 Slack 操作的绝佳机会。我们来看她是如何操作的。
- 单击
 并单击 Setup(设置)。“设置”页面在新选项卡中打开。
- 在 Quick Find(快速查找)框中,搜索并选择 Agentforce Agents(Agentforce 智能体)。
- 单击智能体名称 TH Product Specialist(TH 产品专家)。
- 单击 Open in Builder(在生成器中打开)。
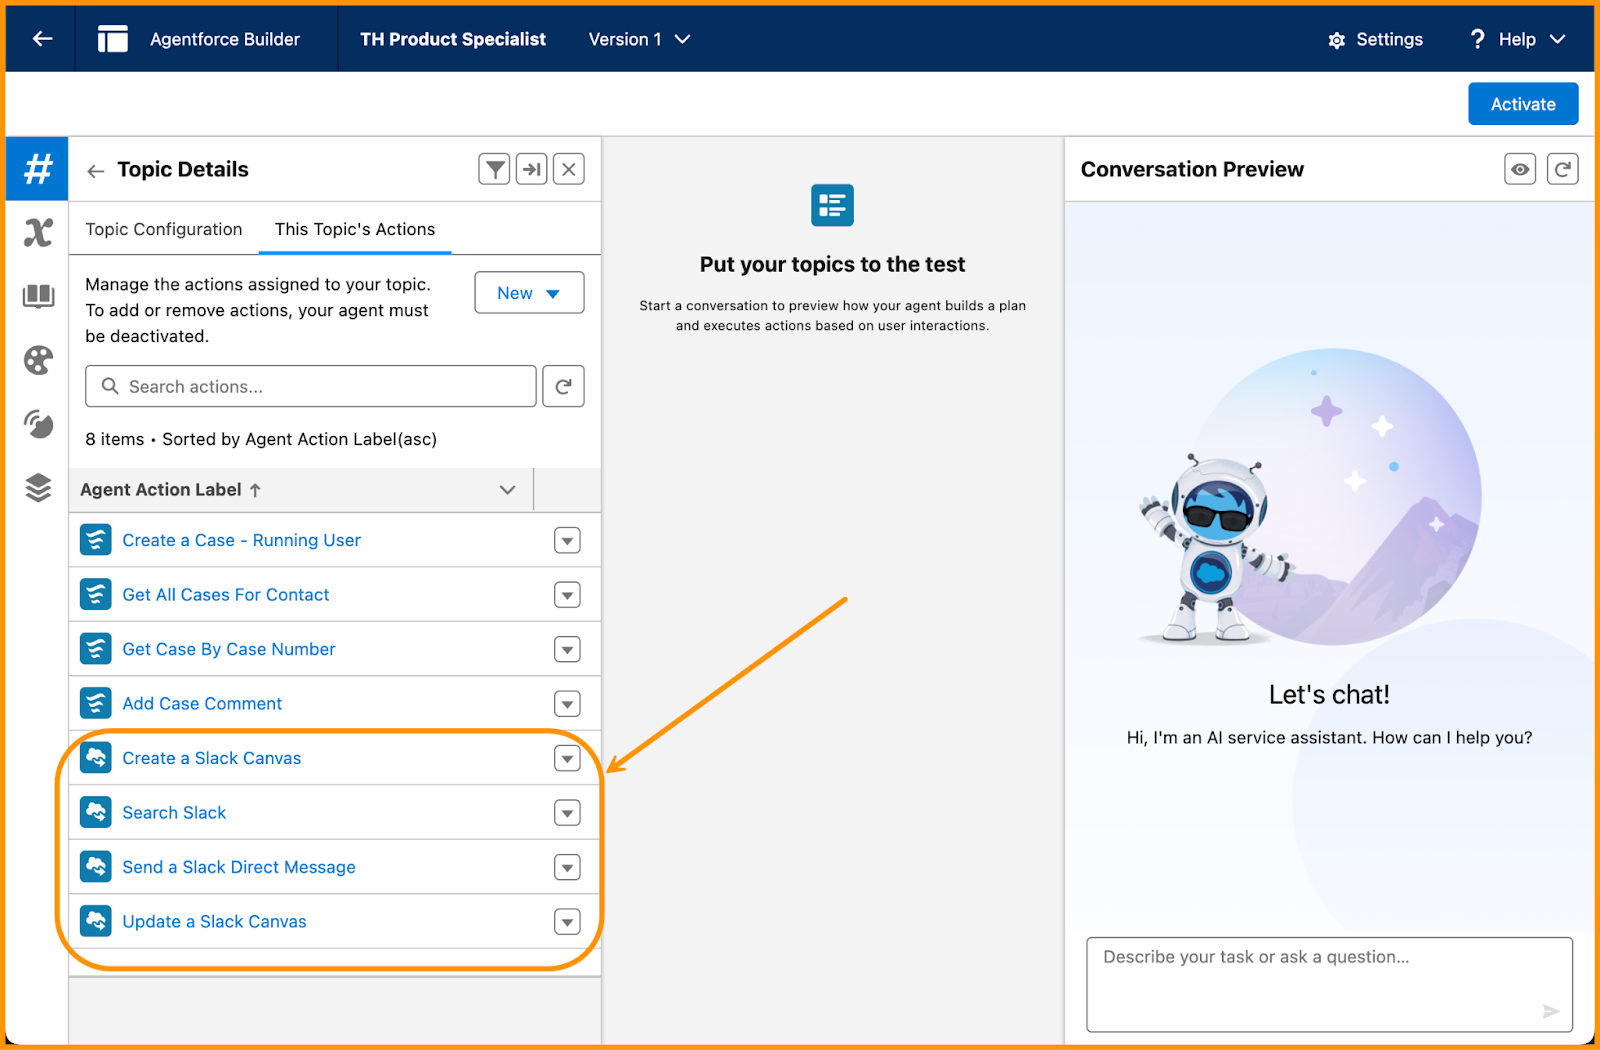
- 单击 Product Gaps(产品缺口)主题。

- 单击 Topic Details(主题详细信息)下的 This Topic's Actions(该主题的操作)子选项卡。
- 单击新建。
- 单击 Add from Asset Library(从资产库添加)。
- 搜索并选择几个 Slack 操作,使 TH Product Specialist(TH 产品专家)能够在 Slack 中搜索公共内容和创建画布。
-
创建 Slack 画布
-
更新 Slack 画布
-
搜索 Slack
-
发送 Slack 私信
-
创建 Slack 画布
- 单击完成。
虽然 TH Product Specialist(TH 产品专家)智能体现在可以执行 Slack 操作,但目前还没有相应的上下文。Sofia 需要为智能体设置这些操作的适用场景。这可以通过 Topic Configuration(主题配置)子选项卡下的指令完成。让我们现在转到该位置。
添加 Slack 操作指令
Sofia 使用智能体主题指令和智能体操作指令来创建边界、设置上下文并定义智能体行为。每个智能体都有自己的一套指令和设置来决定其运行方式。在所有个案中,AI 智能体都遵循 Salesforce 的标准访问控制,例如许可证、权限、字段级安全性和共享设置,从而确保安全运行。
- 在 TH Product Specialist(TH 产品专家)的 Agentforce Builder(Agentforce 生成器)中,单击 Product Gaps(产品缺口)主题。
- 在 Topic Details(主题详细信息)中,单击 Topic Configuration(主题配置)子选项卡。
- 向下滚动到主题指令的末尾,然后单击 Add Instructions(添加指令)。
- 请将以下信息作为新指令输入:
-
If the user requests to add the product gap details to a canvas, then create a canvas in Slack.(如果用户要求将产品缺口详细信息添加到画布中,那就在 Slack 中创建画布。)
-
- 再次单击 Add Instructions(添加指令)。
-
Always ask for a title when a user asks you to create a canvas.(用户要求您创建画布时,务必询问其标题。)
-
- 单击保存。
测试代理
使用 Agentforce Builder(Agentforce 生成器)中的 Conversation Preview(对话预览),您可以输入真实的提示并检查智能体的输出。在激活和部署之前进行测试至关重要,这能确保智能体功能正常可靠。通过识别和修复问题、删除重复项以及优化智能体组件,您可以提升其性能和用户体验。此过程还有助于建立信任,并确保智能体准确、公正且安全。
- 在 Conversation Preview(对话预览)面板中,单击
 以刷新智能体,使其可以访问新指令和 Slack 操作。
- 指导智能体创建产品缺口个案。记住,对于您希望智能体执行的任务来说,提供清晰详细的指令最有效。您可以复制以下示例之一来开始对话:
-
Log a product gap for the Trailhead Escape Room badge. Bring it back!(记录一下 Trailhead Escape Room 徽章所存在的产品缺口。并返回记录!) -
Product gap for a new business unit. We’re expanding!(新业务部门的产品缺口。我们正在扩张!) -
I want to automate the bookings process. Please log a gap.(我想将预订流程自动化。请记录缺口。)
-

测试进行得很顺利。但当 Sofia 要求智能体创建画布时,出现了错误。这是意料之中的,因为她是在自己的 Salesforce 组织中进行测试。这项操作需要在 Slack 中完成。
激活智能体
智能体激活后,无论用户在哪里共享,即可立即访问该智能体。要修改 Live Agent(例如,添加或删除主题或操作),您需要先将其停用。这样可以确保更新不会中断智能体的现有功能。完成必要的更改后,您可以重新激活智能体以应用新的设置。
- 从 Agentforce Builder(Agentforce 生成器)中,单击 Activate(激活)。Agentforce Builder(Agentforce 生成器)会查看您的智能体配置,并提醒您 Product Gaps(产品缺口)主题与默认主题之间的相似之处,以及缺少 Data 360 集成。这没问题。最佳实践是查看激活检查列表并遵循智能体配置最佳实践。但为了获得此徽章,我们将跳过此步骤。
- 请单击 Ignore & Activate(忽略并激活)。
- 单击返回箭头退出生成器,返回 Setup(设置)。
将您的智能体连接到 Slack
Sofia 的智能体配置好产品专家用例所需的所有主题、操作和护栏后,她会在 Salesforce 中为智能体建立与 Slack 的连接。请注意,我们不会在挑战中查看此步骤,但这是成功将智能体部署到 Slack 并获得徽章的关键步骤。
- 单击智能体 TH Product Specialist(TH 产品专家)。
- 单击 Connections(连接)子选项卡。
- 向下滚动到 Connections(连接)部分,然后单击 Add(添加)。
- 在模式中,按如下方式配置 Connections(连接):
- Connections(连接):API
- Integration Name(集成名称):
SlackProductSpecialistAgent - Connected App(连接的应用程序):Slack
- Connections(连接):API

- 单击保存。
通过保存连接,Sofia 可以让智能体在关联的 Slack 组织中安装。Sofia 恰好是她所在组织的 Slack 管理员。如果您不是 Slack 管理员,请寻求他们的帮助来完成下一单元。