Build Your Storyboard
Learning Objectives
After completing this unit, you’ll be able to:
- Explain the purpose of storyboarding.
- Outline the storyboarding process.
Storyboard Like a Pro
You spend hour after hour creating the perfect story for your audience. So it’s only natural you want your demos to go off without a hitch. One way to make sure this happens is to create a storyboard.
A storyboard is a visual representation of your demo story. The goal of storyboarding is to transform your story idea into a screen-by-screen, click-by-click presentation. You don't use it as an end design for your customer. Instead, you and your teams use it as a template to begin creating your demo.
Now, are you asking yourself: “If I already have my story, do I really need to storyboard, as well?” The answer is a resounding “Yes!” Storyboards:
- Identify holes in your narrative.
- Illustrate what is possible on a screen-by-screen basis.
- Show other teams what needs to be built and what it looks like.
- Save time, because building out a demo takes far more time than storyboarding it.
- Tie your story back to your customer’s goals.
Step into Success
Ready to get started? Here are the four steps to build your storyboard.
- Whiteboard each step of your demo story in a linear flow.
- Map out the products, devices, and transitions of each step in your demo.
- Mock up potential screens using Google Slides.
- Build your demo.
An important rule of thumb: Revise your story until it makes sense screen-by-screen, and toss aside what doesn’t work in your storyboard.
Step One: Whiteboard It
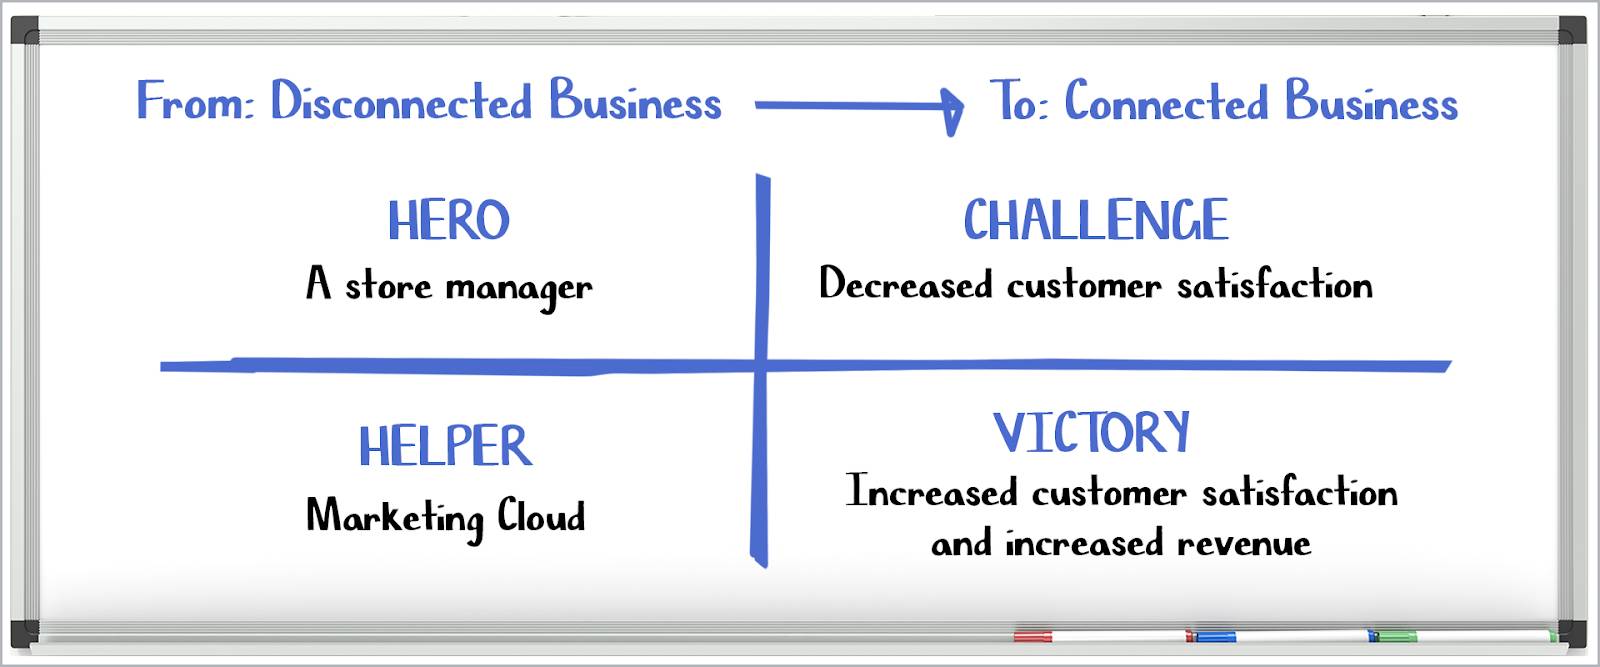
A whiteboard is a fantastic place to begin framing your demo story because it’s easily editable. This is where you align your hero, challenge, helper, and victory along with a timeline.
Think about it. All stories have beginnings and endings, right? Here’s the place to sketch that out in a linear fashion.
Let’s take a look at what this looks like for your upcoming customer demo with Maisie Summers, the local business owner we talked about in Unit 1. Again, we use Salesforce product examples for this section. Please imagine how you would apply these same tools to your products and services.
State your goal at the top. For example: Moving from a disconnected business to a connected one. Draw four quadrants, labeling them Hero, Helper, Challenge, and Victory. Finally, write a short description for each, such as “Hero: a store manager”; “Helper: Marketing Cloud Engagement”; “Challenge: decreased customer satisfaction”; “Victory: increased customer satisfaction and increased revenue.”
Step Two: Map It
Are you using your app on a desktop or on an iPhone? Draw it out on your whiteboard.
Are you transitioning from your app on an iPhone to a desktop view of your app? Write down how you’re going to do that. By seeing each step in front of you, you clearly know where each piece of your story fits and how your transitions flow.
If you’re feeling stuck, try shuffling your products and transitions for a smoother flow.
Here’s an example of how to do this for your demo with Maisie.
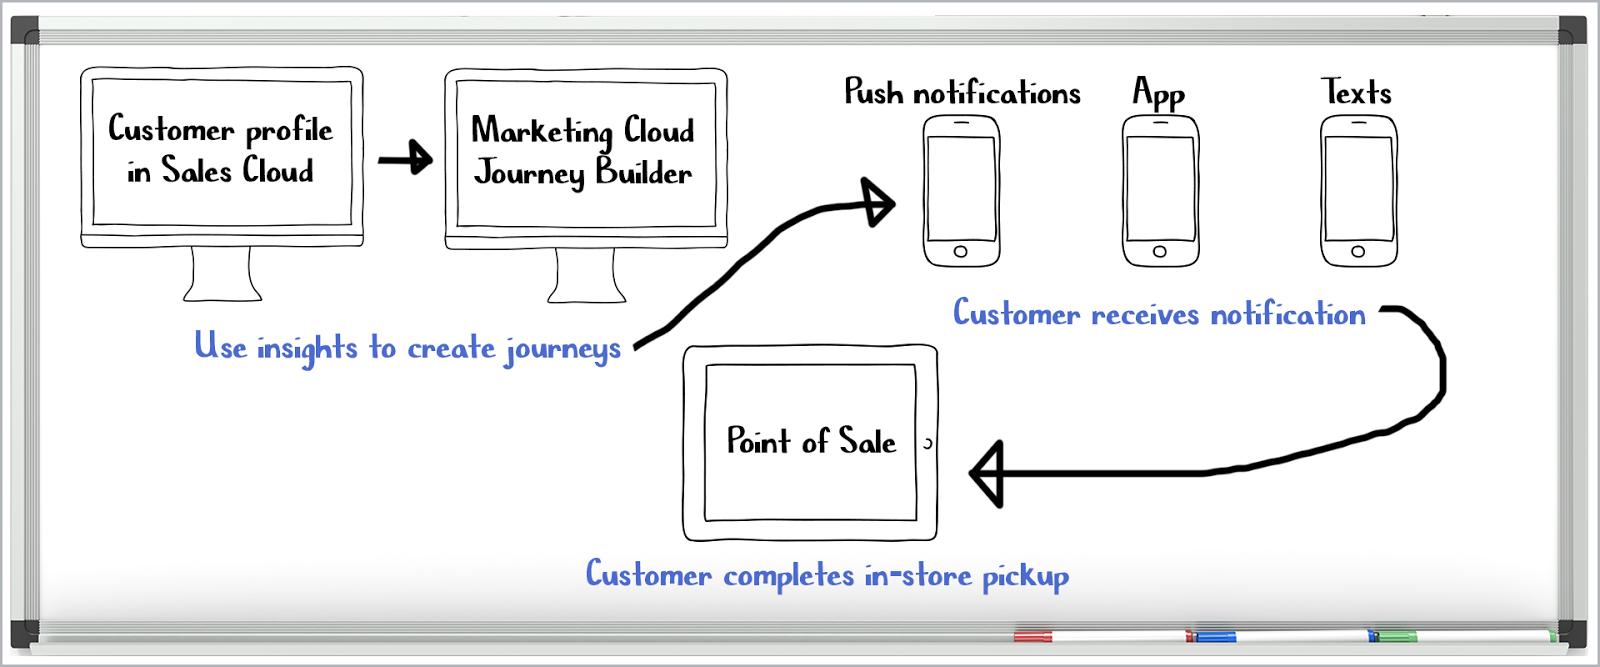
Maisie draws a desktop computer image on the whiteboard with a “customer profile in Sales Cloud” on its screen to indicate what she will show at this step in the demo. Maisie then draws an arrow to the right and another desktop computer image, this time with “Marketing Cloud Engagement Journey Builder” on its screen to indicate the transition to the Marketing Cloud Engagement portion of the demo. These two components are grouped together with the text “use insights to create journeys” to represent the first portion of the demo.
Maisie then draws another arrow up and to the right toward three sketches of an iPhone. On phone screen one is “push notifications,” which indicates what will be shown on it. The second phone screen shows “app,” which indicates that she’ll show the smartphone app here.
Finally, the third phone shows “texts” on the screen to indicate a text interaction. A final arrow points down to the last stage in the demo where a sketch of an iPad is with “point of sale” on the screen. This final step is where the demo ends with the customer completing an in-store pickup successfully.
Once you have your flow and transitions down, get ready to pull all of your ideas together.
Step Three: Slide Your Story into Google Slides
Start planning the look of each of your screens in Google Slides. Your goal isn’t to make each slide perfect—this isn’t a presentation to your customer. Instead, use these slides to see if you’re able to communicate key information to your audience while moving your story forward.
Use plain boxes with text as placeholders until you’re able to update your deck with screenshots. Drop these boxes quickly into Google Slides without spending tons of time taking screenshots or scouring the Internet for the perfect picture.
When creating your slides, have one demo click per page.
Here’s an example of how to do this when mocking up your Journey Builder Interaction Plan for your demo.
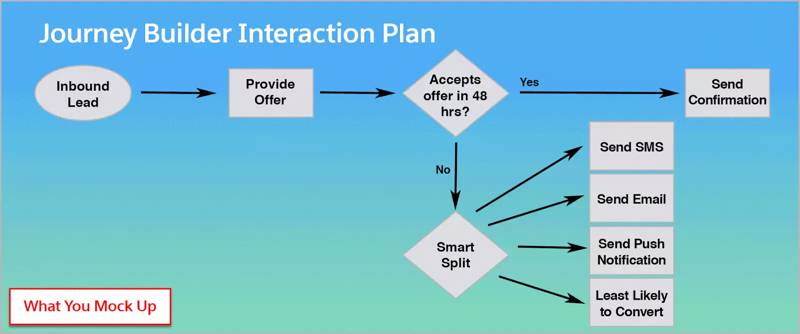
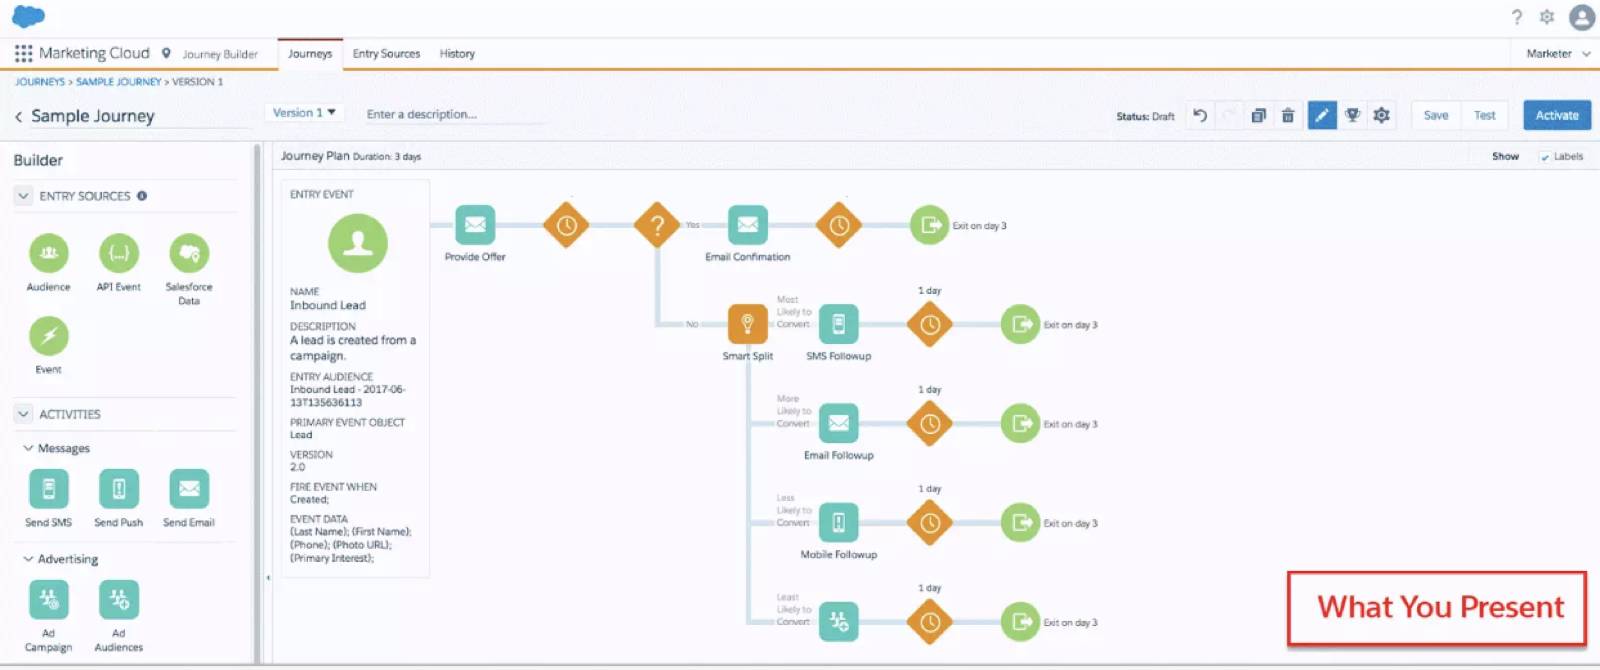
Here we start with a simple mockup of what our Journey Builder Interaction Plan would look like. This is made up of standard grey-filled shapes, like circles, triangles, and squares. In each of these shapes is text describing what the shape represents. For example, “inbound lead” or “offer.” When you’ve finalized what this screen will include in the finished demo, then build a beautiful, pixel-perfect reflection of your mockup.
Step Four: Build with Confidence
Now that your storyboard is locked and ready to go, ask yourself:
- What part of this demo will be the hardest to build?
- What will take the longest to create?
- Do I need to request support from another team to help build this demo?
When you design a storyboard and ask yourself these questions, you set a path for a successful production. So now that all of your prework is done, get out there and build the real thing!