Customize Record Pages

The Rundown
Noah Larkin, AW Computing’s VP of Services, is concerned that his Consulting team uses accounts to capture details of consulting partners, but some of the fields they see aren't applicable to their partner accounts. He would like all sales-related information removed.
Allison Wheeler also contacted you with a request. She's concerned that the new account fields appear together in the top section of account record detail pages. She’d like them organized into different sections to make it easier for her team to find the right information.
You can solve both of these issues using a combination of the Lightning App Builder and page layouts to control the fields, sections, related lists, and buttons that appear when users view or edit a record.
Adjust the Fields on the Page
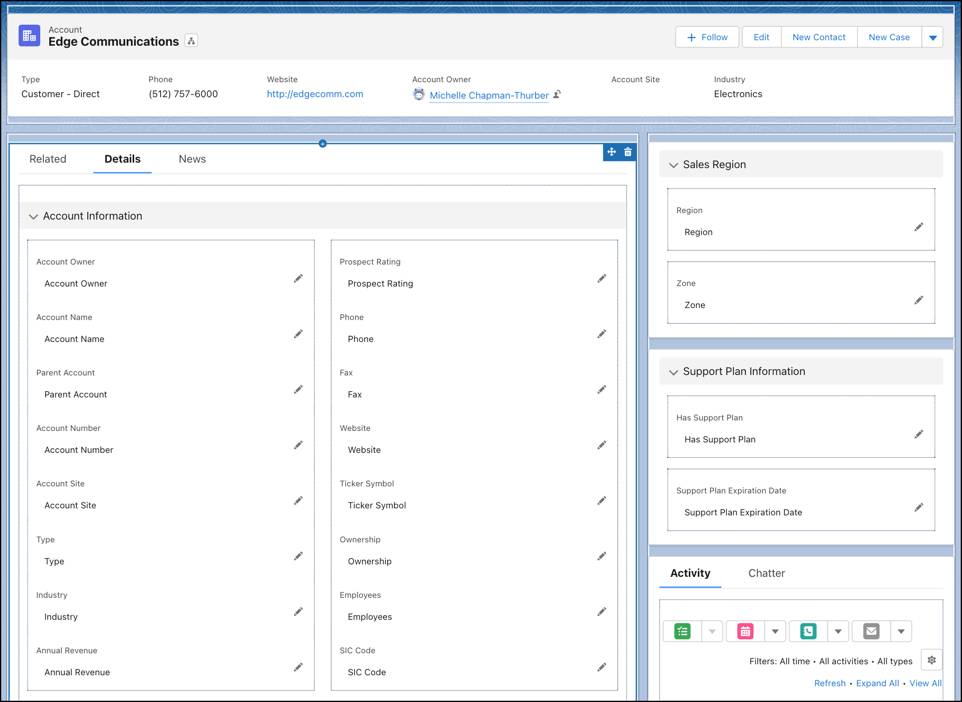
Begin by modifying the default account page to display sales region and support plan information in separate sections.
- From the App Launcher (
 ), find and select Sales, then click the Accounts tab.
- Open the All Accounts list view.
- Select Edge Communications.
- From the Setup menu (
 ), select Edit Page. The page opens in the Lightning App Builder.
- In the page properties, change the Label to
Customer Account Page.
- Change the API Name to
Customer_Account_Page.
- On the canvas, click the Details tab.
- Click the Record Detail component inside the Details tab.
- In the property pane, click Upgrade Now to upgrade the page to use Dynamic Forms.

This will allow you to add, remove, and customize the location of individual fields on the page instead of having to display them in a single block.
- Click Next.
- Select Account Layout, then click Finish.
- Click the Fields tab in the palette.
- Drag a Field Section component onto the canvas and drop it just above the Additional Information section in the Details tab.
- In the property pane, change the Custom Label of the section to
Sales Region.
- Add another Field Section component below the Sales Region section.
- In the property pane, change the Custom Label of the section to
Support Plan Information.
Now arrange the fields.
- From the Account Information section, drag the Region field into the left column of the new Sales Region section.
- From the Account Information section, drag the Zone field into the right column of the new Sales Region section.
- From the Account Information section, drag the Has Support Plan field into the left column of the new Support Plan Information section.
- From the Account Information section, drag the Support Plan Expiration Date field into the right column of the new Support Plan Information section.
Next, make the new sections more visible. They’re kind of buried in the record details.
- Hover over the Sales Region section, click
 and drag the section above the Activity and Chatter tabs in the right hand region of the page.
- Do the same for the Support Plan Information section.
Lastly, make the Prospect Rating field required.
- In the Account Information section, click the Prospect Rating field and select the Required radio button in the property pane.
- Click Save, then Not Yet.
Saving a page for the first time in the Lightning App Builder doesn’t push the customizations out to your users. You have to activate the page for your users to see it. We’ll get to activation shortly, after finishing the customizations.
Customize Related Lists
The Lightning App Builder lets you customize a lot of the pieces of a record page. However, if you want to make a related list available to the page in the Lightning App Builder, or adjust related list columns, you have to do that in the page layout editor.
First, add the Do Not Call column to the Contacts related list.
- Click Back (
 ) in the Lightning App Builder to return to the Edge Communications account record.
- From the Setup menu (
 ), select Edit Object.
- Click Page Layouts, then Account Layout.
- Scroll down to the Contacts related list and click the wrench
 on the gray bar above it.
- From the Available Fields list, select Do Not Call.
- Click Add, then click OK.
Now move the Opportunities related list to the top.
- Find the Opportunities related list.
- Click the gray bar above the related list and drag it above the Contacts related list.
- Click Save, then Yes.
Activate the Customer Account Page
Assign the Customer Account Page to the appropriate record type.
- From Setup, click the Home tab.
- Enter
App Builderin the Quick Find box, then select Lightning App Builder.
- Click Edit next to Customer Account Page.
- Click Activation.
- Click the App, Record Type, and Profile tab.
- Click Assign to Apps, Record Types, and Profiles.
- Assign the page to the Sales app, then click Next.
- Leave the Form Factor assignment set to Desktop and phone, then click Next.
- Select the Customer Account record type, and click Next.
- Select both the Sales User and Support User profiles, and click Next.
- Review the assignments, then click Save.
Create a Partner Account Page
Create a new account page called Partner Account Page by cloning the Customer Account Page.
- Click Back (
 ) in the Lightning App Builder.
- Click Clone next to Customer Account Page.
- In the page properties, change the label to
Partner Account Page.
- Change the API Name to
Partner_Account_Page.
- On the canvas, click the Details tab.
Now, remove the Prospect Rating, Region, Zone, Has Support Plan, and Support Plan Expiration Date fields.
- Hover over the Sales Region section and click
 to delete it.
- Do the same for the Support Plan Information section.
- In the Account Information section, hover over the Prospect Rating field, and click
 to delete it.
- Click Save, then Activate.
- Click the App, Record Type, and Profile tab.
- Click Assign to Apps, Record Types, and Profiles.
- Assign the page to the Sales app, then click Next.
- Leave the Form Factor assignment set to Desktop and phone, then click Next.
- Select the Partner Account record type, and click Next.
- Select both the Sales User and Support User profiles, and click Next.
- Review the assignments, then click Save.
Now that Noah's and Allison’s teams can see what they need to see in their account pages, move on to the next step, where you enable field history tracking.
Resources
- Salesforce Help: Create and Configure Lightning Experience Record Pages
- Salesforce Help: Break Up Your Record Details with Dynamic Forms
- Salesforce Help: Dynamic Forms Tips and Considerations
- Salesforce Help: Required and Read-Only Fields in Dynamic Forms