Submit Your Solution for Security Review
Learning Objectives
After completing this unit, you’ll be able to:
- Explain when your solution needs a security review.
- List the materials you need to submit for a security review.
- Explain how to begin the security review submission process.
- Describe the security review submission process.
Know When You Need a Review
The security review process is critical, but it doesn’t have to be painful. We want to make it comfortable and familiar to you. We want it to be no big deal.
You know that your managed package, Salesforce Platform API solution, or Marketing Cloud Engagement API solution needs to go through a security review before you launch it on AppExchange. But new threats appear every day. So the Salesforce Product Security team can ask for your solution to be reviewed at any time, even after it’s been approved. Typically, AppExchange solutions are reviewed for security once a year.
Here’s the good news: You don’t have to go through a security review every time you release a new version of your solution. You can release new package versions without re-submitting them for security review. Just complete a quick attestation on your solution’s listing in the Partner Console, which appears when you update the package version via Step 4, Link your Solution.

Assemble Your Materials
What you provide to the Product Security team depends on your solution’s architecture. The folks reviewing your solution need everything a new customer needs to use it. After all, they’re masquerading as attackers who have access to a running instance. So provide access to any environments, packages, and external components your solution uses and include any documentation that comes with your solution. Our testers like to see complete customer, admin, and user documentation. When you submit your solution for review, make sure that you provide:
- Usage documentation
- Documentation of data flow between the Salesforce org and the composite site, mobile app, or chrome extension
- A full list of features for the composite component, optional but encouraged
The Product Security team also wants to know that you’ve done your homework. Include the reports you got from the scanners you ran on your solution, along with explanations of any false positives.
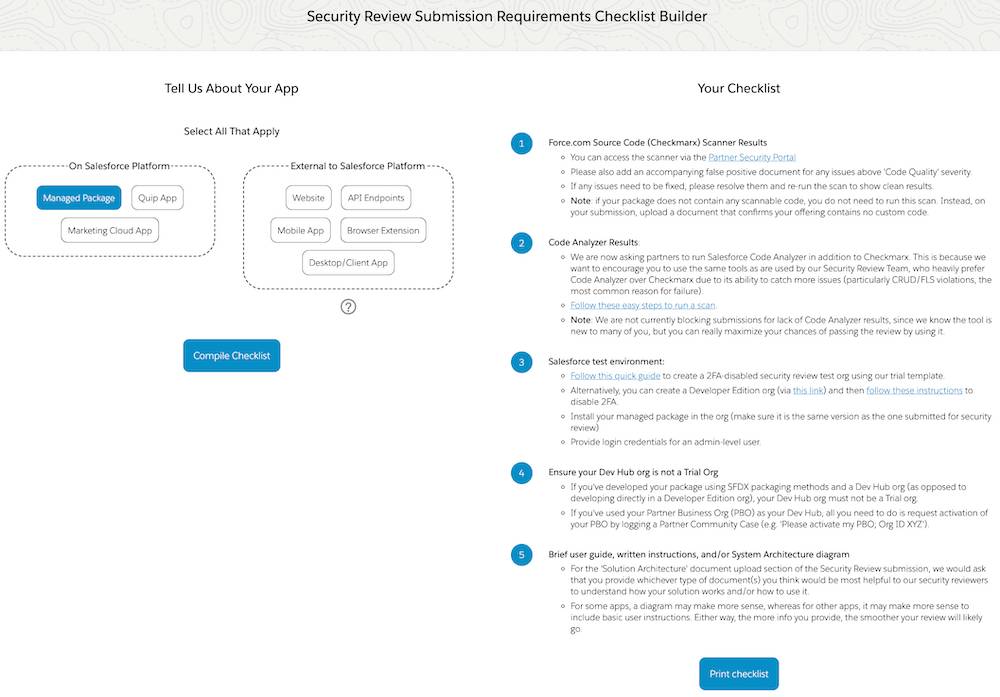
To generate a security review checklist that is customized to your solution, use the Security Review Submission Requirements Checklist Builder. Select the appropriate architecture elements for your solution, such as Lightning component. Then click Compile Checklist to generate a list of security review materials.
You must meet several milestones before you submit your solution for security review. To learn about each one, review our ISV Onboarding Guide.
When you’re ready to get started, follow the instructions in the Publish Your Solution on the AppExchange section of the ISVforce Guide.
Submit Your Materials
The Salesforce Product Security team knows that they’re asking you for a lot. So they created the handy security review interface.
Start the Review
Begin the security review submission process from the Publishing Partner Console. Let's walk through the process for a Lightning-compatible app developed as a 2GP managed package.
- From the Partner Community, click Publishing.
- In the Partner Console, click the Technologies tab.
- On the Solutions tab, click the arrow next to your solution.
![A sample solution in the Technologies section with a highlight on an arrow.]](https://res.cloudinary.com/hy4kyit2a/f_auto,fl_lossy,q_70/learn/modules/isv_security_review/isv_security_review_submit/images/bc072690561a532601de26393e2ec415_1684436157608.png)
4. Click Start Review.
You’re immediately redirected to the AppExchange Security Review Wizard.
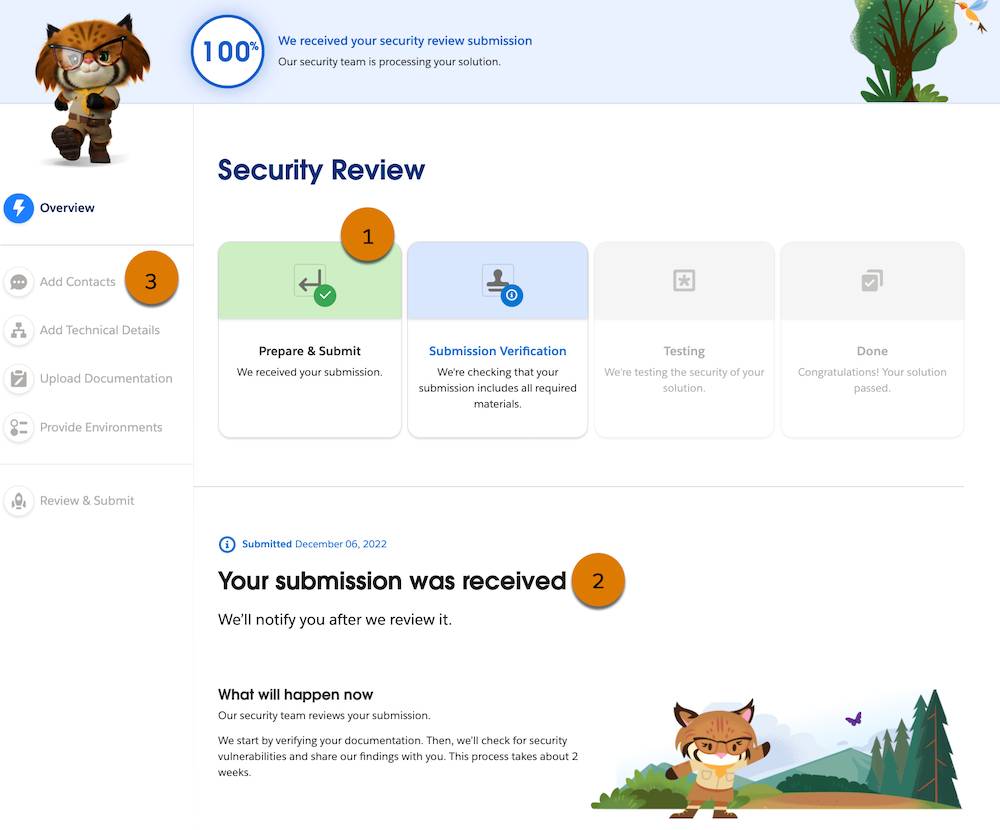
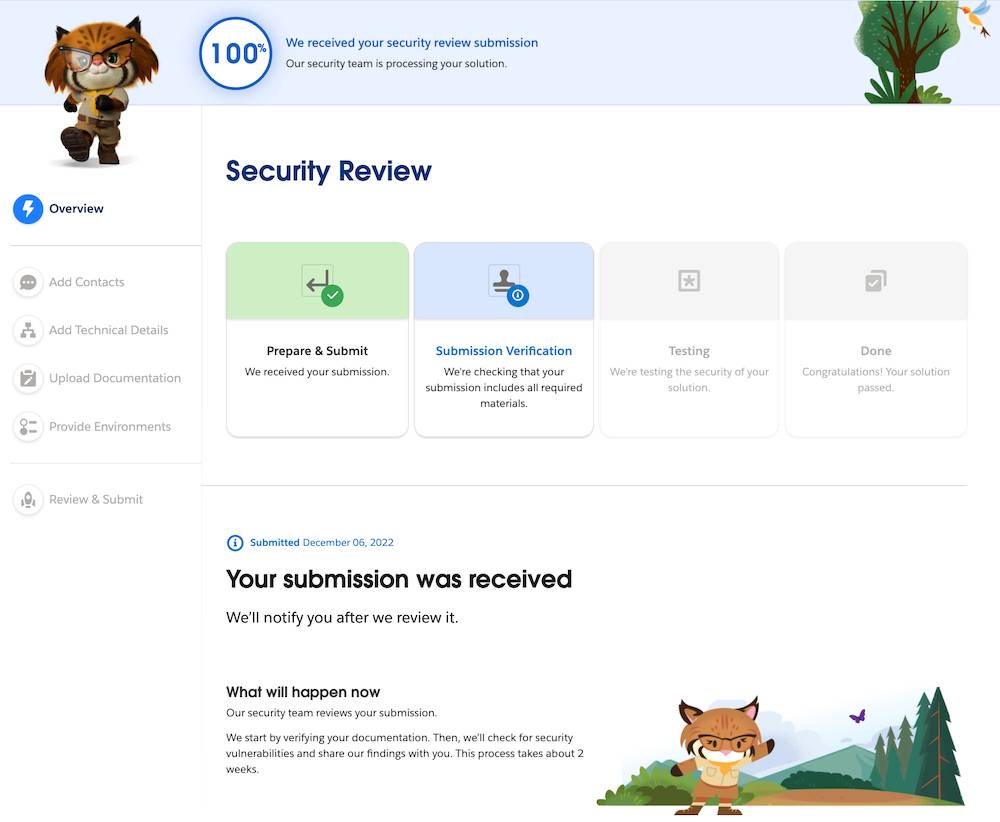
Keep Track of Your Progress
The overview page is the feedback and communication hub for your security reviews. After you submit a solution for review, check here to read the latest updates and to communicate with the Security Operations and Product Security teams.
To get a quick look at a review’s progress, check the status indicator (1). To find recommended next steps, and communicate directly with the review teams, check the feedback section (2).
As you prepare your security review for submission, use the security review steps tracker (3) to quickly see where you are in the process. After you complete a section, it will change from blue to green. You can jump around, but you must complete all sections before submitting.
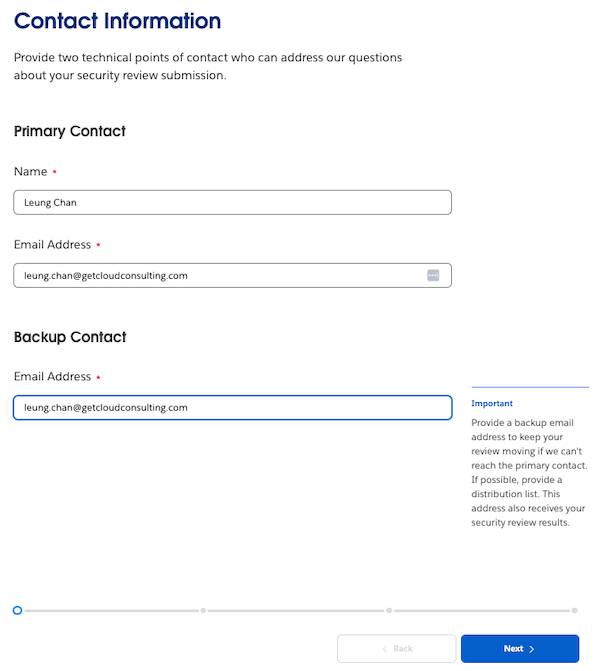
Add Contacts
The first step of the security review submission process is to provide your contact information.
- Provide contact information: a primary contact person who the Salesforce security team can contact with questions and distribution list as a backup contact. These contacts also receive your security review results.
 2. Click Next.
Provide Technical Details
The next Security Review Wizard step is Add Technical Details. Here, describe your solution, provide info about your solution’s technical specifications, and add details if your solution is a mobile app. The questions change depending on your solution type and architecture.
Provide your answers, then click Next.

Include Documentation
Remember when we asked you to assemble your materials earlier in this unit? It’s time to go get those files and reports to complete the next Security Review Wizard step, Upload Documentation. The documents you need vary depending on your solution type and architecture.

- Enter a Title and File to include your solution's architecture and usage documentation.
- Enter a Title and File to documentation for API Callouts, security scanner reports, false positives documentation, and other documentation.
- Click Add + after each piece of documentation that you want to add.
- Click Next.
Provide Environments
The Product Security team must test your app in every environment possible. Follow these steps to provide your solution’s test environments and credentials.
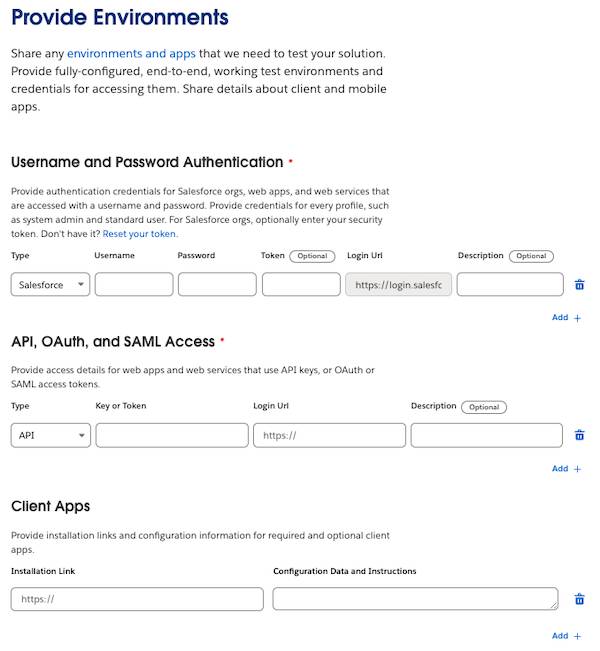
- In Username and Password Authentication, select the appropriate Type from the dropdown list. Then, add details to authenticate into your Salesforce orgs, web apps, and web services that require a username and password. Click Add +. The form verifies authentication by logging into the org.
- In API, OAuth, and SAML Access, select the appropriate Type from the dropdown list. Then provide details for web apps and services that use these methods of authentication. Click Add +.
- For each desktop client your solution includes, enter an installation link, along with any credentials, license files, and configuration data. Click Add + after you’ve finished entering each one.
- For each of your solution's mobile apps, provide the platform, an installation file or link, and any other helpful information. Click Add + after each one.
- Enter any other test environment information.
- Click Next.
Review Your Summary
The Review & Submit section contains a list of notifications that you need to fix before you can submit your solution for review. Address each notification by clicking the Go to link.
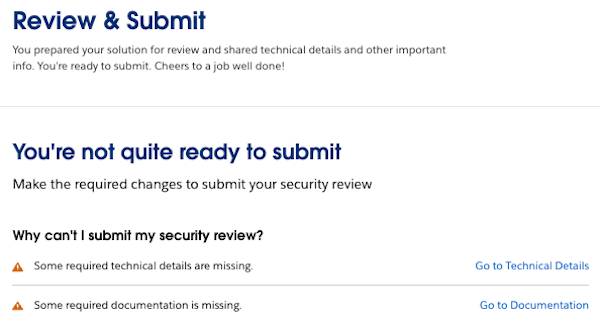
After you’ve resolved each notification, be sure to scroll down and click Save & Next in that Security Review Wizard step.
When you’re ready, return to the Review & Submit step, and click Submit.
Have Your Payment Ready
For every paid solution you sell on AppExchange, we ask for a $999 fee payment for the initial submission and for any subsequent attempts. This can be paid via credit card or via connecting your bank account. If we discover security vulnerabilities in your submission, then you fix and resubmit, that’s another attempt. Most submissions pass on the second attempt. Enter your billing information in the Payment section, then click Submit.
You’re All Set!
Congratulations—you made it! Take a deep breath, do some stretches. If anything is missing from your submission, the security review team contacts you. After everything is in place, you get an email confirming that your solution is in line for a security review.
A solution typically takes 4–5 weeks to get through the review process.
You can always check on the status of your solution’s security review. In the Partner Console in Technologies, click Check Status on your solution version.

Your solution’s security review Overview page opens. You can track your review as it progresses through all the stages.
When the Product Security team finishes, you receive an email to let you know that there's new info available in the Security Review wizard. You can download your report from the Overview page. If they find nothing wrong, they approve your solution. Woo-hoo!
If the team does find issues and you have questions or need specific guidance on a security issue or failure result, get help at our office hours on the Partner Security Portal. Our technical office hours are very popular. A little extra help is likely all that you need to get your solution approved.
What happens next? Continue on to find out.
Resources
- Salesforce Partner Community: Chatter Group for Security Review
- Salesforce Partner Community: Security Portal
- Salesforce Partner Community: ISV Onboarding Guide (login required)
- Salesforce Partner Community: Security Review Overview (login required)
- Salesforce Partner Community: Improve Your AppExchange Listing Performance
- Salesforce Developer Site: ISVforce Guide: Build and Distribute AppExchange Solutions