Control Access to Records
Learning Objectives
- List the four ways to control access to records.
- Describe situations in which to use each of the four record-level security controls.
- Explain how the different record controls interact with each other.
- Set org-wide sharing defaults to control access to records.
Record-Level Security
- Should your users have open access to every record, or just a subset?
- If it’s a subset, what rules should determine whether the user can access them?
For our example Recruiter app, let’s say you create a new profile called Recruiter to give recruiters the object-level permissions they need. You restrict the power to delete recruiting-related objects, so recruiters will never be able to delete these objects. However, granting recruiters permission to create, read, or edit recruiting objects does not necessarily mean recruiters can read or edit every record in the recruiting object. This is a consequence of two important concepts:
- The permissions on a record are always evaluated according to a combination of object-level, field-level, and record-level permissions.
- When object-level permissions conflict with record-level permissions, the most restrictive settings win.
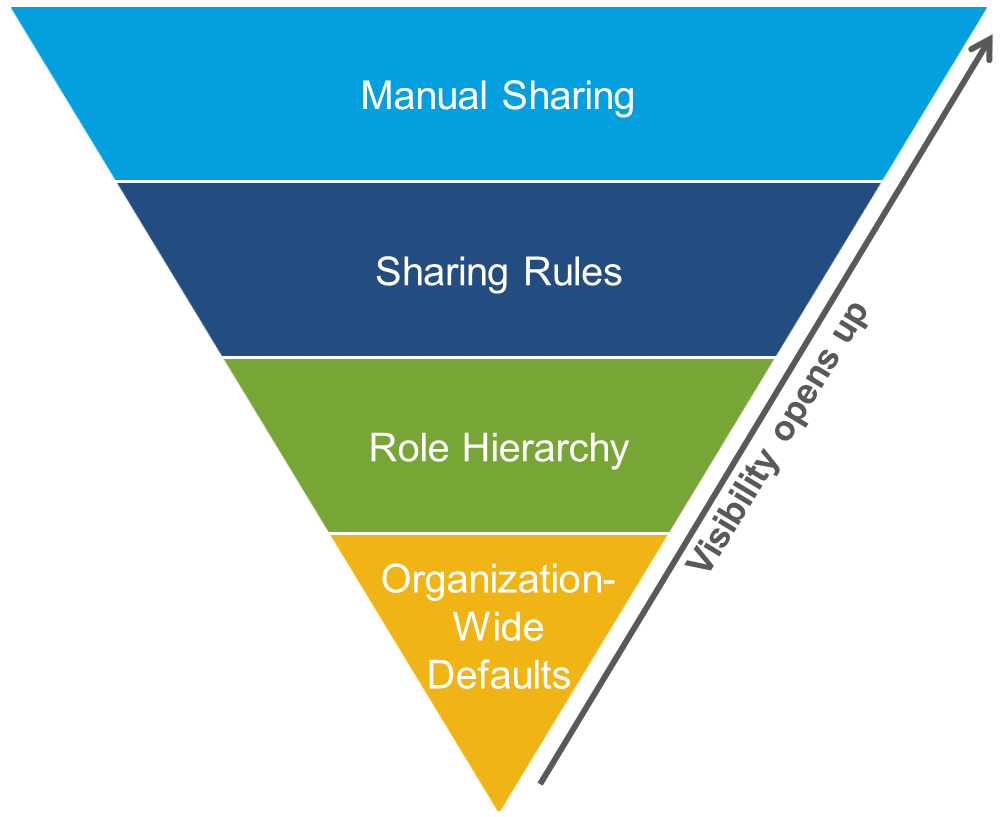
- Org-wide defaults specify the default level of access users have to each other’s records.
- Role hierarchies ensure managers have access to the same records as their subordinates. Each role in the hierarchy represents a level of data access that a user or group of users needs.
- Sharing rules are automatic exceptions to org-wide defaults for particular groups of users, to give them access to records they don’t own or can’t normally see.
- Manual sharing lets record owners give read and edit permissions to users who might not have access to the record any other way.
- A user’s baseline permissions on any object are determined by their profile.
- If the user has any permission sets assigned, these also set the baseline permissions in conjunction with the profile.
- Access to records a user does not own are set first by the org-wide defaults.
- If the org-wide defaults are anything less than Public Read/Write, you can open access back up for certain roles using the role hierarchy.
- You can use sharing rules to expand access to additional groups of users.
- Each record owner can manually share individual records with other users by using the Share button on the record.
You’ve already seen how to configure object-level and field-level access using profiles and permission sets. Now we’ll look at details of the various record-level security controls.
Org-Wide Sharing
- Who is the most restricted user of this object?
- Is there ever going to be an instance of this object that this user shouldn't be allowed to see?
- Is there ever going to be an instance of this object that this user shouldn't be allowed to edit?

Based on your answers, you can set the sharing model for that object to one of these settings.
PrivateOnly the record owner, and users above that role in the hierarchy, can view, edit, and report on those records.
Public Read Only
All users can view and report on records, but only the owner, and users above that role in the hierarchy, can edit them.
Public Read/Write
All users can view, edit, and report on all records.
Controlled by Parent
A user can view, edit, or delete a record if she can perform that same action on the object it belongs to.
When the org-wide sharing setting for an object is Private or Public Read Only, an admin can grant users additional access to records by setting up a role hierarchy or defining sharing rules. Sharing rules can only be used to grant additional access. They cannot be used to restrict access to records beyond what was originally specified with the org-wide sharing defaults.
As an example, let’s go through and answer the above list of questions for the Position object in the Recruiting app.
Who is the most restricted user of this object?A member of the Standard Employee profile. All that they're allowed to do is view a position.
Is there ever going to be an instance of this object that this user shouldn't be allowed to see?
No. Although the values for the minimum and maximum pay fields are hidden from standard employees, they're still allowed to view all position records.
Is there ever going to be an instance of this object that this user shouldn't be allowed to edit?
Yes. Standard employees aren’t allowed to edit any position record.
Since we answered “Yes” to the third question, the sharing model for the Position object should be set to Public Read Only. By repeating the same exercise with the other recruiting objects, you can easily figure out the appropriate org-wide default settings for them. The Standard Employee profile is the most restricted user for each object, and there are going to be candidate, job application, and review records that particular employees won't be able to view. Consequently, the sharing model for the Candidate, Job Application, and Review objects should all be set to Private.

Set Your Org-Wide Sharing Defaults
- From Setup, in the Quick Find box, enter Sharing Settings, and then select Sharing Settings.
- Click Edit in the Organization-Wide Defaults area.
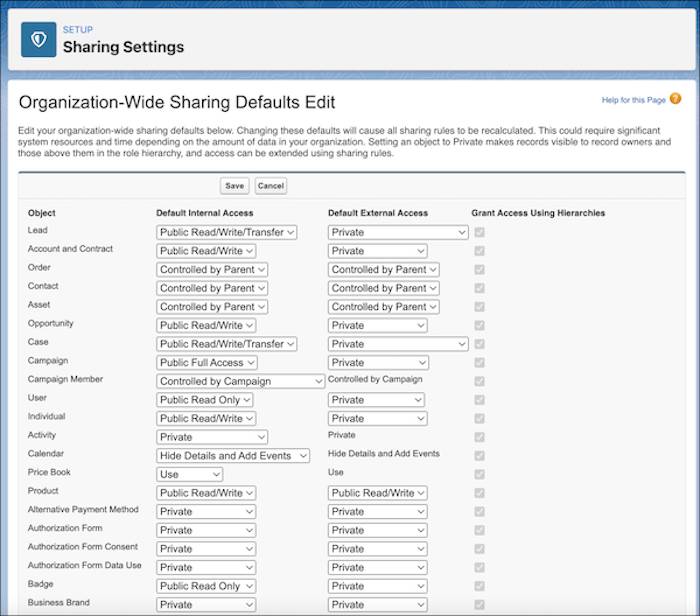 Note that some standard objects use different org-wide default options. Custom object org-wide default options include Private, Public Read Only, or Public Read/Write.
 - For each object, select the default internal access and default external access.
- To disable automatic access using your hierarchies, deselect Grant Access Using Hierarchies for any custom object that doesn't have a default access of Controlled by Parent.
Even if Grant Access Using Hierarchies is deselected, some users—such as those with the “View All” and “Modify All” object permissions and the “View All Data” and “Modify All Data” system permissions—can still access records they don’t own.
Tell Me More...
Apex managed sharing allows developers to programmatically share records associated with custom objects. When you use Apex managed sharing for any custom object, only users with the “Modify All Data” permission can add or change the sharing on that custom object's records, and the sharing access stays the same even if the record owner changes. For more information, see Apex Sharing.