Create a Filtered Patient List
Patient Lists
Patient lists are special because you can select patients using criteria from multiple related objects. Let’s consider an example.
A care program called Goodly Healthification Post-Operative Care recently became available to patients with Medicaid. (Medicaid is a government-funded health-insurance payer in the US.) Leif has several patients recovering from surgery and enrolled in physical therapy. How can he determine which of those patients are also eligible for Medicaid? He needs a list that considers both Medicaid eligibility (defined in the Account object) and physical therapy enrollment (defined in the Physical Therapy Session object). To create such a list, we need a cross object relationship.
Cross Object Relationships
Cross object relationships facilitate filtering patient and member lists by fields on separate but related objects. All cross object relationships include the Account object. AccountToCondition is one example of a cross object relationship.
| Cross Object Relationship Name | From Object |
To Object |
| AccountToCondition | Account | EhrCondition__c |
For Leif’s patient list, we need to relate the Physical Therapy Session object to the Account object, like this.
| Cross Object Relationship Name | From Object | To Object |
| AccountToPhysicalTherapySession | Account | Physical_Therapy_Session__c |
Let’s create this cross object relationship.
Create a Cross Object Relationship
- If you’re not already in Health Cloud – Lightning Admin, open it from the App Launcher (
 ) now.
 - In the App Launcher search, enter
Crossand select Cross Object Relationships. - Click New.
- Define a cross object relationship:
- Cross Object Relationship Name:
AccountToPhysicalTherapySession - From Object:
Account - To Object:
Physical_Therapy_Session__c
- Cross Object Relationship Name:
- Save the relationship.
Create a Custom Patient List
With the cross object relationship in place, now we set up a custom patient list using new filters.
Define the Filters
- From the App Launcher (
 ), open Health Cloud – Lightning Console.
 - In the navigation menu, select Patients.
- Click Settings (
 ) and select Create New List.
 - Define the first filter:
- Record: Physical Therapy Session
- Field: Therapy Type
- Filter operator: contains
- Filter value: Post-Operative Care
- Click Add Row.
- Define another filter:
- Record: Account
- Field: Medicaid Eligibility Status
- Filter operator: equals
- Filter value: true
- For Filter Logic, enter
1 and 2.
- Click Next.
Customize the Display and Name the List
- Select the Physical Therapy Session category.
- Add these fields to the Set Column Order list:
- Session Date
- Physical Therapy Session Name
- Duration
- Select the Account category.
- Add the Medicaid Eligibility Status field to the Set Column Order list.
- Click Next.
- For Name, enter
PT for Post-Operative Care. - Save the list.
Let’s create a physical therapy session so we can see the new list.
- In the App Launcher search, enter
Physicaland select Physical Therapy Sessions. - Click New.
- Define a new physical therapy session:
- Duration:
60 - Account: Charles Green
- Date: Choose a date next week
- Therapy Type: Post-Operative Care
- Duration:
- Save the session.
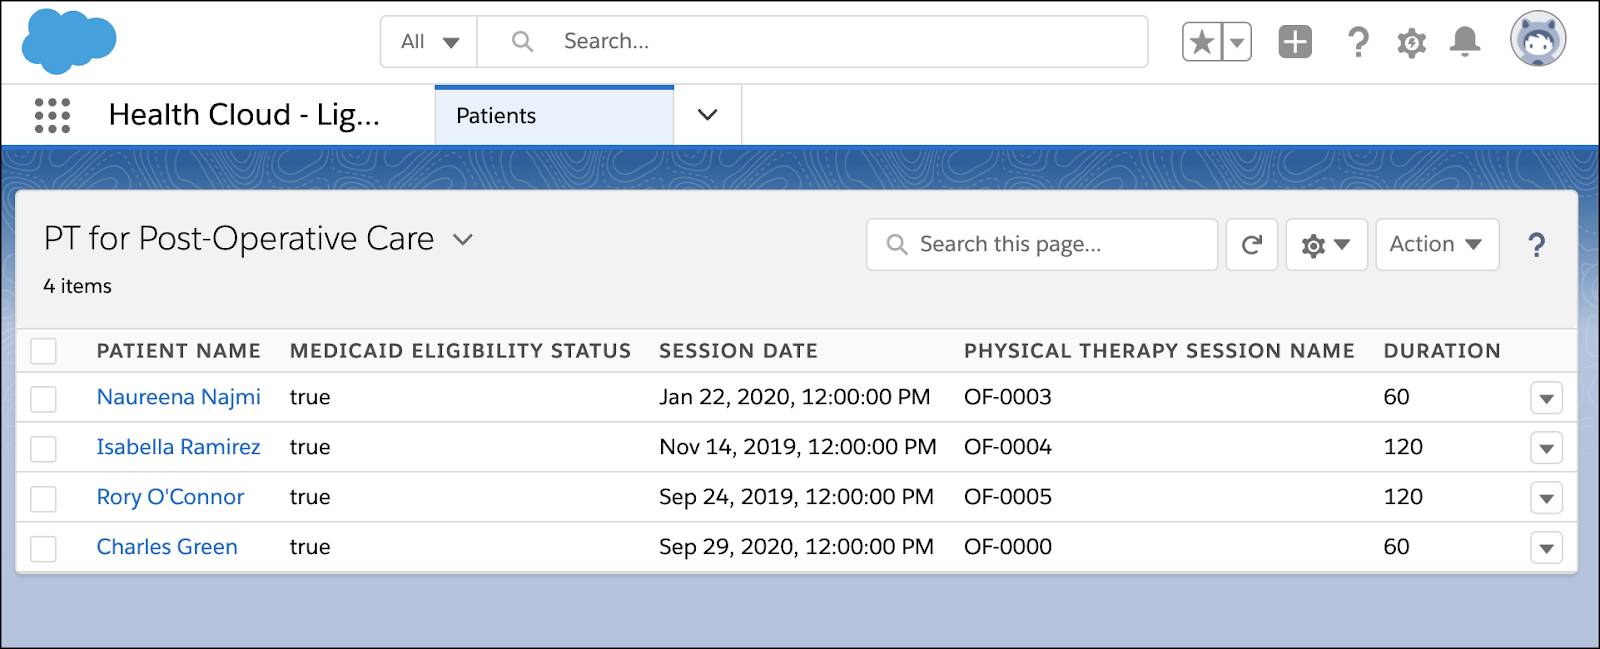
Now when Leif chooses the PT for Post-Operative Care list, he sees patients who have opted for physical therapy sessions for post-operative care and are eligible for Medicaid. He can view the Medicaid eligibility status, and the session date, name, and duration.
With these easy-to-use customizations, you are ready to set up what works best for your users and their patients. Using custom objects, you can create new timeline views, tweak the patient card, and define personalized patient lists. All in all, a great way for care coordinators to organize their work!