Criar um registro de usuário para seu agente

Antes de criar um registro de usuário para o agente, primeiro é necessário conceder a si mesmo a capacidade de gerenciar e usar o agente SDR.
Conceder aos usuários acesso ao agente
Há conjuntos de permissões adicionais que concedem acesso para configurar e usar o agente.
- No Salesforce Go, na área de configuração SDR Agent (Agente SDR) | Inbound Nurturing (Cultivo de entrada), clique em Manage (Gerenciar) ao lado de Manage User Access (Gerenciar acesso do usuário).

- Isso abrirá a página de acesso do usuário Manage SDR Agent (Gerenciar acesso do usuário) | Inbound Nurturing (Cultivo de entrada). A guia Configure Agentforce SDR Agent (Configurar agente SDR do Agentforce) já está selecionada. Clique na lista suspensa Recently Viewed (Visualizado recentemente) e selecione All Users (Todos os usuários).
- Na lista, marque a caixa ao lado de YOUR NAME (SEU NOME).

- Clique em Assign (Atribuir). Você concedeu a si mesmo a capacidade de configurar o agente.
- Clique na guia Use Agentforce SDR Agent (Usar agente SDR do Agentforce).
- Clique na lista suspensa Recently Viewed (Visualizado recentemente) e selecione All Users (Todos os usuários).
- Na lista, marque a caixa ao lado de YOUR NAME (SEU NOME).

- Clique em Assign (Atribuir). Você concedeu a si mesmo a capacidade de usar o agente. Você já recebeu a atribuição prévia do conjunto de permissões de administrador do Data Cloud, portanto, não se preocupe em atribuir essa permissão a si mesmo agora.
- Clique em Done (Concluído).
Criar um usuário do agente SDR
Seu agente SDR opera como um usuário no Salesforce, usando os mesmos métodos de geração de relatórios, manutenção de registros e gerenciamento que outros usuários. Para que isso aconteça, é necessário criar um tipo específico de usuário e atribuir as permissões apropriadas.
Adicionar um usuário do agente SDR
- Em Setup (Configuração), na caixa Quick Find (Busca rápida), insira
Users(Usuários).
- Clique em Users (Usuários) e, em seguida, em New User (Novo usuário).
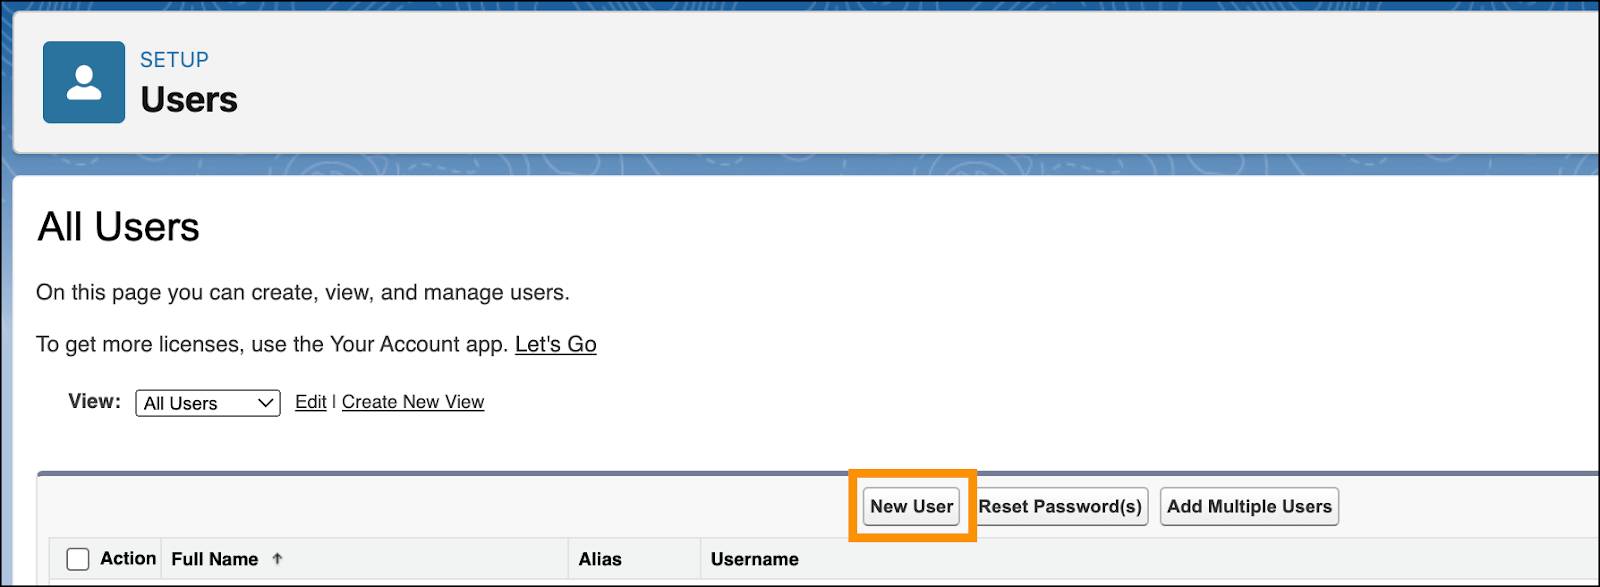
- Uma nova guia é aberta para permitir que você crie um usuário. Preencha os campos do novo usuário da seguinte forma:
- First Name (Primeiro nome):
SDR - Last Name (Sobrenome):
Agent(Agente) - Alias: preenchido automaticamente
- Email: insira seu endereço de email
- Username (Nome de usuário): sdr + <your initials (suas iniciais)> + <today’s date (data de hoje)> + <your favorite color (sua cor favorita)> + @thsdr.com
O nome de usuário deve ser exclusivo.
- Nickname (Apelido): preenchido automaticamente
- Company (Empresa):
Acme - User License (Licença de usuário): Einstein Agent (Agente do Einstein)
- Profile (Perfil): Einstein Agent User (Usuário do agente do Einstein)
- First Name (Primeiro nome):

- Clique em Save (Salvar). O registro de usuário do seu agente foi criado.
Atribuir o conjunto de permissões necessárias ao usuário do agente do SDR
- Na caixa Quick Find (Busca rápida), digite
Permission Sets(Conjuntos de permissões). Nota: Permission Sets (Conjuntos de permissões) podem estar visíveis devido à pesquisa anterior de Users (Usuários). Se for o caso, ignore esta etapa.
- Clique em Permission Sets (Conjuntos de permissões) e, na lista, localize e clique em Agentforce SDR agent (Agente SDR do Agentforce).
- Clique em Manage Assignments (Gerenciar atribuições).

- Clique em Add Assignments (Adicionar atribuições).
- Marque a caixa ao lado de SDR Agent (Agente SDR) (não atribua isso a você mesmo), clique em Next (Avançar), em Assign (Atribuir) e em Done (Concluído).
Configurar Einstein Activity Capture (Captura de atividades do Einstein)
- Na caixa Quick Find (Busca rápida), digite
Einstein Activity Capture(Captura de atividades do Einstein).
- Clique em Settings (Configurações) no cabeçalho Einstein Activity Capture (Captura de atividades do Einstein).

- Uma guia Einstein Activity Capture (Captura de atividades do Einstein) é aberta, permitindo que você configure e defina a sincronização dos emails e calendários dos representantes de vendas com o Salesforce. Clique em Add Contact and Event Sync (
Adicionar contato e sincronização de eventos).

- Deixe Google G Suite selecionado e clique em Next (Avançar).
- Selecione User Level (Nível do usuário) e clique em Next (Avançar).
- No campo Name (Nome), insira:
SDR Agent Config(Configuração do agente SDR).
- Deixe o campo Description (Descrição) em branco e clique em Next (Avançar). Nota: Essas etapas são para fins deste exercício. Se estiver configurando isso em seu ambiente, ajuste essas configurações de acordo com as metas e expectativas de sua empresa.
- Deixe o campo Review Sync Settings (Revisar configurações de sincronização) como está e clique em Next (Avançar).
- Deixe o campo Advanced Settings (Configurações avançadas) como está e clique em Next (Avançar).
- Na tela Add Users and Profiles (Adicionar usuários e perfil), passe SDR Agent (Agente SDR) da caixa Available (Disponível) para a caixa Selected (Selecionado) e clique em Next (Avançar).

- Clique em Finish (Concluir). Agora você configurou Einstein Activity Capture (Captura de atividades do Einstein) para funcionar com o Google G Suite.
Perfeito! Agora você tem o Agentforce para desenvolvimento de vendas ativado em seu Playground. E criou um usuário e concedeu as permissões corretas para permitir que esse usuário crie seu primeiro agente SDR. Na próxima etapa, configuraremos, ativaremos e testaremos seu primeiro agente.