Create a Department Object
The next step in creating your organization’s travel approval app is to create the data model. The first object to create is the Department object. This object stores information about your departments such as name and cost center code.
- From Setup, click Object Manager.

- Click Create, then select Custom Object.

- Enter these details.
Field |
Value |
|---|---|
Label |
Department |
Plural Label |
Departments |
Object Name |
Department (this field auto-populates) |
Record Name |
Department Name |
Data Type |
Text |
- Now scroll down and select these options:
-
Allow Reports (1)
-
Allow Search (2)
-
Launch New Custom Tab Wizard after saving this custom object (3)

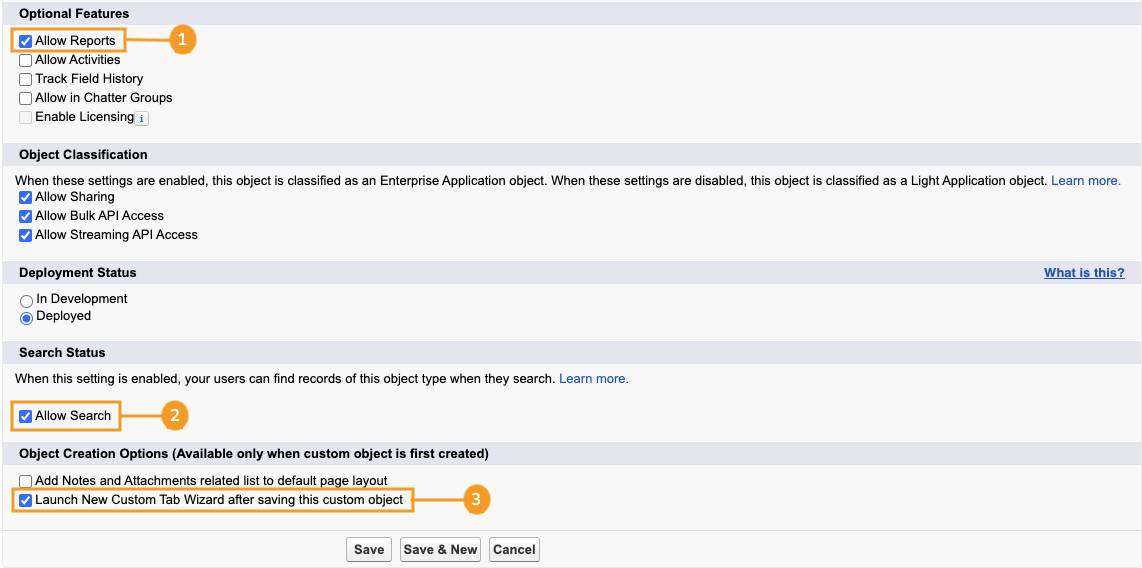
- Click Save.
- Now, define your tab settings. Click the
 next to the Tab Style field and select Books.

- Click Next. Leave the next screen as is and click Next.
- Next, choose which applications to associate with this tab.
- Click the Include Tab (1) option at the top of the column to deselect all apps.
- Select only the Travel App (2) app from the list.
- Click Save (3).
- Click the Include Tab (1) option at the top of the column to deselect all apps.

- On the next screen, click Fields & Relationships, then click New.
- Select Text as the data type, then click Next.
- Enter these details.
- For Field Label, enter
Department Code - For Length, enter
10 - Select Required
- Select Unique, then select case sensitive
- Click Next.
- Leave the Establish field-level security screen as is, and click Next.
- Leave the Add to page layouts screen as is, and click Save.
Now that you created the Department Object, you’re ready to move on to the next step, creating the Travel Approval object. The Travel Approval object stores basic information about where employees are traveling and trip duration.