Edit Rule Metrics
Learning Objectives
After completing this unit, you’ll be able to:
- Update metrics for rules.
- Modify field names for rule metrics.
Rule Metrics Overview
Rule metrics provide insights into commission calculations and other relevant data points tied to specific rules and are essential for evaluating the performance and effectiveness of payout rules within Salesforce Spiff. Understanding how to edit and customize these metrics enhances the clarity and usefulness of the information presented in rep statements.
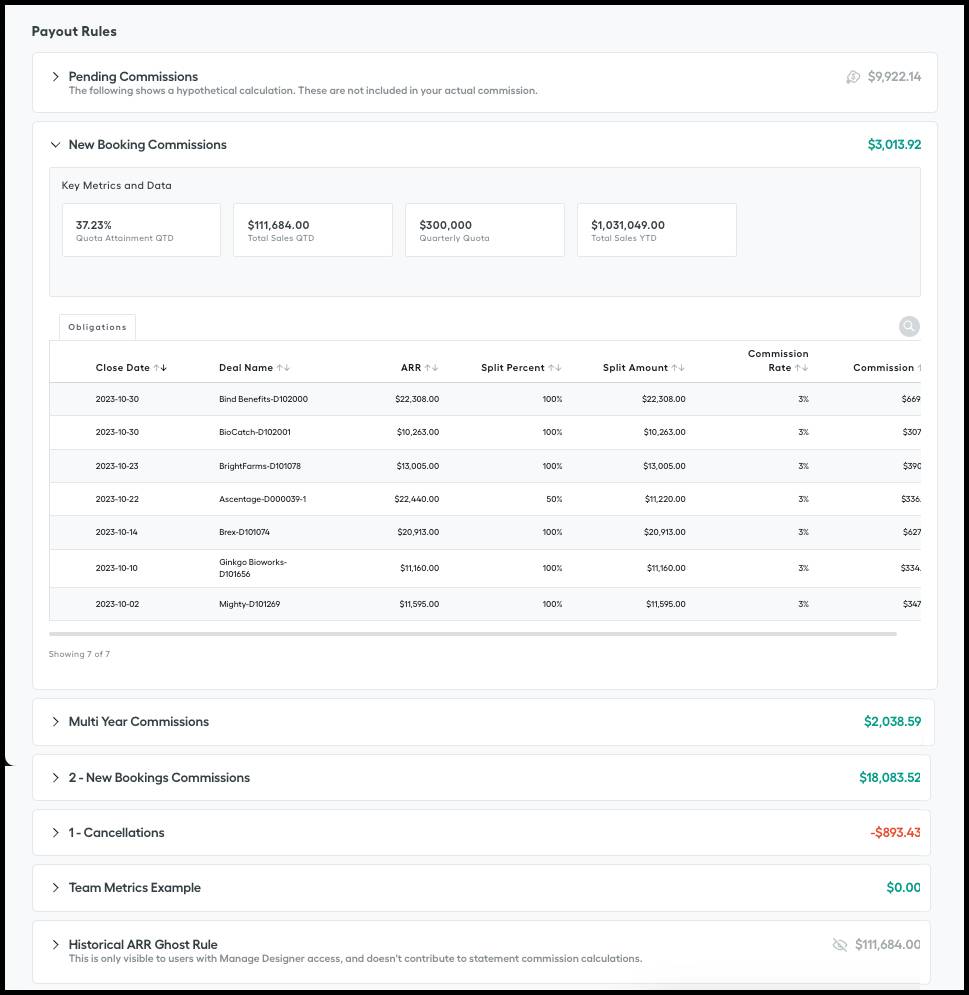
Edit Rule Metrics
When editing rule metrics, there are two primary components to focus on: columns and rule metric cards.
Columns
Columns are associated with datasheet calculations, which aggregate data from various entries. These calculations are displayed in a table format and provide a detailed breakdown of data associated with payout rules. By editing columns, you can adjust which specific calculations are displayed, allowing for more tailored and relevant data for your representatives.

Here’s how you can customize the columns displayed on a payout rule.
- Click Edit to enter Edit mode.
- Select the rule you want to update, and click Edit Columns to open a modal window.
- Toggle on or off the fields you wish to display on the payout rule card. You can also search for a specific datasheet field name and use the Show Display Name option to view either the Display Name or the API name.
- Rearrange the order of the fields by clicking and dragging them to your preferred position.
- Click Apply to save your changes.
- Click Done Editing to exit Edit mode.
Rule Metric Cards
Rule metric cards focus on worksheet calculations, which are a single data point. These cards summarize key metrics and calculations related to payout rules. They often present higher-level insights at a glance. Editing these cards allows you to highlight the most important information for quick reference.

To customize the rule metric cards displayed on a payout rule:
- Click Edit to enter Edit mode.
- Select the rule you want to update and click Edit Metrics to open a modal window.
- Toggle on or off the fields you wish to display on the payout rule card. You can also search for a specific datasheet field name and use the Show Display Name option to view either the Display Name or the API name.
- Click Apply to save your changes.
- Rearrange the metric cards as needed by clicking on
 and dragging them to your desired location.
- Click Done Editing to exit Edit mode.
Once saved, the changes made will apply to all rep statements assigned to the same plan, ensuring consistency across the board.
Edit Rule Tabs
In addition to editing rule fields, you can add or remove additional data filters for viewing payout rules. This feature is available only for rules where the final payout amount is calculated using a worksheet. Rules, where the final payout amount is calculated using a datasheet field, will show only a single data filter and cannot have additional tabs.
If you want to display additional data filters on a tab that is not currently used in your commission logic, you need to create a formula that references the data filter and include it in your final payout amount calculation.
Here’s how you can add a tab to a payout rule.
- Click Edit to enter Edit mode.
- Select the rule you want to update, and click Edit Tabs to open a modal window.
- In the modal, next to each data filter name, you’ll see a plus (+) icon. Click the plus icon next to the data filter you want to display. The plus button will turn into a green check mark, indicating that the data filter is now a tab on the payout rule card.
- To remove a tab, simply click the green check mark next to the data filter. It will turn back into a plus button, indicating the data filter has been removed as a tab.
- Click Apply to save your changes.
- Rearrange the tab order by clicking on the tab and dragging it to your preferred position.
- Click Done Editing to exit Edit mode.
Remember, any changes you make to the tabs will be reflected across all reps assigned to the same plan.
Update Metric and Field Names
Customizing metric and field names helps clarify the information presented on rep statements.
Here’s how to update metric and field names.
- Go to Designer and click the search icon at the top of the page.
- Enter the name of the metric or field you want to update.
- Click the relevant metric or field when it appears in the search results.
- In the Settings section, edit the Display Name.
- Recalculate the statement.
This update will reflect on user statements without affecting the underlying commission logic. The original name will still be preserved, ensuring that your calculations remain intact while providing a clearer label for reps.
You have learned how to navigate and customize statements in Salesforce Spiff, allowing you to tailor the data and metrics to fit your reporting needs. By mastering the ability to edit both top-level and rule-specific metrics, update field names, and adjust columns, you’ve gained control over how commission information is displayed. Effective statement design is crucial for providing reps with clear, relevant insights into their performance, which in turn helps drive motivation and understanding. With these skills, you can ensure that your statements deliver the most impactful and actionable information.