Build a Data Mapper Turbo Extract and Data Mapper Load
Learning Objectives
After completing this unit, you’ll be able to:
- Build an Omnistudio Data Mapper Turbo Extract in Omnistudio for Managed Packages.
- Build an Omnistudio Data Mapper Load in Omnistudio for Managed Packages.
- Explain how an Omnistudio Data Mapper Load decides to create or update records.
Explore a Use Case for Omnistudio Data Mappers
Here’s a simple guided user interaction. A user updates basic customer account details, such as the account’s phone number and website. The steps are intuitive and simple to complete, even though some complex functionality happens behind the scenes.
That’s because an Omniscript guides users through the process.
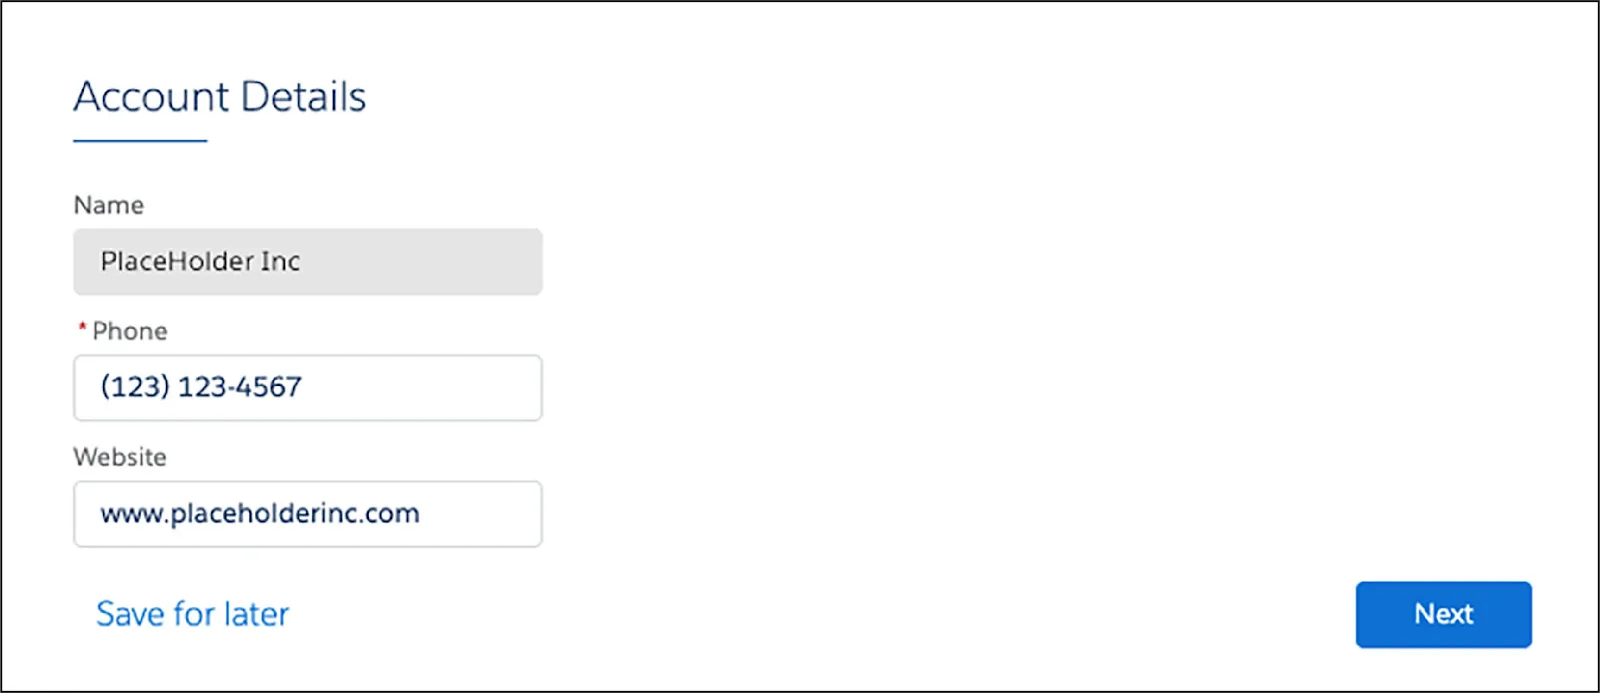
Now let’s consider the complex functionality the user doesn’t see.
How does this data appear in the fields displayed in this interaction? And how does the updated data get saved? This is where Omnistudio Data Mappers get to play their part.
An Omnistudio Data Mapper Turbo Extract retrieves the data from the Account object, and an Omnistudio Data Mapper Load saves the data updates back to the Account object. In this unit, you learn how to build these Omnistudio Data Mappers.
Build an Omnistudio Data Mapper Turbo Extract
In the last part, you learned that when you want to set up an Omnistudio Data Mapper in Omnistudio for Managed Packages, you use the Omnistudio Data Mapper Designer. You can find it on the Omnistudio Data Mappers tab in the Omnistudio app.
When you build an Omnistudio Data Mapper Turbo Extract, use these tabs in the Omnistudio Data Mapper Designer to specify what you want the Turbo Extract to do:
- Extract
- Preview
Let’s explore these tabs in more detail and get an overview of the steps you need to take in the tabs.

Extract Tab
On the Extract tab, you:
- Specify the Salesforce object that you want the Omnistudio Data Mapper to query.
- Set the filters that determine the data retrieved from the object.
- Specify the fields to extract.
Here’s how to do that for our Omniscript example for editing an account.

- For the Omniscript, you want to extract data from the Account object, so select Account for the source object.
- The Extract Output Path (1) specifies the top-level JSON node in the output. This is typically the same as the source object, so enter
Accountin the Extract Output Path field.
- Create a filter that determines the data to be read. A filter consists of three fields: The source object (2), a comparison operator (3), and either a quoted literal value, an input parameter, or another field of the same source object (4). In our example, you want to retrieve data for the Omniscript, so enter
Id,=, andAccountIdin the three fields.
- Under Search Fields, use the arrow to select Name, Phone, and Website. These are the fields you want to extract.
- You can enter a value in the Search Fields box (5) to filter the field list. The Id field (6) is always included in the output.
Preview Tab
Test the input and output of the Omnistudio Data Mapper on the Preview tab.

Specify a Key/Value pair in the Input Parameters panel (1), by entering AccountId for the Key and an account’s RecordId for the Value—we explain how to find the RecordId next. When you execute the Omnistudio Data Mapper Turbo Extract, the Response pane (2) returns results to confirm it's extracting data correctly.
All records in Salesforce have a unique RecordId. To find a RecordId for an account, open any Account record in your Salesforce org, and copy the RecordId from the URL.

Now that you’ve learned how to retrieve data from a Salesforce object, let’s see how to save updated data back to the object with an Omnistudio Data Mapper Load.
Build an Omnistudio Data Mapper Load
When you create an Omnistudio Data Mapper Load, use these tabs in the Omnistudio Data Mapper Designer to specify what you want the Omnistudio Data Mapper Load to do:
- Objects
- Fields
- Preview
Let’s discover how to configure these tabs to build the Omnistudio Data Mapper Load.
Objects Tab
The Objects tab is where you specify the Salesforce objects that you want to update.
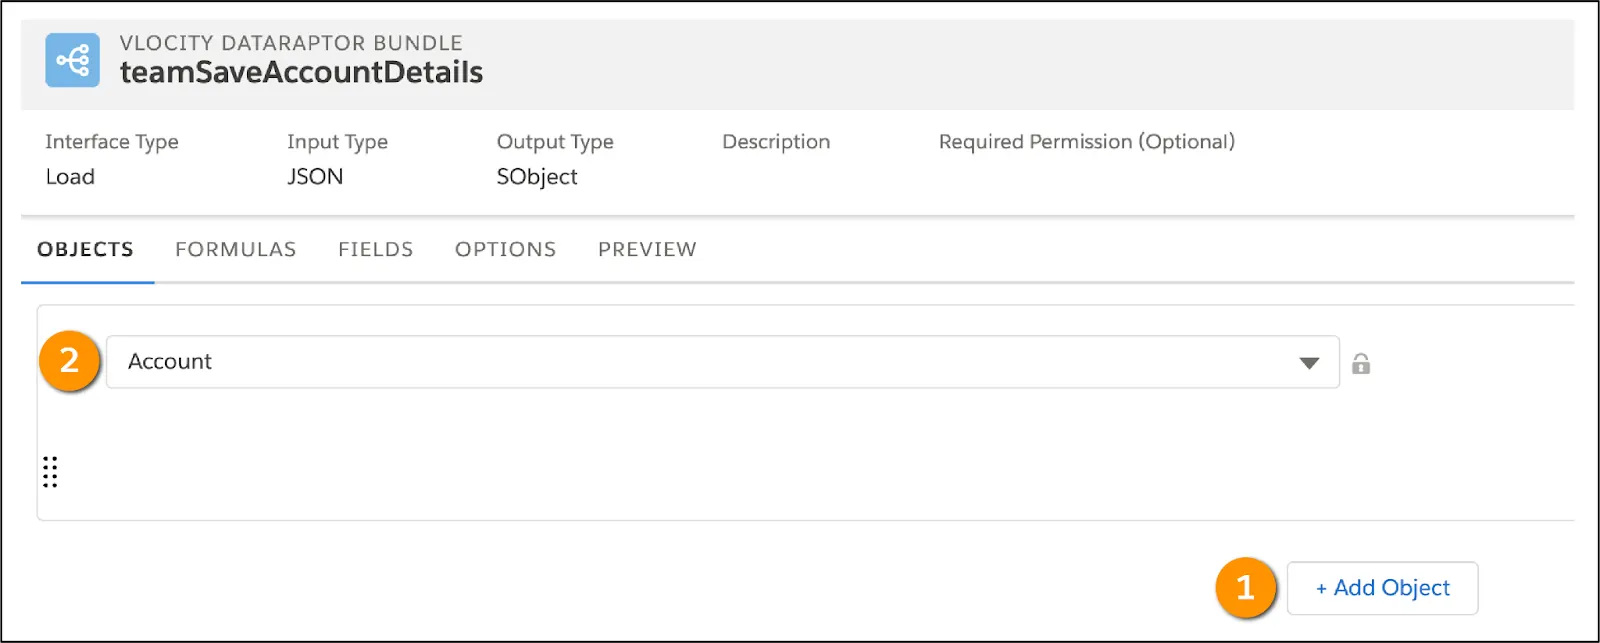
Because you want to write data back to the Account object, select + Add Object (1) and then select Account (2).
Fields Tab
On the Fields tab, map the input data to the Salesforce object fields that you want to update.

The Input JSON Path (1) specifies the key of the JSON node containing the data you want to write to the Salesforce object. The Domain Object Field (2) specifies the field on the Salesforce object that you want to update.
When you execute an Omniscript as in our example, it builds a Data JSON that is populated with the data required for the interaction. Use the Omniscript JSON as input data for the Omnistudio Data Mapper Load. You can find the Omniscript JSON in the Request Data pane in the Omniscript’s Action Debugger.
Paste the Omniscript’s JSON into the Input JSON panel (3) to create input mappings. Then use the Quick Match button (4) to match the input mappings with the object fields.
Preview Tab
On the Preview tab, test the output of the Omnistudio Data Mapper.

Make a change in the Omniscript JSON input in the Input panel (1). For example, change the account’s phone number or website. The Objects Created panel (2) lists the resulting objects, which are saved permanently.
Create or Update: How Does an Omnistudio Data Mapper Load Decide?
An Omnistudio Data Mapper Load saves updates to records in Salesforce by either overwriting existing data, or creating new records, too, if that data doesn’t yet exist. We call this process of updating or inserting records upsert.

It’s possible to designate any field in the Omnistudio Data Mapper Fields mapping as an Upsert Key (1) by selecting that option. Setting a field as an upsert key means it’s required to match a unique record in Salesforce.
To control how data is upserted, select Is Required For Upsert (2). When this is selected for a field, there must be data present in that field, otherwise the Omnistudio Data Mapper won't upsert the record. You can also set any field in the Omnistudio Data Mapper Fields mapping as Required For Upsert. This means data must be in the field for an upsert to happen.
Let’s look at this for the AccountId mapping in the Fields tab.
Before an Omnistudio Data Mapper Load decides how to save data, it checks for two conditions.
- Does the new record have data in all of the Is Required For Upsert fields?
- Do all of the Upsert Key fields for the new record match a unique record in Salesforce?
This is what the process looks like when you combine the two conditions.
- For each Object in the Input JSON, the Omnistudio Data Mapper Load looks at each field.
- If the field is marked Is Required For Upsert, the Omnistudio Data Mapper Load checks to see if the field has data.
- All Is Required For Upsert fields must have data. If not, the Omnistudio Data Mapper Load skips that record.
- If the field does have data, the Omnistudio Data Mapper Load checks to see if the field is an Upsert Key, and then compares all the fields that are Upsert Keys.
- If all of the Upsert Keys together find a match with an existing record in Salesforce, the Omnistudio Data Mapper updates the target record rather than creating a duplicate record.
- If the Omnistudio Data Mapper Load can’t find a match with any existing record, it creates a new record.
See Object Field Mapping in Salesforce Help for more information.
You wanted the details on Omnistudio Data Mappers, and we delivered! However, this is just the start of your Omnistudio Data Mapper journey. How can you use them in your Omnistudio projects?