Design Data Mappers for Performance
Learning Objectives
After completing this unit, you’ll be able to:
- Recognize the steps involved in creating and configuring a Data Mapper.
- Identify key considerations for Data Mapper performance and management.
The Data Mapper Development Process
Now that you understand the types of Data Mappers, it’s time to discuss how they’re created. The process for creating all of the Data Mappers you learned about in the last unit is generally the same. Here’s a diagram for the workflow.
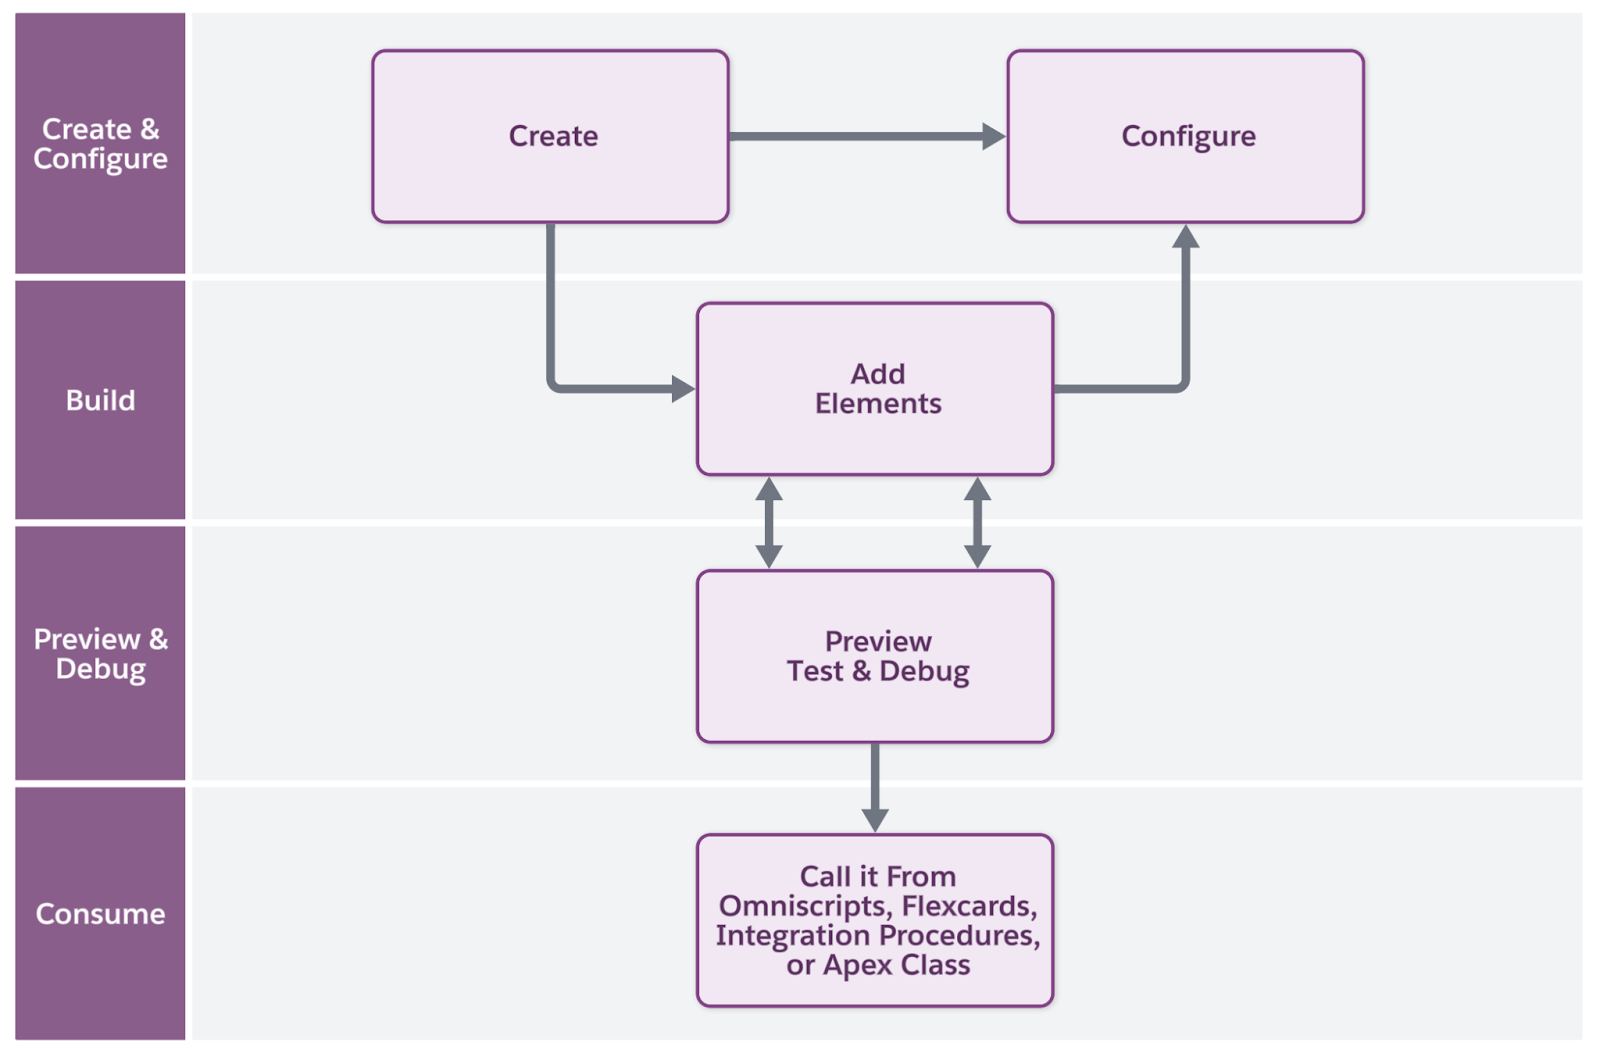
Let’s explore each step briefly.
-
Create and configure your Data Mapper to make basic decisions about what it will do, its input and output data format, and more.
-
Build your Data Mapper by adding elements to retrieve, transform, map, and load data—all with drag-and-drop tools. After you add elements, you may need to go back and further configure your Data Mapper.
-
Preview and debug your Data Mapper to test the data it returns.
-
Consume data from your Data Mapper by calling it from Omniscripts, Flexcards, Integration Procedures, and Apex Classes.
In this unit, you explore tips and advice when you create, configure, and build your Data Mapper. Then, in the final unit in this module, you’ll learn about how data from Data Mappers are consumed by other Omnistudio components. Let’s get started at the beginning: Creation.
Choices When You Create and Configure Your Data Mappers
Many important features of a Data Mapper are determined when it’s first created and configured. Let’s explore the options there.
Name
A Data Mapper’s name must start with a letter and contain only letters and numbers, without special characters, spaces, and underscores. We recommend using camel case following a prefixVerbObjectDetail format. For example, the name of a general Data Mapper Load that saves contact email addresses to Salesforce can be generalSaveContactEmails.
Interface Type
This field is where you select which Data Mapper type to create, either Extract, Turbo Extract, Load, or Transform. You can’t change this setting after the Data Mapper is created.
Input Type
This determines the format of the data loaded into the Data Mapper, either JSON, XML, or Custom. If you choose Custom, enter a Custom Input Class, which is an Apex class that you create so Omnistudio can process another input data format.
Output Type
The options in the Output Type field are determined by which Interface Type you select, because each Data Mapper type has different output capabilities. Here are the details for each Data Mapper type.
Interface Type |
Output Type Options |
|---|---|
Extract |
JSON, XML, Custom |
Turbo Extract |
JSON, Custom |
Load |
sObject |
Transform |
JSON, XML, Custom, PDF, DocuSign, Document Template |
Notice here that Loads can only write to Salesforce objects (sObject), while Transform can provide data in many different formats.
If you select Custom for any Interface Type, you will see a Custom Output Class field to enter an Apex class, similar to custom inputs.
Required Permission
This field controls who can run a Data Mapper. If this field is left blank, all users can run the Data Mapper unless a default required permission has been set at the org level.
To specify permissions, enter a comma-separated list of roles, profiles, permission sets, or custom permissions. There’s a specific syntax for this field that follows a User Access and Permission Type:Name pattern. For example, consider this list: Role:Architect, Profile:System Administrator, PermSet:OmniStudio Admin Group, CustomPerm:Can_Run_My_Mapper. See Syntax of the Required Permission Property in Salesforce Help for more details.
Description
Yes, this is self-explanatory, but here we go: This field describes the Data Mapper! The Data Mapper’s name generally tells anyone who comes after you—including your future self—what a Data Mapper does and how it’s used. But the Description field helps you explain it in more depth.
Now that you know how to create a Data Mapper, let’s explore some best practices to follow as you build them.
Considerations for Building Your Data Mappers
As you learned on your tour of the Data Mapper Designer, each Data Mapper type is configured slightly differently. In a foundational module like this, we can’t dive into configuring each type of Data Mapper. There are, however, some best practices to follow no matter what type of Data Mapper you create.
Focus Only on the Data You Need
For reusability, design targeted Data Mappers that focus on extracting or loading only the data required for one operation. You can use several of these smaller Data Mappers together in Integration Procedures, Omniscripts, and other tools to get and load all the data you need.
Plus, for optimal server performance, limit the number of Salesforce objects that a Data Mapper processes to three or fewer.
Plan Your Data Extract Order
In Extracts, Omnistudio chains queries for each object in order to get child data as you work down multiple Extract Objects. When you execute the query for the first object, it then queries each returned record for the next object, and so on. Because of this, follow these best practices.
- Query parent objects before child objects. For example, query accounts before opportunities.
- Only include other extract Salesforce objects if they’re directly related to the top-level object. For example, if an extract’s top-level object is an account, only include related objects such as opportunities and contacts.
- Use the IDs of earlier objects as part of the criteria to extract later objects. For example, use an account record ID to find related opportunities and contacts.
- Avoid combining queries for unrelated objects.
Use Unique Names and Mappings
Use unique names for the data outputs across all of your Data Mappers to avoid confusion and data problems. With unique names, you can precisely reference a specific piece of data, maintain data hierarchy, and prevent data overwrites and merge errors. For example, don’t output data with the name Customer from two different Data Mappers.
Also avoid duplicate mappings within your Data Mappers, especially for Data Mapper Loads. This can lead to unexpected and inaccurate data saves. When a Data Mapper finds the same field mapped multiple times, the order in which those duplicate fields are processed will determine which value gets set on the Salesforce record, and that might not be the value you intended.
Even if you use unique names for your output data and have no duplicate mappings, remember the hierarchy returned by your queries. Make sure your output mappings keep the Parent Object:Child Object:Field structure, such as Accounts:Contacts:Name. If you need a different structure later, use a Data Mapper Transform.
Consider How Data Mappers Work with Omnistudio Integration Procedures
Data Mapper isn’t the only tool in the Omnistudio services layer. Integration Procedures have a role to play, too. Sometimes you might add a Data Mapper to an Integration Procedure, or use an Integration Procedure instead of a Data Mapper.
How can you decide? In general, think of a single Data Mapper for a direct read, write, or simple change. Use a single Data Mapper if you’re performing a single-step operation. Data Mappers are designed for focused tasks called by other components.
An Integration Procedure can call several Data Mappers and other actions to achieve more complex logic. Use it if your process has many steps, needs data sources other than Salesforce objects, includes complex data changes, or takes actions like sending emails.
See When to Use Omnistudio Data Mappers and Integration Procedures in Salesforce Help for details.
What’s Next
Now you have some practical advice to follow when you create, configure, and build your Data Mapper. The preview and debug step is important, too, to catch problems with your data outputs before they are consumed by other Omnistudio components or Apex classes. To check the Data Mapper’s data, select Preview in the Data Mapper Designer’s toolbar.
Now, on to the next step: consuming the data that Data Mappers provide. In the next unit, you’ll learn how Data Mappers work with Omniscripts, Integration Procedures, and Flexcards. Let’s go!