Evaluate Clients and Create Financial Accounts
Learning Objectives
After completing this unit, you’ll be able to:
- Describe how to evaluate applicants using third-party integrations and purpose-built data models.
- Explain the tools for automating application decisions and compliance checks.
- Describe how to obtain client authorization and open accounts.
- Describe the features to deepen client relationships immediately after onboarding.
Know Your Customers
In the previous units, you learned about the Know Your Customer (KYC) and Know Your Business (KYB) data models, including Beneficial Owners and Controlling Parties (BOCP). Now it’s time to evaluate client applications using these data models.
With the KYC and KYB data models, you can integrate third-party risk assessment tools to evaluate applicants. The Party Profile object is a key object at this stage of the process. Create an approval process in Stage Management to automate the review of party profiles and child records created for onboarding applicants. Use transition criteria to specify the sequence of steps that are necessary to approve a record.
A few of those steps include anti-money laundering (AML) screening, identity verification, and employment verification. Complete all of these checks through quick integrations with third-party service providers. Set up integrations with tools such as Data Consumption Framework, Integration Definitions, and Integration Orchestration, which all work with Stage Management.
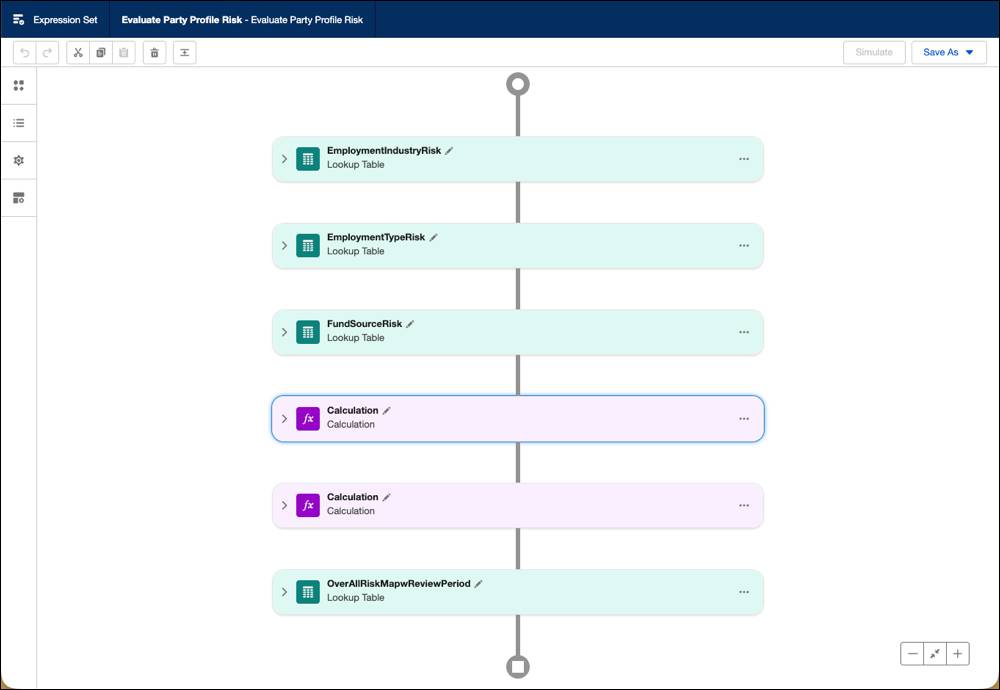
Completing each evaluation check triggers automated decision making processes to approve or reject a client application. Here, too, Business Rules Engine (BRE) helps you automate complex decisions based on defined criteria, such as automatically approving or denying applications based on credit scores or risk profiles. In this screenshot, a BRE expression set template defines how to evaluate party profile risk for an applicant.
How do you track those decisions? The Audit Trail feature helps your team inspect customer identity verification logs, detect potential cases of identity fraud, and meet audit compliance standards during evaluation. Plus, Cross Object Field History helps you track changes to records across related objects, even made by different users, in a single view. Use the Cross Object Field History component on the Party Profile record page to provide a view of changes across multiple child objects in the detailed KYC and KYB data models.
Now that you’ve learned how Agentforce Financial Services speeds up the work of applicants and reviewers, explore how to finish up the final tasks for onboarding your new clients.
Turn Prospects into Clients
When your team approves new clients, the next step is to provide disclosures and obtain consent.
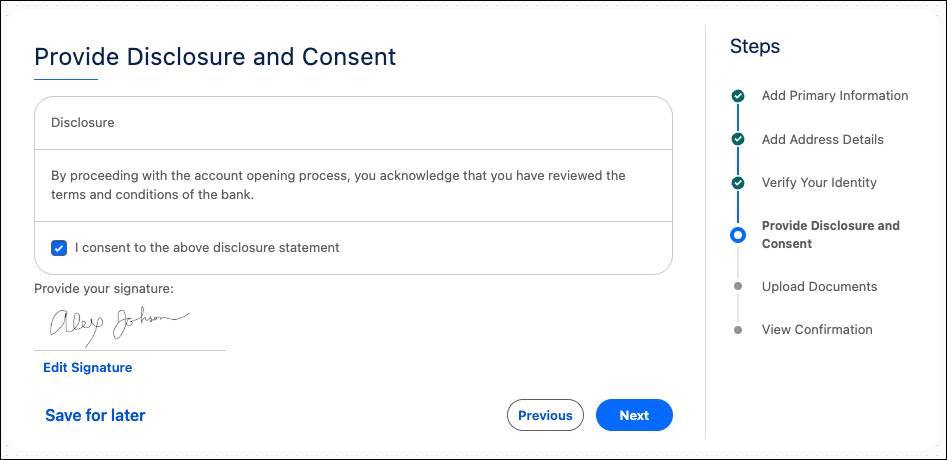
Agentforce Financial Services provides the relevant disclosures and consent forms based on each financial relationship, helping clients to digitally sign forms for quick, easy acknowledgments. Here’s a sample consent with the client’s signature.
Manage this authorization using two objects: Authorization Form to present information and requests consent, and Data Use Purpose to define why consent and disclosure information is collected.
After a client signs off on disclosures and consents with a tool such as eSignature, it’s time to collect any final signatures and authorizations using Document Generation and other tools.
Then, you’re ready to open a client’s new financial accounts. In Agentforce Financial Services, you represent these accounts using Financial Account and related objects. Then, integrate the data from financial accounts with custodial and core banking systems to track accounts across systems. Complete the Agentforce Financial Services Data Modeling badge on Trailhead for details about setting up and managing financial accounts.
Deepen Client Relationships
After you onboard clients, Agentforce Financial Services gives you the tools to deepen those client relationships, and get them to apply for more products. These next steps build upon the strong foundation of information you collected and verified about each client during onboarding.
Individual Clients
The Retail Banking Console app acts as a central hub for your bankers and customer service reps to get a complete view of each client’s information, interactions, transactions, and cases. This at-a-glance data helps your team improve service and tailor additional offers. Plus, you can use the AI-powered Next Best Action feature to recommend actions to users that deepen relationships and grow revenue.
B2B Clients
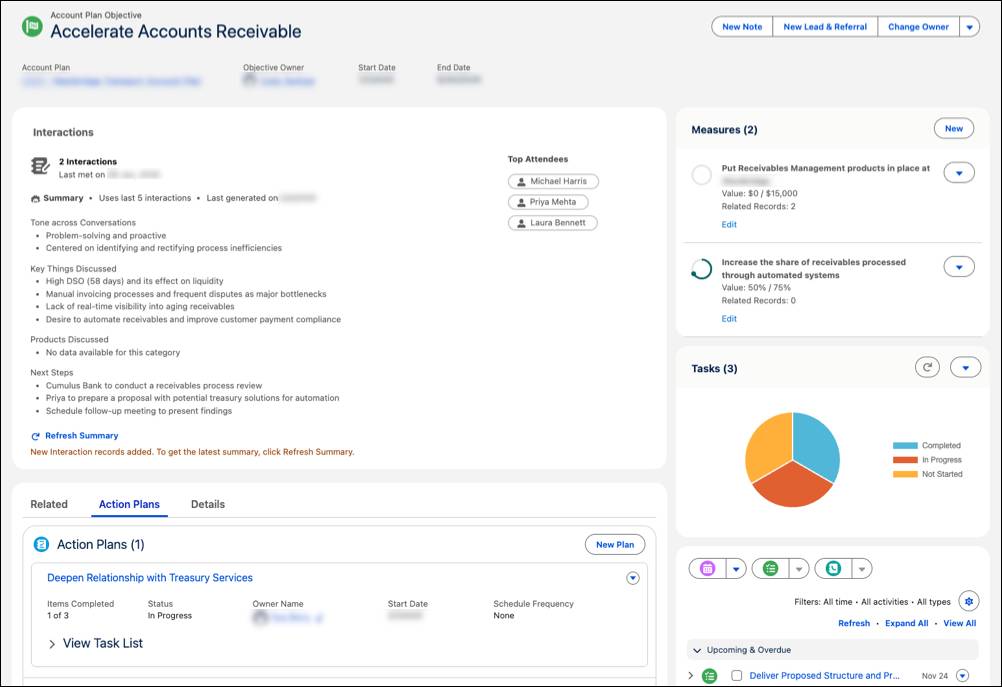
Your B2B relationship teams can use the Business Relationship Plan feature to plot a strategic, collaborative plan for a client’s goals and needs. This image shows an account plan objective to track a client’s need to accelerate accounts receivable and all of the tasks and measures that support that goal.
This enhancement to the Account Plan object captures essential client account details, helps prepare objective-driven plans, and offers AI-powered summaries for better relationships.
Speaking of AI, Agentforce agents can work as AI-powered assistants for relationship managers by pulling relevant relationship and business data, analyzing it, and drafting initial relationship plans for review.
For more details about developing B2B relationships, complete the Agentforce Financial Services B2B Foundations badge on Trailhead.
Wrap Up
In this unit, you learned about evaluating and approving applicants using KYC and KYB data models, integrating with third-party providers for risk assessment, and automating decisions with the Business Rules Engine. You also explored features such as Audit Trail to ensure compliance, and how to transition approved applicants into clients by managing disclosures, consent, and financial account setup. Finally, you learned about the post-onboarding features to grow client relationships.
Add these tools to those you learned about earlier—such as Discovery Framework and Stage Management—to reduce client effort, improve your team’s efficiency, and ensure compliance.
With what you learned in this badge, you’re ready to dig deeper into improving your onboarding process. Check out Get Started With Integrated Onboarding for Financial Services in Salesforce Help to learn more.
Resources
- Salesforce Help: Set Up Integrations to Run Identity Verification and Anti-Money Laundering (AML) Screening for Applicants
- Salesforce Help: Set Up an Approval Process to Approve Party Profile Records
- Salesforce Help: Ensure Privacy of Customers with Audit Trail
- Salesforce Help: Intelligent Document Automation for Consent and Disclosures
- Salesforce Help: Provide a Comprehensive View of Customer Financial Account Details
- Salesforce Help: Console App for Retail Banking
- Salesforce Help: Suggest Options with Recommendation Strategies
- Salesforce Help: Business Relationship Plan
- Trailhead: Agentforce Financial Services B2B Foundations
- Trailhead: Agentforce for Financial Services