Implement Derived Pricing
Learning Objectives
After completing this unit, you’ll be able to:
- List the steps involved in setting up a derived product.
- Create derived price records.
- Add the Derived Price element to a pricing procedure.
- Test the configured pricing on a quote.
Derived Product Setup Process
Now that you understand how derived pricing and discovery procedures work, it's time to look at the steps involved in setting up a derived product. Here's the typical process.
Click each box to learn more.
By following these steps, you can implement and manage complex derived pricing models, boosting pricing accuracy and efficiency.
Next, it’s time to bridge theory with practice. This unit guides you through each step of the derived product setup process, helping you implement derived pricing in your org. Keep following along!
Connect Your Developer Edition Org
Before you follow along, you must connect the Developer Edition org you signed up for in unit 1 to Trailhead.
- Make sure you’re logged in to your Trailhead account.
- In the Challenge section at the bottom of this page, click the playground name and then click Connect Org.
- On the login screen, enter the username and password for the Developer Edition you just set up.
- On the Allow Access? screen, click Allow.
- On the Want to connect this org for hands-on challenges? screen, click Yes! Save it.
You’re redirected back to the challenge page and ready to use your new Developer Edition to earn this badge.
Define a Derived Product
InfinitraBytes wants to boost sales of their Laptop product. To entice customers, they’ve decided to offer a laptop bag at a price directly tied to the laptop itself. This ensures the bag’s cost always scales proportionally with the laptop’s price. Richa is tasked with implementing this new pricing strategy.
-
Source Product: Laptop
-
Derived Product: Laptop bag
-
Pricing Rule: The laptop bag’s cost is 10% of the laptop’s list price.
She sets to work, configuring the laptop bag as a derived product.
For this use case, Richa uses the Default Discovery Procedure included in Salesforce Pricing. With that in place, she moves on to the next step, which is defining the derived product. Follow along on your Developer Edition org.
- From the App Launcher, find and select Price Management.
- On the Price Management home page, click the Products tile, and change the list view to All Products.
- Under Product Name, click Laptop Bag.
- On the Related tab, scroll down until you find the Price Books section.
- Click Add Standard Price.
- Enter these details:
- Is Derived: Selected
- List Price:
0 - Product Selling Model: One Time
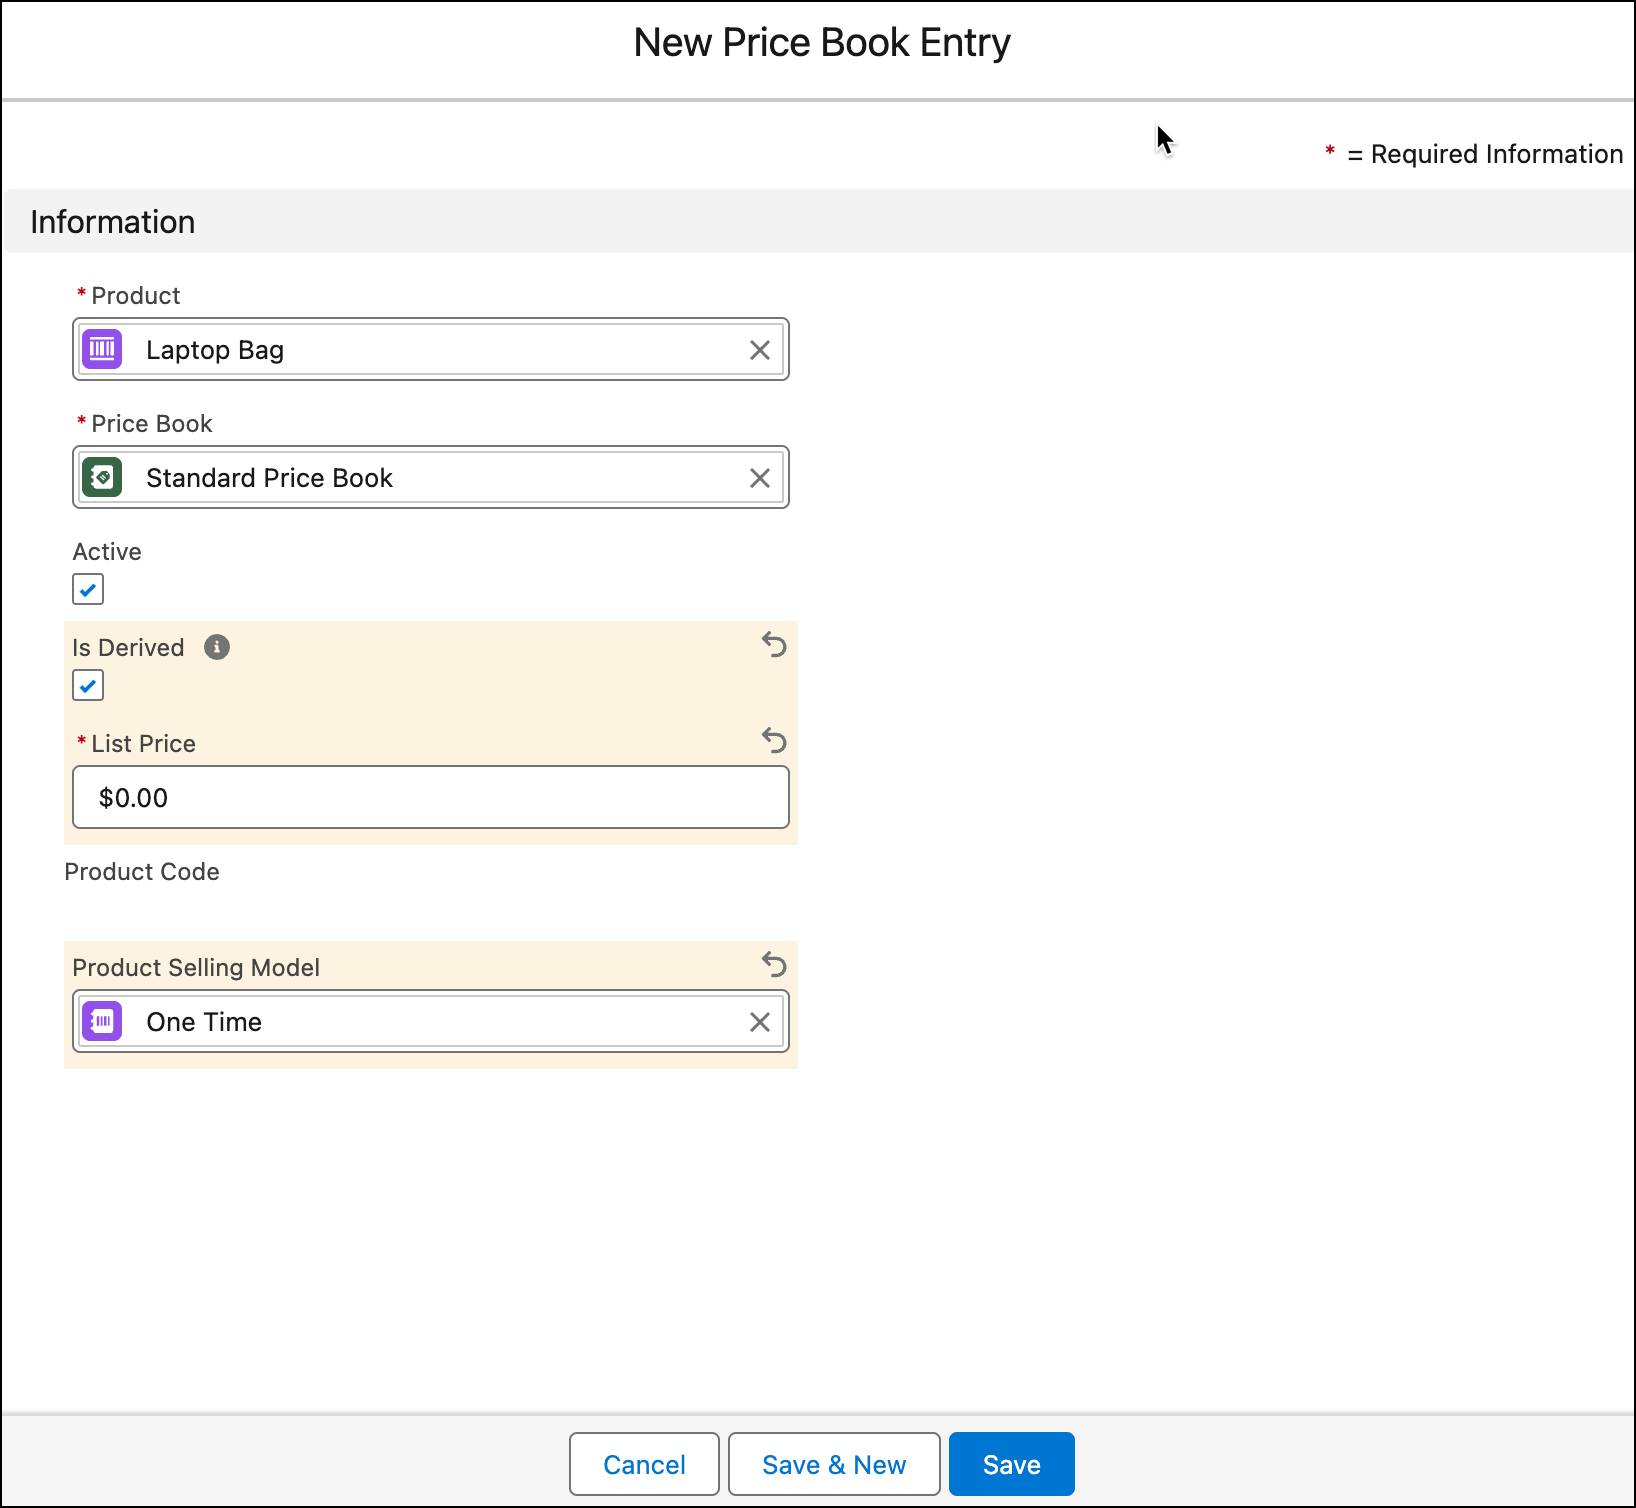
7. Click Save.
The list price of the laptop bag is set to zero indicating that it doesn't have a fixed base price. Instead, it uses the derived price feature to calculate the price dynamically.
Create a Derived Price Record
A derived price record is the central configuration object where you define the specific rules and formulas for calculating the price of a derived product. This record is the basis for determining the price.
Richa’s next task is to create a derived price record. Join her as she does that.
- From the App Launcher, find and select Derived Prices.
- Click New.
- On the New Derived Price page, add these details:
- Derived Pricing Scope: Transactional
- Pricing Source: Product
- Price Book: Standard Price Book
- Derived Product: Laptop Bag
- Product: Laptop
- Formula:
ListPrice * 0.10 - Effective From: Today’s date
- Click Save.
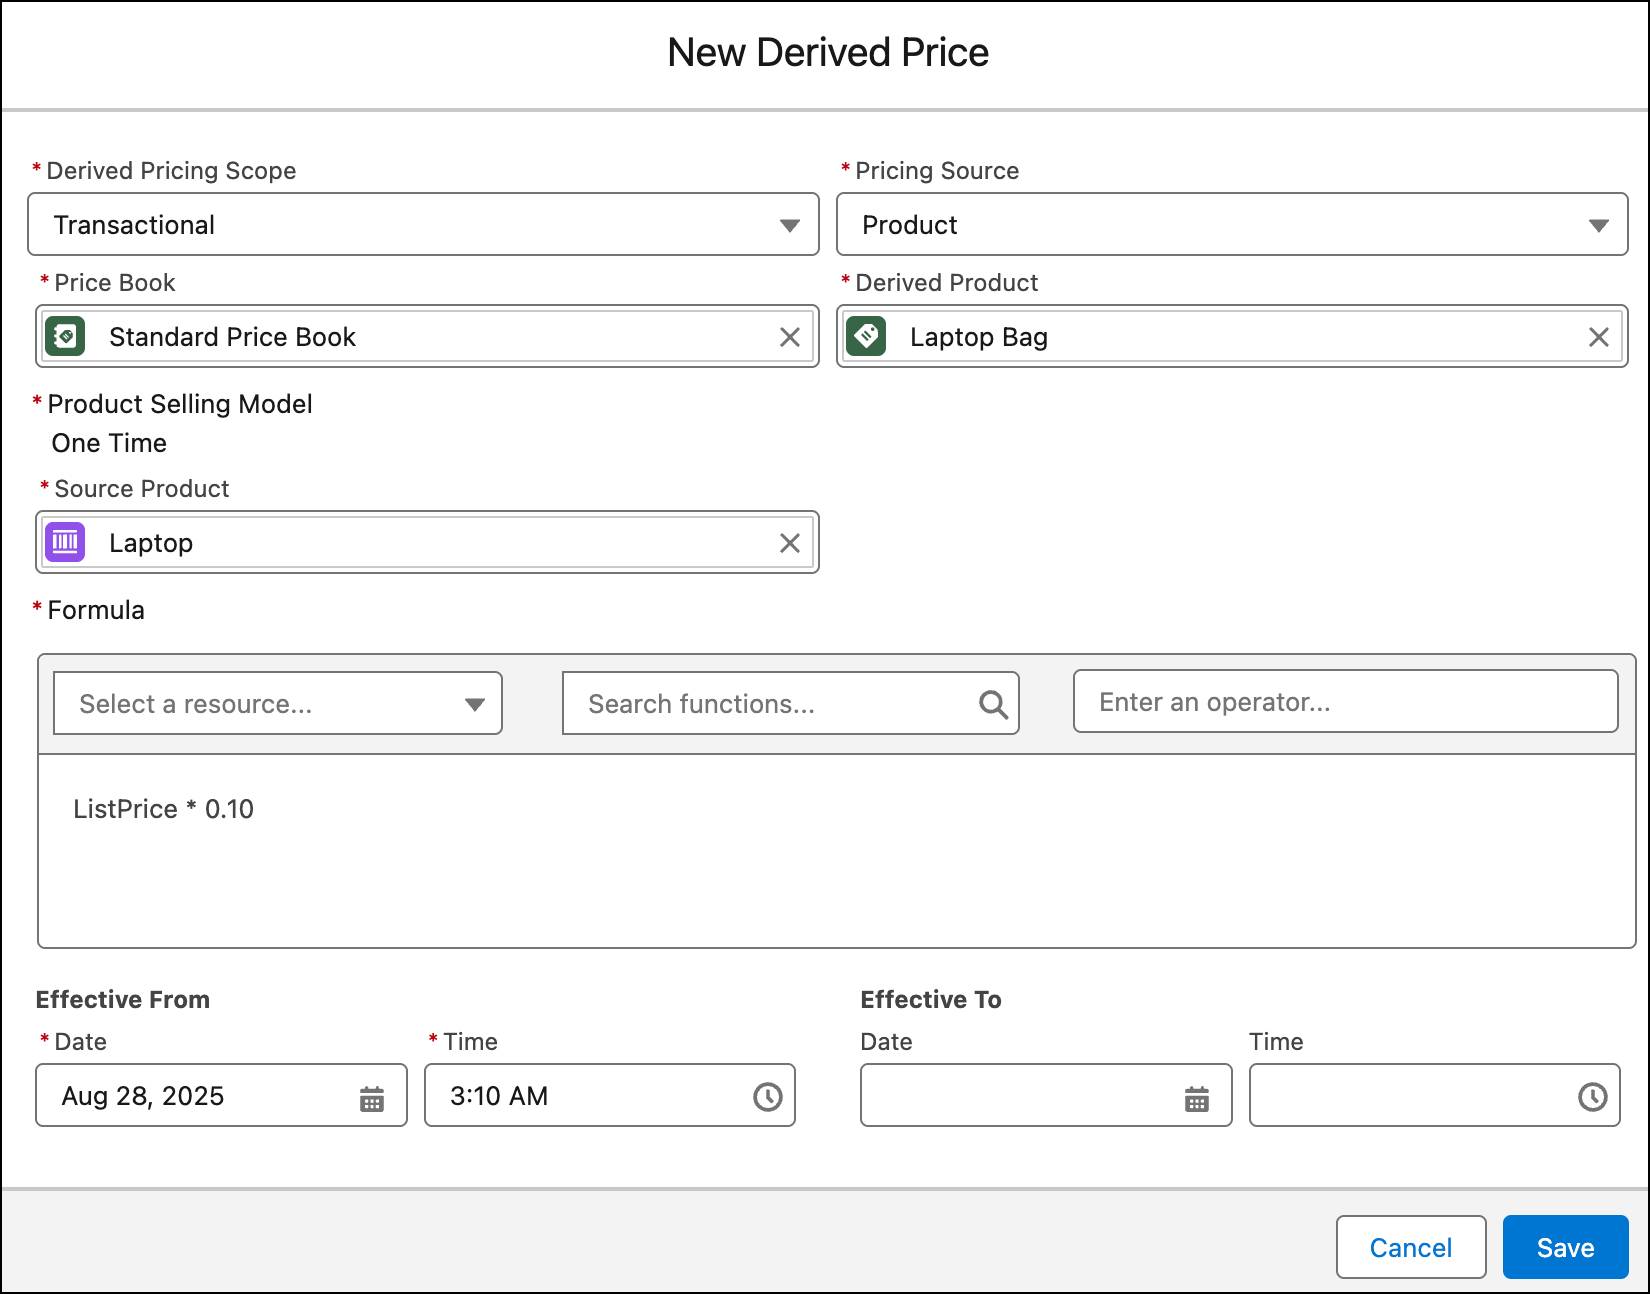

Refresh the page to see your newly created derived price record.
Sync Pricing Data
Follow these steps to ensure that the latest pricing data is available in the decision tables.
- From Setup, in the Quick Find box, search for and select Salesforce Pricing Setup.
- Under the Sync Pricing Data section, click Sync.

- Confirm that you want to sync your org.
The pricing data sync takes a few minutes to complete, but you don’t have to wait. Proceed to the next section.
Add the Derived Price Element
After defining the derived price record, Richa's next task is to add the Derived Price element to a pricing procedure. When the pricing procedure runs, the Derived Price element calculates the product's derived price using the formula from the derived price record and the data gathered by the discovery procedure. The element then populates the calculated price to the relevant transaction line item.
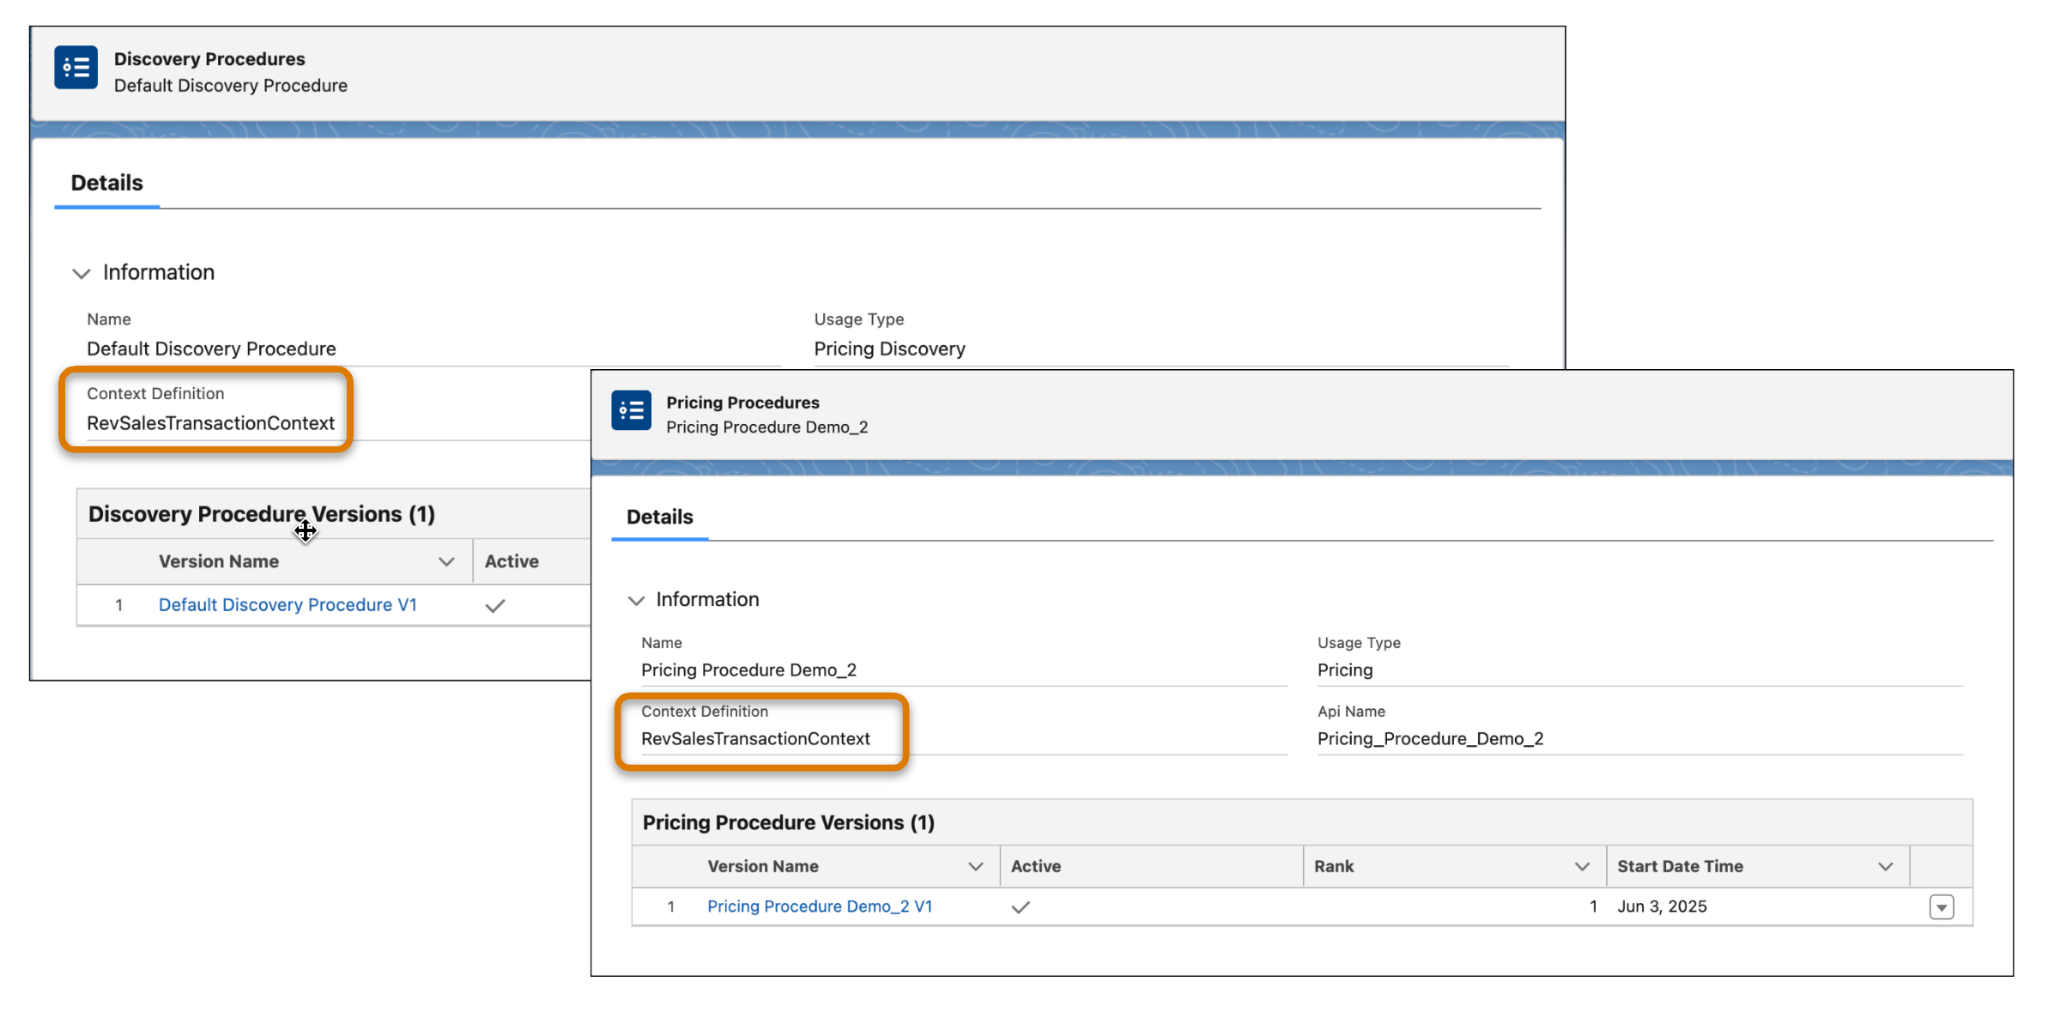
To make sure derived pricing works, always use the same context definition in both your discovery procedure and your pricing procedure. The image shows an example where the context definition is the same in both records.
Your Developer Edition org comes preloaded with a pricing procedure called Pricing Procedure Demo_2, which already has the Pricing Setting and List Price elements added. However, Richa needs to make a couple updates to the List Price element so that it’s ready to use for derived pricing. After that, she’ll add the Derived Price element to this pricing procedure. Follow along using your Developer Edition org.
Update the Pricing Procedure
- From the App Launcher, find and select Price Management.
- Select Pricing Procedures from the navigation pulldown menu.
- Change the list view to All Pricing Procedures.
- Click Pricing Procedure Demo_2.
- Under Pricing Procedure Versions, click Pricing Procedure Demo_2 V1. This opens the Pricing Procedure Builder in a new browser tab.
- Expand the Pricing Setting element.
- Expand Input Variables, and add this mapping:
- Is Derived:
DerivedPricingAttribute
- Is Derived:
- Expand the List Price element.
- For Lookup Table Details, remove Price Book Entries. For Derived Pricing, you’ll use a different lookup table.
- In the Lookup Table Details field, search for and select Price Book Entries V2.
- In the Input Rule Variables section, map the variables to these context tags:
- Product:
Product - Price Book:
PriceBooks - Product Selling Model:
ProductSellingModel
- Product:
- In the Output Rule Variables section, map the variables to these context tags:
- Price Book Entry ID:
ItemPricebookEntry - Is Derived:
DerivedPricingAttribute
- Price Book Entry ID:
Your List Price element should look like this.

Next, add the Derived Price element to your pricing procedure.
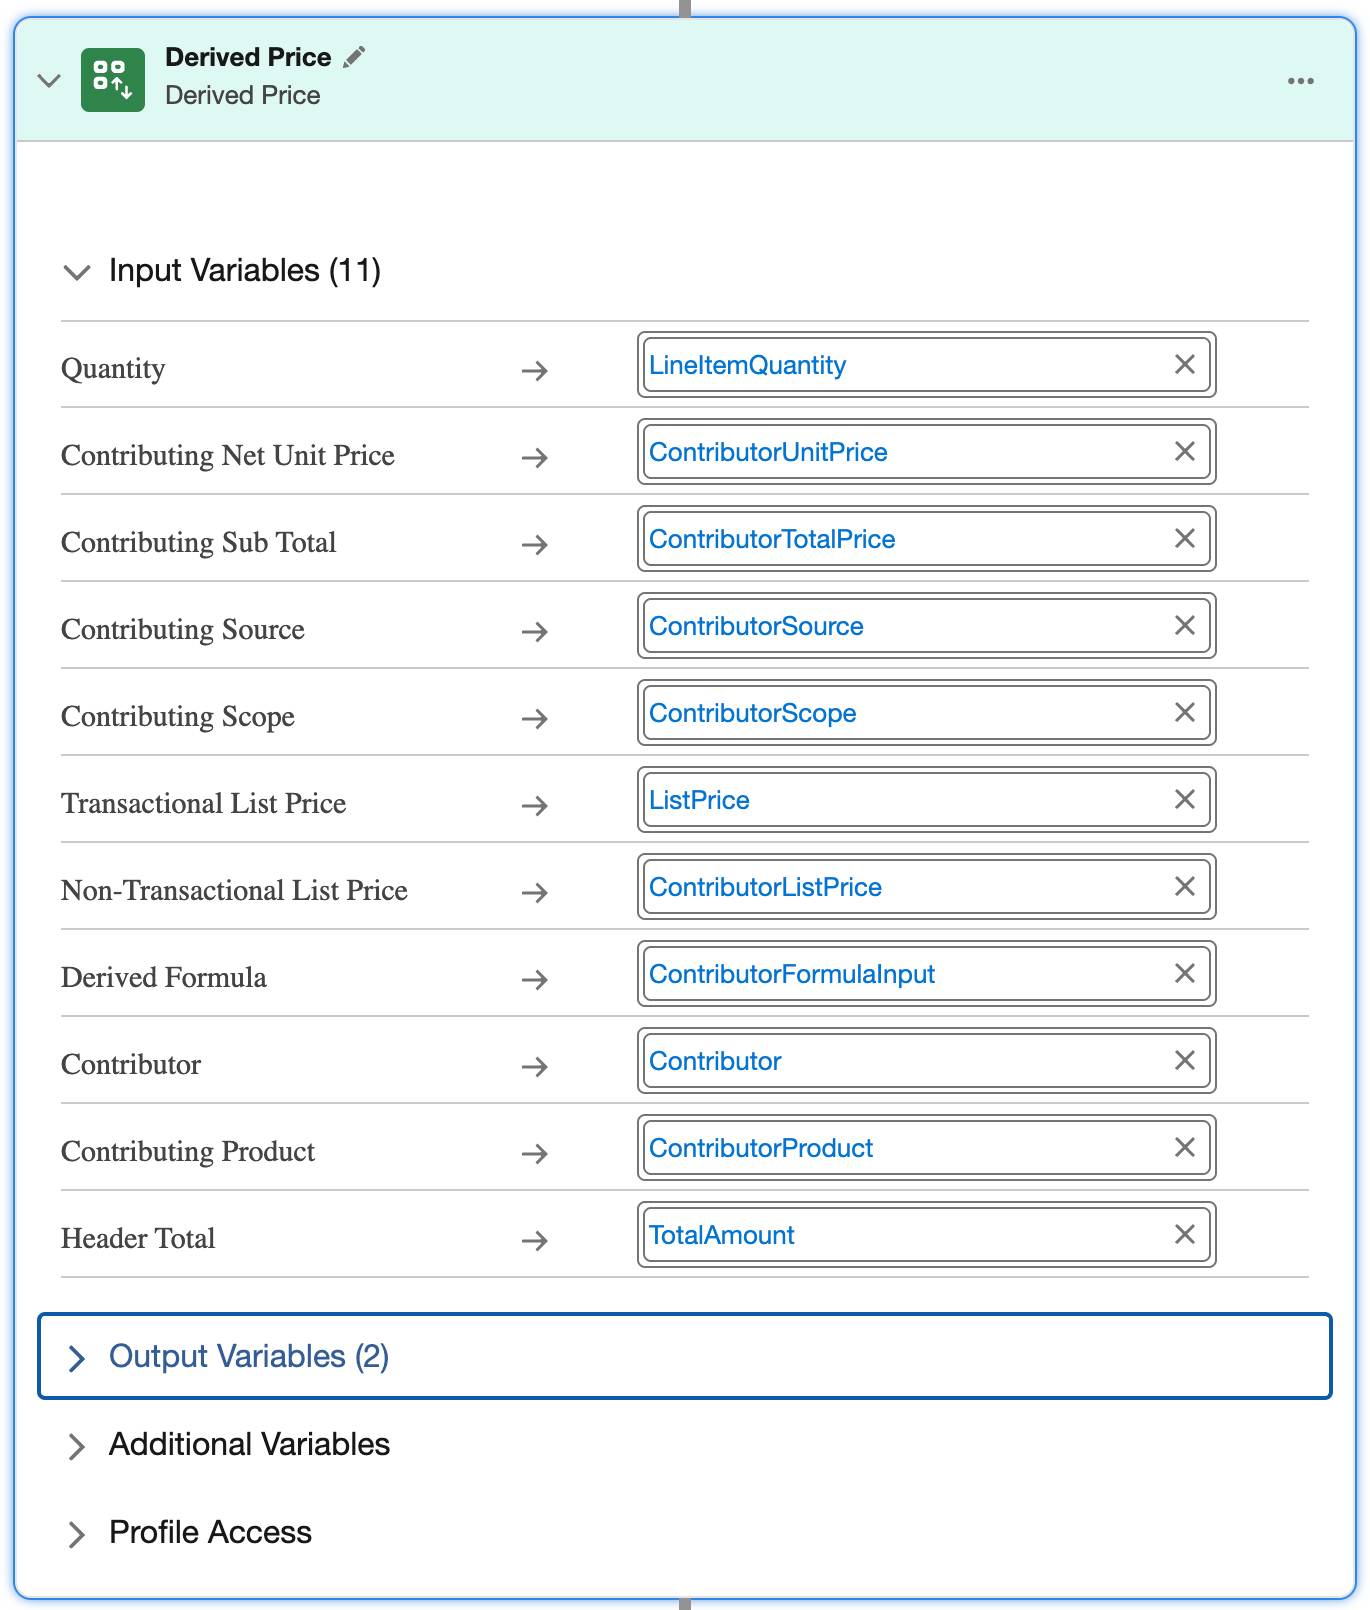
Add Derived Price Element
- Under the List Price element, click the + symbol.
- Search for and select Derived Price from the Add Element menu.
- Expand the Input Variables section and map the variables to these context tags:
- Quantity:
LineItemQuantity - Contributing Net Unit Price:
ContributorUnitPrice - Contributing Sub Total:
ContributorTotalPrice - Contributing Source:
ContributorSource - Contributing Scope:
ContributorScope - Transactional List Price:
ListPrice - Non-Transactional List Price:
ContributorListPrice - Derived Formula:
ContributorFormulaInput - Contributor:
Contributor - Contributing Product:
ContributorProduct - Header Total:
TotalAmount
- Quantity:
- On the left panel of the Pricing Procedure Builder, click

- Select the Include in Output checkbox.
- Click Save.
- Click Activate.
Here’s how your Derived Price element should look.
You have successfully added the Derived Price element to your pricing procedure.
Test the Pricing Procedure on a Quote
As best practice, test the pricing procedure before finalizing it. Richa tests the procedure on a quote to confirm it’s real time functionality. To start, she updates the pricing procedure name in her org setup, which involves changing it in one specific location.
- From Setup, in the Quick Find box, search for and select Revenue Settings.
- Under Set Up Salesforce Pricing, click the remove icon to delete the default pricing procedure.
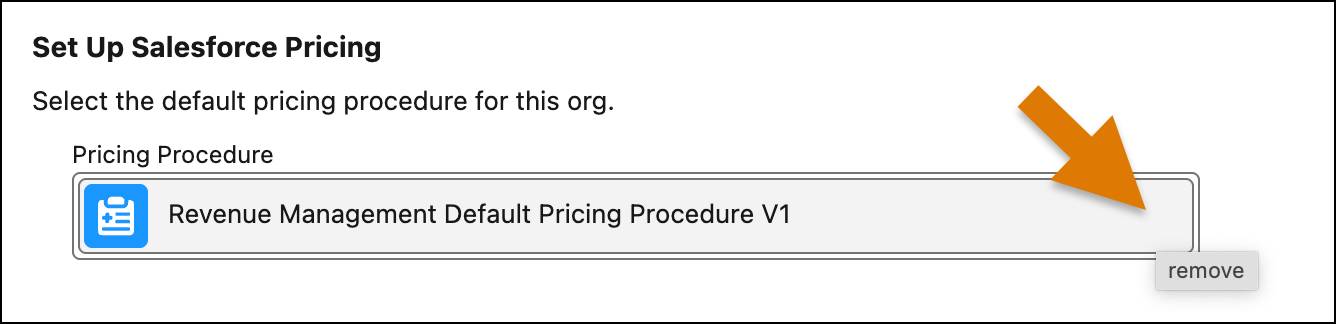
- From the dropdown menu, select Pricing Procedure Demo_2.
Richa is now ready to test derived pricing on a quote.
- From the App Launcher, find and select Quotes.
- Change the list view to All Quotes.
- Click Advanced Pricing Demo.
- From the Advanced Pricing Demo quote page, click Browse Catalogs.
- In the All Catalogs list, select Hardware Catalog, and click Next.
- From the displayed products list, select the checkbox for Laptop and Laptop Bag.
- Click Add Selection to Quote.
- Click Save Quote.
Here’s how your quote should look.
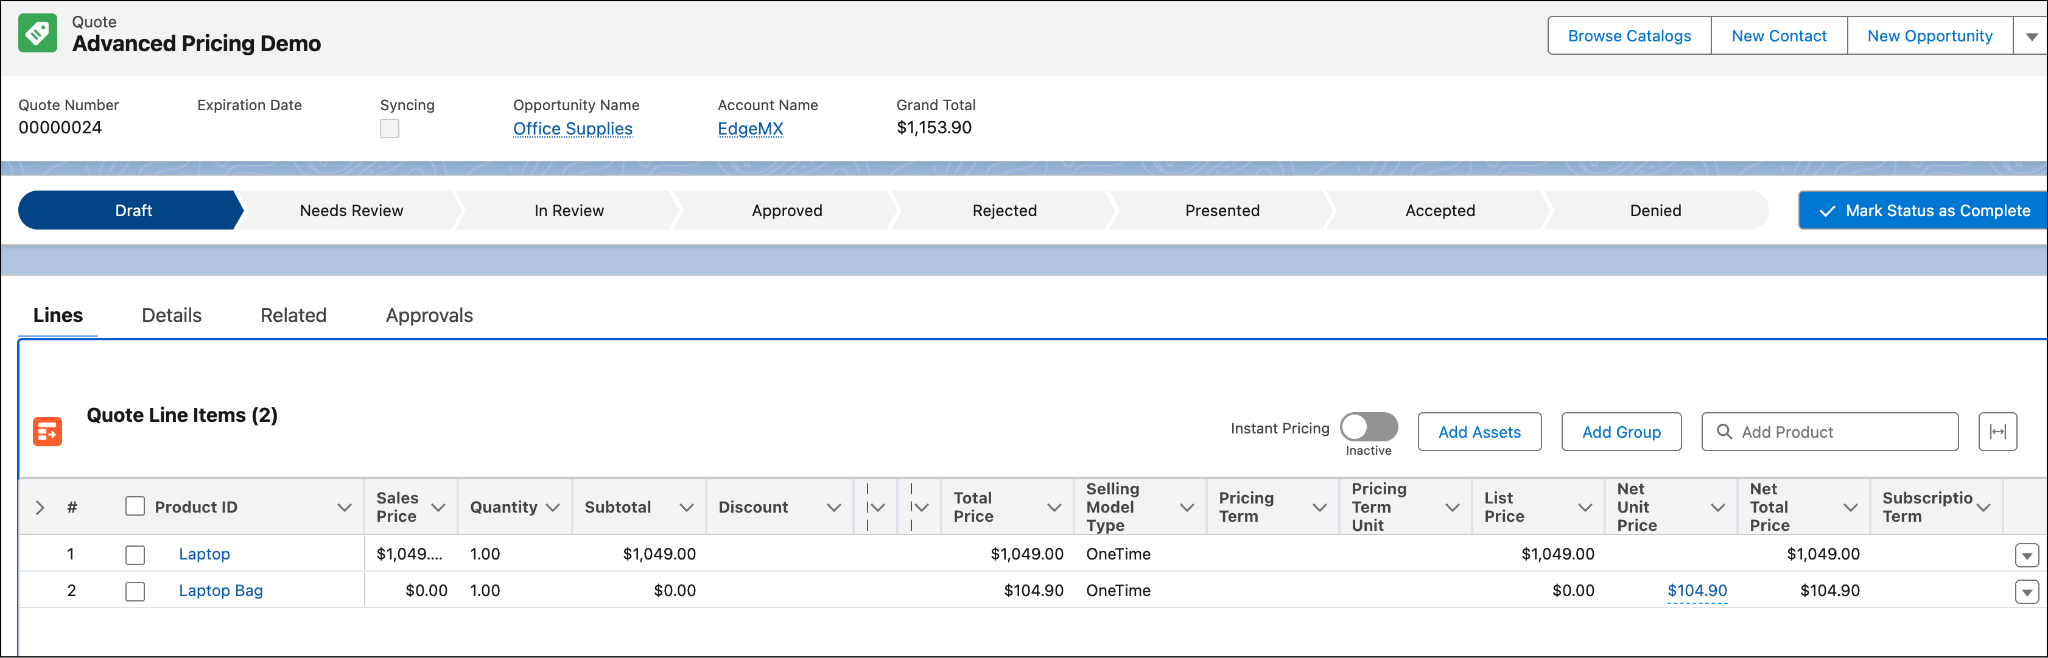
Notice that the laptop bag’s price automatically updates based on the price of the laptop. When you hover your mouse over the Net Unit Price field of the Laptop Bag, the price waterfall shows the derived price in action.
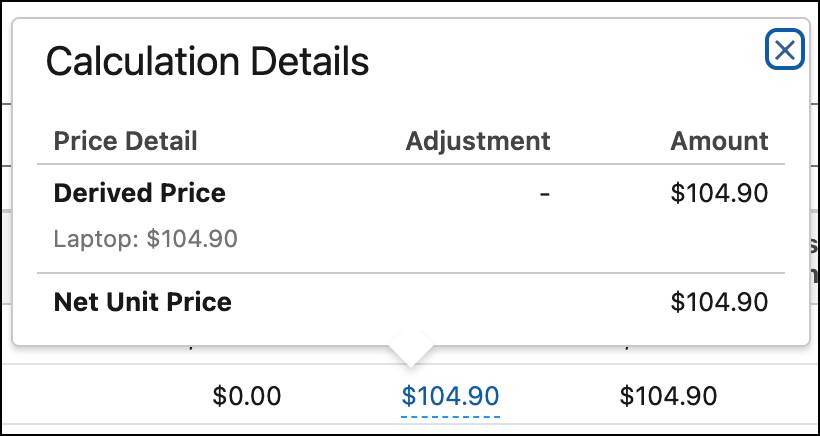
Congratulations! Your derived pricing is working as expected.
Coming Up
In this unit, you learned how to implement derived pricing. You know how to define a derived product, create a derived price record, and configure the Derived Price element in your pricing procedure. Head to the next unit to discover another advanced pricing strategy: subscription pricing.