Use Quick Actions, Custom Buttons, or Apex
Learning Objectives
After completing this unit, you’ll be able to:
- Create quick actions (instead of using JavaScript) to validate fields, create records with prepopulated values, and redirect to a Visualforce page.
- Describe how to use custom URL buttons to fulfill the same navigation and redirect functionality as JavaScript buttons.
- Use a Visualforce custom button or a quick action instead of a JavaScript button to work with multiple records in lists.
You Have Buttons? We Have Alternatives
Previously, we explained why it’s time to migrate to Lightning Experience, where great new features let you move past JavaScript buttons. Next, we explain how you can easily migrate your custom JavaScript button functionality using solutions that work in both Salesforce Classic and Lightning Experience.
This table maps use cases for JavaScript buttons to alternate—and, in most cases, better—solutions in Lightning.
JavaScript Button Top Use Cases |
Lightning Alternatives |
Declarative/Programmatic |
|---|---|---|
Validate fields (presave) |
Quick actions (using default values or formulas) |
D |
Apex triggers |
P |
|
Create records with prepopulated values |
Quick actions (using default values or formulas) |
D |
Redirect to a record page |
Custom URL buttons |
D |
Mass actions on list view records |
Quick actions |
D |
Custom Visualforce buttons on list views |
P |
|
Redirect to a Visualforce page |
Visualforce quick actions |
P |
Lightning web component actions |
P |
|
Prefill values based on inputs |
Lightning web component actions |
P |
Confirmation pop-up screens |
Lightning web component actions |
P |
API calls (Salesforce and third-party) |
Lightning web component actions |
P |
Feedback pop-up screens |
Lightning web component actions |
P |
Third-party integration |
Lightning web component actions |
P |
As you can see, Salesforce offers several declarative tools for converting the functionality of your JavaScript custom buttons.
Quick Actions
Quick actions support many of the common uses of JavaScript buttons. Quick actions can be based on a specific object or can be global, meaning that they’re more generic and accessible from any record or the Chatter feed. There’s a quick action to do just about anything in Salesforce. Here are some examples.
Validate Field Values
Sometimes you want to make sure that certain fields are filled in or populated with specific criteria when your users create or update records.
Let’s say you want to create an action for closing a task without requiring users to go to a full edit page. But you also want to make sure that the task has a due date before it can be closed.
You can fulfill all these requirements by creating a quick action for the Task object.
- From the object management settings for cases, go to Buttons, Links, and Actions.
- Click New Action.
- For Action Type, select Update a Record.
- For Label, enter
Close Task.
- Click Save.
Now we update the Close Task quick action’s layout to select the fields that we want to appear on the action. You can easily make a field required or read-only through its field properties. In this example, we marked the Assigned To field as required.

After you set the fields and save the action layout, you can add predefined field values for any of the fields on the task record. We also added a predefined value for the Status field to be changed to Completed.

Now that we’re done configuring the layout for the action, we edit the Task page layout. We drag the action from the Mobile & Lightning Actions category in the palette to the Salesforce Mobile and Lightning Experience Actions section.

Now users can access the Close Task action from a task record page in both Lightning Experience and the Salesforce mobile app. Here’s an example of a Close Task action on the Tasks page.
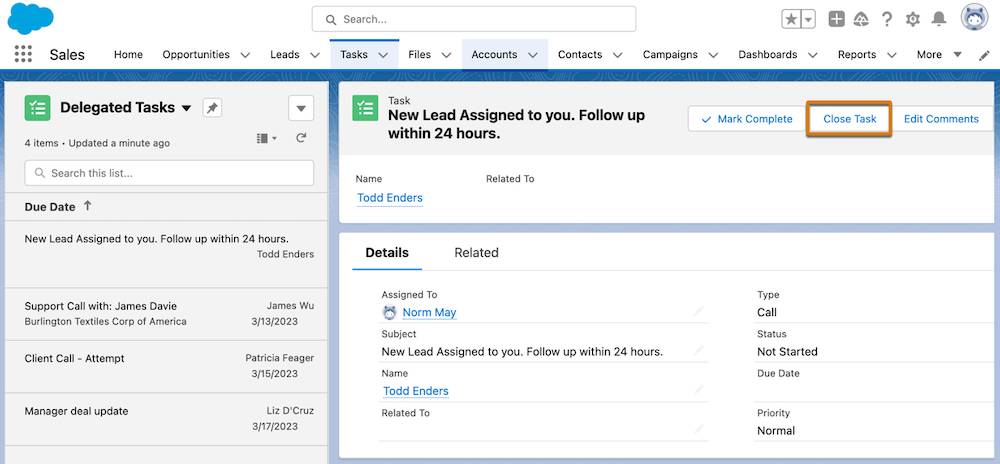
Clicking Close Task brings up the action, which the user can quickly act upon and save.

Here’s what it looks like in the Salesforce mobile app.

Prepopulate Fields with Values
A more advanced use case is when you want to let users create a record, but you also want one or more of the fields to be populated automatically based on values in a dependent field.
For example, let’s say your inside sales team’s typical quarterly quota is one fourth of their customers’ annual revenues, increased by 10%. Because that simple formula doesn’t always apply, you want to prefill the opportunity amount with the value, but also let the user modify it. Create an action so your users can modify the field quickly and efficiently without going to the full opportunity record page.
To create this sample action, you follow the same steps as before for creating the opportunity quick action.
- From the object management settings for accounts, go to Buttons, Links, and Actions.
- Click New Action.
- For Action Type, select Create a Record.
- For Target Object, select Opportunity.
- Pick the appropriate Record Type.
- For Label, enter
New Oppty.
- Click Save.
Once you’ve picked the fields for the action layout, you can add predefined values for the Amount field. In our example, we’ve used this formula:
Account.AnnualRevenue * 1.10 / 4
Add this action to the Account page layout. When users invoke it, they see a value prepopulated in the field that they can accept or override.

The cool thing about this action is that you can pull data from the opportunity’s account to use when creating the opportunity. Salesforce also supports record traversal, so if you have hierarchical accounts, you can pull the revenues from the parent account like this:
Account.Parent.AnnualRevenue
Don’t worry about remembering the formula formats; quick actions are declarative and use the Salesforce formula builder.
Redirect to a Visualforce Page Based on Input Values
You can create Visualforce pages to enhance your business processes. Users can navigate to these Visualforce pages in various ways, such as with custom buttons, action overrides, and tabs.
One benefit of Visualforce pages is that by using the standard controller, you can create customized record pages and add prevalidation, prepopulated fields, formulas, and much more.
JavaScript buttons are commonly used in Salesforce Classic to read and pass values from a record into a URL that then redirects users to a Visualforce page. You can also give your users access to Visualforce pages via quick actions. Creating Visualforce quick actions is easy, and a similar process to what we’ve already covered. The only difference is that you select Custom Visualforce as the action type.
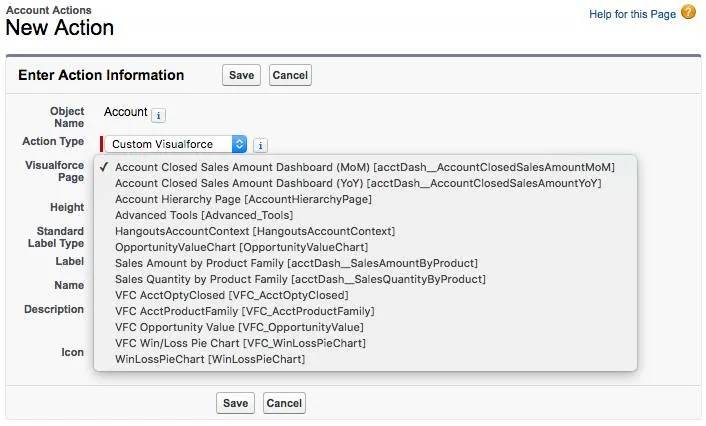
For object-specific Visualforce quick actions, you must include the standardController for the object in your Visualforce page to gain access to the record data and have the Visualforce page appear in the quick action picklist.
Custom URL Buttons and Links
Maybe you use JavaScript buttons for navigation, redirecting users to another page with the command window.open(URL) and some variables. In most cases, you can use custom URL buttons or links in Lightning Experience instead.
Here’s a list of different URL buttons and links, and their redirect behavior in Lightning Experience.
Custom URL Button or Link |
Lightning Experience Behavior |
|---|---|
|
External URL www.google.com
|
URL opens in new tab |
|
Relative Salesforce URL, View /{!Account.Id}
|
Record home page opens in existing tab |
|
Relative Salesforce URL, Edit /{!Account.Id}/e
|
Edit overlay pops up on the existing page |
|
Relative Salesforce URL, List /001/o
|
Object home page opens in existing tab |
|
$Action URL, View {!URLFOR($Action.Account.View, Account.Id)}
|
Record home page opens in existing tab |
|
$Action URL, Edit {!URLFOR($Action.Account.Edit, Account.Id)}
|
Edit overlay pops up on the existing page |
Apex Triggers
You might be familiar with Apex triggers; they’ve been supported on our platform for years. Apex triggers can be configured to execute before or after a user clicks Save on a record.
When you need pre-save validation, calculation, and population of fields, consider using Apex triggers. They’re especially useful for third-party integration, because the rules are enforced through the Salesforce API across Salesforce Classic, Lightning Experience, and the Salesforce mobile app.
For more information on Apex triggers, check out the Apex Developer Guide or earn the Apex Triggers badge.
Mass Actions with Custom Visualforce Buttons and Quick Actions
Another great feature in Lightning Experience is support for using Visualforce buttons on list views. With this feature, you can use your existing Visualforce actions in Lightning Experience to work with multiple records in lists. Here’s how.
- Create your Visualforce page. Here is sample code for editing the Stage and Close dates for multiple opportunities:
<apex:page standardController="Opportunity" recordSetVar="opportunities" extensions="tenPageSizeExt"><apex:form><apex:pageBlock title="Edit Stage and Close Date" mode="edit"><apex:pageMessages /><apex:pageBlockButtons location="top"><apex:commandButton value="Save" action="{!save}"/><apex:commandButton value="Cancel" action="{!cancel}"/></apex:pageBlockButtons><apex:pageBlockTable value="{!selected}" var="opp"><apex:column value="{!opp.name}"/><apex:column headerValue="Stage"><apex:inputField value="{!opp.stageName}"/></apex:column><apex:column headerValue="Close Date"><apex:inputField value="{!opp.closeDate}"/></apex:column></apex:pageBlockTable></apex:pageBlock></apex:form> </apex:page>
- Create a custom button that references your Visualforce page.
- Add the button to your list view.
You can also use quick actions to set up mass actions on a list view declaratively. Mass quick actions are available for cases, leads, accounts, campaigns, contacts, opportunities, work orders, and custom objects that support quick actions and have a list view button layout in Lightning Experience.
Here’s how to set up a mass action.
- Set up Create a Record or Update a Record quick actions for your objects.
- From the object management settings for the object that you added quick actions on, go to List View Button Layout.
- Edit the List View layout.
- In the List View Actions in Lightning Experience section, add the actions that you want your users to be able to perform on list views for multiple records.
- Save your changes.
Here’s how mass actions show up in Lightning Experience.

As you can see from our examples, Salesforce has a great set of features that allow you to migrate your JavaScript button functionality and move to Lightning Experience.
Start Converting JavaScript Buttons
You may have a lot of JavaScript buttons that have accumulated in your org over the years. You might expect that the migration or conversion process will take a long time. But the job might not be as hard as you think. We did an analysis of JavaScript buttons in the internal Salesforce org that all our employees use. We found that many buttons were obsolete or rarely invoked by users.
Others were simply duplicates—the same button but on different objects. After going through the list, we discovered that many of the JavaScript buttons could be converted to the solutions we’ve looked at so far. For the remainder, we could address quite a few with the Lightning web component actions.
You probably noticed Lightning web component actions in the list of programmatic solutions as a common replacement for many of the JavaScript button use cases. Lightning web component actions are easy to build, because they’re based on the quick action framework. We cover Lightning web component actions more in depth next.
Resources
- Salesforce Help: Quick Actions
- Trailhead: Understand How Actions Work in Lightning Experience
- Apex Developer Guide: Apex Quick Start