Create and Customize List Views
Learning Objectives
After completing this unit, you'll be able to:
- Create a custom list view.
- Create a custom list view chart.
- Edit and sort list views.
Create a List View
Since users don’t need an admin to create list views for them, Maria’s going to go get some coffee, and we’ll step into the shoes of one of her coworkers, Erin Donaghue. Erin’s a new sales rep for Ursa Major Solar, focusing on channel customers in the United States. She wants to set up a custom list view so she can see only those types of accounts. Here we go.
- From the App Launcher, find and select the Sales app and select the Accounts tab.
- From the list view controls
 , select New.
- Name the list
Channel Customers.
- Select All users can see this list view.
- Click Save.
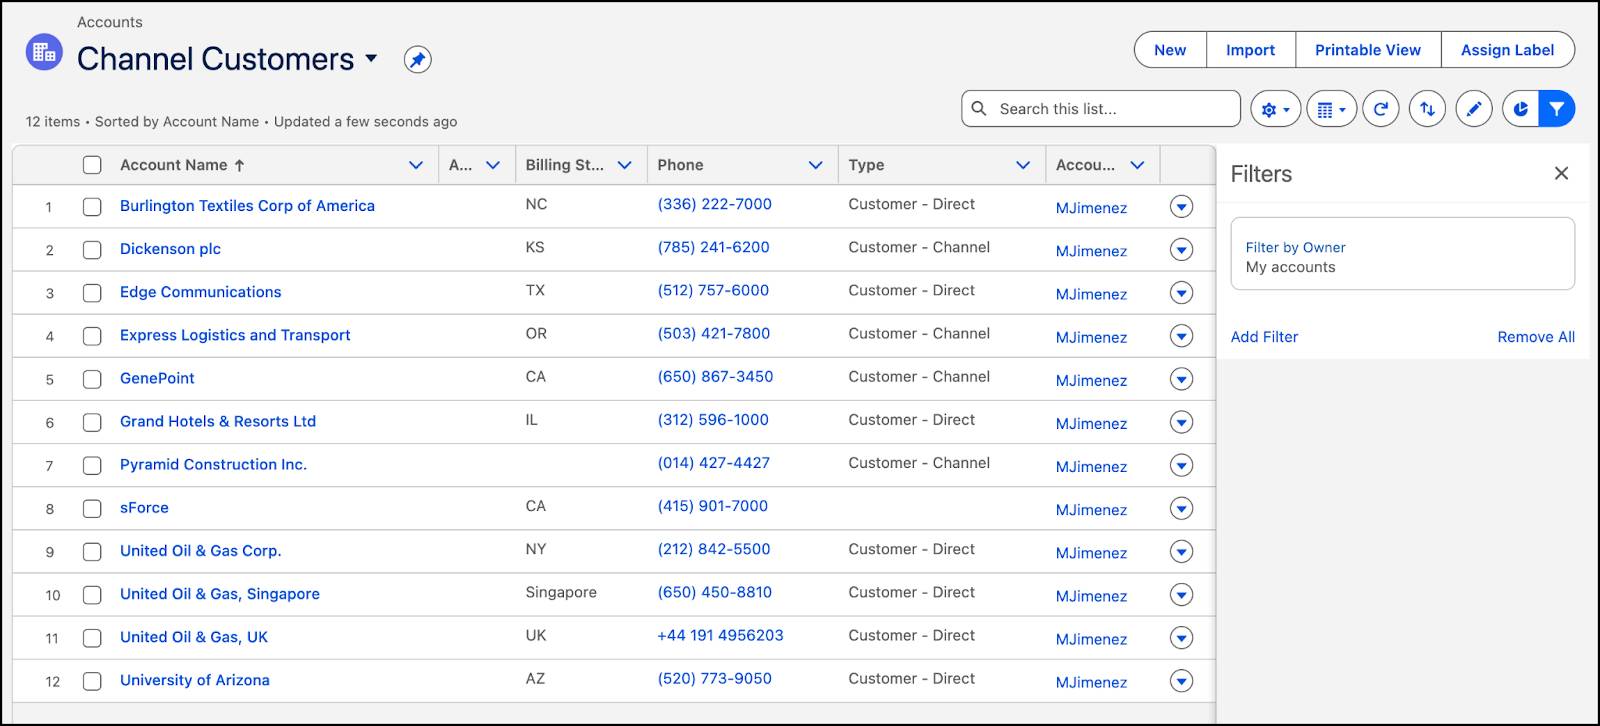
So far, the list view is showing us all of Maria's accounts, regardless of their type or location. Also, the Filters panel is now available.

Let’s set up some filters.
First, Erin wants to see only channel customers.
- Click Add Filter.
- From the Field dropdown menu, select Type.
- Select the equals operator.
- For Value, select Customer - Channel, then click Save, and then click Save again.
Great! The list has been pared down to only channel customers.

But let’s say Erin not only wants to see channel customers, but also only those on the West coast of the United States.
- Add another filter where Billing State/Province equals WA,OR,CA.
Wow, that filtered the list down to only a few items. But you get the idea. The new view appears in the list view dropdown list so you can access it later.

You can collapse and expand the filter pane by clicking  . You can change who can see the list view by clicking
  and selecting Sharing Settings.
Customize a List View
You’ve created a custom list view and added filters, but there’s even more you can do. Erin doesn’t want to see certain columns, and wants to add others. Let’s start there.
- From the list view controls
 , select Select Fields to Display.
- Move Account Site, Account Owner Alias, and Phone out of the Visible Fields area, and add Industry and Customer Priority instead.

- Click Save.
See the little arrow in the Account Name column header? That indicates which direction the contents of that column are sorted. Click the header to sort that column. The arrow indicates how the list is sorted: from the column’s first record  (alphanumerically) or its last
  .
.

You can edit record fields directly from within a list view. Editable cells display a pencil icon  when you hover over the cell, while non-editable cells display a lock icon
  .
.
Create a List View Chart
List view charts help you visualize your list view data. Erin wants to see which accounts represent the most overall pipeline value, so she’s going to add a chart to the All Opportunities list view. Let’s follow along.
- From the Sales app, click the Opportunities tab.
- Use the dropdown menu (
 ) to select the All Opportunities list view.
- Click
 .
.
- In the Charts panel that appears, click
 and select New Chart.
- Name the chart
Pipeline Total Valueand give it these parameters.
- Chart Type: Donut Chart
- Aggregate Type: Sum
- Aggregate Field: Amount
- Grouping Field: Account Name
The aggregate type specifies how the field data is calculated: by sum, count, or average. The aggregate field specifies the type of data to calculate. The grouping field labels the chart segments.

- Click Save.
Resources
- Salesforce Help: Create or Clone a List View in Lightning Experience
- Salesforce Help: Edit List View Filters in Lightning Experience
- Salesforce Help: Create a List View Chart in Lightning Experience
- Salesforce Help: Update Records Inline from a List View in Lightning Experience
