Set Up an Experience Cloud Site for Salesforce Customer Identity
Learning Objectives
After completing this module, you’ll be able to:
- Enable Salesforce Experience Cloud sites.
- Create and activate a site.
- Change the default login page.
Experience Cloud Sites and Salesforce Customer Identity
You set up and manage Salesforce Identity for customers through Experience Cloud sites. Using the Communities license that you get with Salesforce Identity, you can create and deliver pages for your customers and partners to self-register and log in to your site.
In this brief encounter, you get a glimpse of all that sites offer. You can get to know it better with the Experience Cloud trail. But for now, we’ve got a Salesforce Customer Identity site to set up!
Enable Experience Workspaces
To set up an Experience Cloud site, you enable Experience Workspaces. With Workspaces, you can build and modify your site using templates.
- From Setup, enter Digital Experiences in the Quick Find box. Under Digital Experiences, select Settings.
- Select Enable Digital Experiences. Your digital experiences domain is shown. It includes your My Domain name in the format MyDomainName.my.site.com for production orgs.
- Click Save.
Now that you’ve enabled sites in your org, let’s create your Salesforce Customer Identity site.
Create Your Site
After you enable sites, you’re ready to create your first site. Experience Workspaces makes it easy for you by providing several templates. When you create a site, default pages for login, self-registration, change password, forgot password, and your home page are set based on your site template.
For this demo, we’re using the Customer Service template. It has an App Launcher that lets users quickly find and access applications. By adding a selection of apps to the App Launcher, you’re making it easy for your customers to access everything they need. There’s no need for them to go elsewhere.
- From Setup, enter Sites in the Quick Find box, then select All Sites.
- Click New. The Experience Workspaces Creation wizard displays several templates to choose from. Hover over them to read their descriptions.
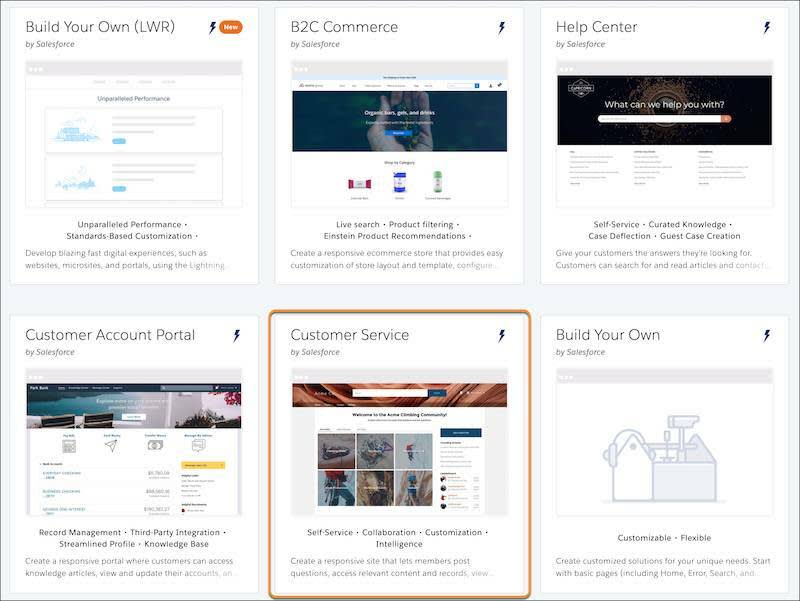
- Select the Customer Service template.
- Click Get Started.
- Name it customers, and add customers at the end of the URL.
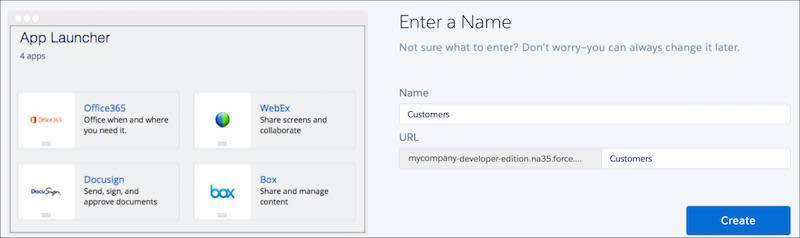
- Click Create.
After a brief intermission, your new site opens in Experience Workspaces. This is where you manage your Salesforce Customer Identity site. Administration is where we configure our Salesforce Customer Identity site login page.

Control Membership to Your Site
Use profiles to lock down your data so that customers and partners see only what you want them to see. You certainly don’t want to give access to malicious users. A user who appears to be a customer can be a reaver (or, as they say on Earth, a hacker) in disguise. Profiles help prevent that from happening.
- From Experience Workspaces, select Administration, then select Members.
- Under Select Profiles, from the dropdown list, select All.
- In the list of Available Profiles, locate the Customers profile and then click Add to add it to Selected Profiles.

- Click Save.
Salesforce takes a couple of minutes to update membership for your site. You receive an email confirming that you created a customer profile.
Complete the Initial Site Setup
To complete your Salesforce Customer Identity site setup for this demo, you need to publish it, complete the registration, and then activate it.
Publish the Site
Why publish your site now? You wouldn’t publish it yet in a production org, but our demo requires this step to avoid an error later on.
- At the top left, select Administration, then select Builder.
 Now you’re at the tool that lets you easily brand your site pages. If you never opened this tool before, an introductory walk-through appears. Feel free to step through the walk-through before you continue.
- At the top right, click Publish, and in the confirmation dialogue, click Publish again. Then click Got it.
Behind the scenes, Salesforce creates login, password, and self-registration pages based on the Customer Service template. You receive an email when the site is published. Continue on—you don’t have to wait for the email to come.
Review the New Pages
When a site is created with the Customer Service template, pages customized for the Customer Service experience are added. You can modify the Login & Registration page to determine the look and behavior of your customers’ login experience.
- From the top left, click
 , then select Administration.
- Select Login & Registration. Notice that “Experience Builder Page” appears under Login Page Setup and Password Pages. These custom pages come with the Customer Service template and were designed using Experience Builder.
- Scan over the Login & Registration page to see which login settings you can configure. For now, we’re going to keep the default values.
- Click Cancel.

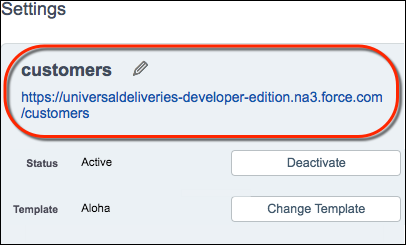
Activate Your Site
- From the left, select Settings. Notice that the URL of your site appears under its name. You’ll use it soon.
- Click Activate, then click OK.
Salesforce sends you an email when the site’s activated.
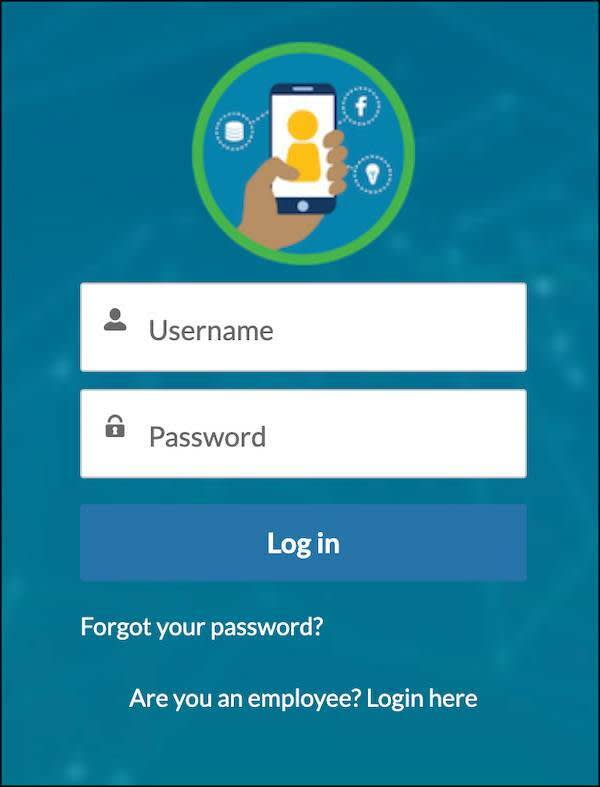
View Your New Login Page
To view your login page, open your site URL in a private browsing (incognito) window to see what new users get when they click the URL. If you open the URL in a regular window, you see a page for someone who’s already logged in.
- If you’re not already there, from the left, select Settings.
- Right-click the URL and select Open Link in Incognito Window (in Chrome) or Open Link in New Private Window (in Firefox or Safari).
Your login page looks something like this. Check out the Log In and Forgot your password? links under the Login button. Remember the custom “Experience Builder Page” you saw on the Login & Registration page? That’s what built these links.

Replace the Logo on the Login Page
You now have a login page, but it’s got the Salesforce logo, which the Customer Service template supplied. Let’s change it. Here’s where you can impress your customers with a professional-looking and branded login page. You’re the most established delivery service in the galaxy, make sure that your customers—and potential customers—know it.
It’s easy to replace the default logo with your own. For this module, you use the Universal Deliveries’ logo file that we placed in our Salesforce Identity GitHub repository.
By the way, if the GitHub public repository is unfamiliar to you, it’s a great way to store code in the cloud. Developers can share code and related resources independent of any single corporation.
- From another browser window, go to the GitHub repository, https://github.com/salesforceidentity/IdentityTrail-Module3.
- Select identity_external_logo.png and save the logo on your local drive.
Now add the logo to your login page.
- If you closed Experience Workspaces, from Setup, enter Sites in the Quick Find box, select All Sites, then click Workspaces next to customer site URL.
- Select Administration, then select Login & Registration.
- Replace the logo. For Logo Type select File. Then select Choose File (or Browse depending on the browser you’re using). Select the file that you downloaded from GitHub and click Save.
Return to the login page in your private (incognito) browser and reload it.
Check it out. Your login page has the logo for our Salesforce Customer Identity module.
Replacing a logo is a simple customization that you can do right from the Login & Registration page. This is just one way that you can use Experience Builder to brand your site.
What’s next? Let’s set up a way for visitors to register as customers right from the login page.
Resources
- Salesforce Help: Experience Management
- Salesforce Help: Set Up and Manage Experience Cloud Sites
- Trailhead: Experience Cloud Basics
- Salesforce Help: Register a Salesforce Sites Domain