Install AppExchange Packages
Learning Objectives
After completing this unit, you’ll be able to:
- Describe the differences between managed and unmanaged packages.
- List key questions to ask before installing a package.
- Install a package in your org.
Get Ready to Install
You found a solution that fits your needs. Awesome! Before you install the solution in your org, let’s learn about the types of packages you might install from AppExchange.
Managed and Unmanaged Packages
AppExchange solutions are installed in your org in packages, which are containers for apps, tabs, and objects. Packages come in two flavors: managed and unmanaged. The solution provider decides which package type to use to distribute the solution, which in turn influences how the solution behaves in your org. Let’s review the most important differences between package types.
Attribute |
Managed Packages |
Unmanaged Packages |
|---|---|---|
Customization |
You can’t view or change the solution’s code or metadata. |
You can customize code and metadata, if desired. |
Upgrades |
The provider can automatically upgrade the solution. |
To receive an upgrade, you must uninstall the package from your org and then reinstall a new version from AppExchange. |
Org limits |
The contents of the package don’t count against the app, tab, and object limits in your org. |
The contents of the package count against the app, tab, and object limits in your org. |
If you’re interested in getting under the hood of a solution, look for an unmanaged package. Otherwise, a managed package probably suits your needs, because you can install it without worrying how it affects your org’s app, tab, and object limits. Plus, upgrades are painless. Now that you reviewed the differences between package types, let’s look at how to approach the installation process.
How to Install Solutions
In the Get Started with AppExchange unit, you saw how taking a little time to strategize greatly streamlines your search. Similarly, asking yourself a few questions before installation can help you zip through the process. So, before installing, ask:
-
Am I installing the package in the right org? AppExchange experts never install in production without testing in a Developer Edition org or a sandbox first. When you’ve decided where to install the package, have the login credentials for that org available. You need those credentials to establish a connection with AppExchange.
-
Have I reviewed the documentation? Many providers include documentation to help you with installation, configuration, and troubleshooting. If documentation is available, it appears on the app’s Overview tab.
-
Who needs access to the solution? When you install a package, you determine which users can access its functionality. Options include admins only, all users, or specific profiles. If you’re not sure, grant access to admins only—you can always give other users access later.
Get Your Trailhead Playground Username and Password
In this unit, you practice installing a package into a Trailhead Playground. You need your login credentials for the installation, so the first step is to get your username and password. In this section, you learn how to find your playground username and reset your password. If you already know your playground login credentials (or if you use a Developer Edition org and know your DE credentials), you can skip this section.
Let’s get started by opening your Trailhead Playground. Scroll to the bottom of this page and click Launch. If you see a tab in your org labeled Get Your Login Credentials, great! Follow the steps below.
If not, from the App Launcher ( ), find and open Playground Starter and follow the steps. If you don’t see the Playground Starter app, check out Find the Username and Password for Your Trailhead Playground on Salesforce Help.
- Click the Get Your Login Credentials tab and take note of your username.
- Click Reset My Password. This sends an email to the address associated with your username.
- Click the link in the email.
Enter a new password, confirm it, and click Change Password.
Connect Your Trailhead Playground Account to Your Trailblazer Profile
Your next step is to connect your Trailhead Playground account to your Trailblazer account, so you can install packages into your playground. Trailblazer gives you a single identity to log in to AppExchange and other Salesforce-related sites. If you don't want to keep your playground account connected to Trailblazer, you can disconnect it after you complete the challenge at the end of this unit.
- Go to your Trailblazer settings.
- Click Connect An Account.
- For account type, choose Salesforce.
- Enter the username and password for your Trailhead Playground.
- Click Log In.
- If prompted, click Allow to confirm the connection between Trailblazer and your playground.
Use these steps to connect your production orgs, Developer Edition orgs, and Trailhead Playgrounds to your Trailblazer profile.
What Org to Choose?
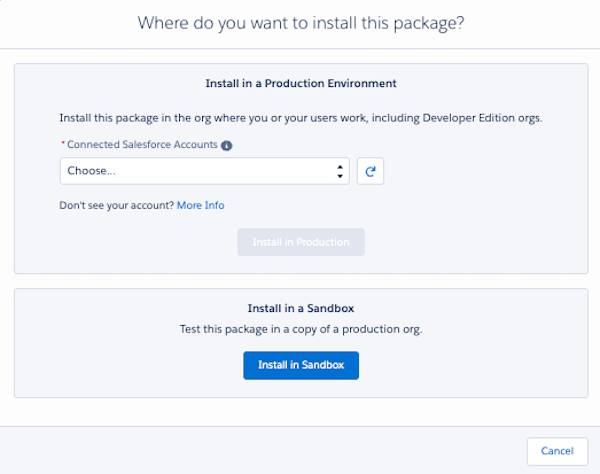
Remember those Ursa Major solar panels that do little magic converting sunlight to energy? There’s a little magic in AppExchange, too. When you click Get It Now to install a package, the AppExchange Account Picker displays all of your Salesforce orgs that you:
- Linked to your Trailblazer account
- Have install permissions for

Click the arrows in Connected Salesforce Accounts to select which org to install the package into. Don’t see the account you want? Check that you connected the account to your Trailblazer profile, and have the Manage Billing permission.
Install the Adoption Dashboards App
Now you’re ready to install Salesforce Adoption Dashboards! Keep these three things in mind to make sure you’re installing the package in the right org, giving the right folks access, and that you’ve reviewed the documentation.
-
Org: You install the app in a Trailhead Playground (or DE org) that you use for testing new features and completing Trailhead challenges. That way, Ursa Major’s users won’t be impacted if something unexpected happens.
-
Documentation: On the Overview tab of the listing, there’s a datasheet that recommends following the Salesforce normal install procedure.
-
Access: You’re the only person who needs to use the app, so you install for admins only.
Ready, set, let’s install!
- In AppExchange, if you don’t have it open already, search for and open the Salesforce Adoption Dashboards listing.
- Click Get It Now.
- From the Connected Salesforce Accounts dropdown, choose your Trailhead Playground username, then click Install in Production.
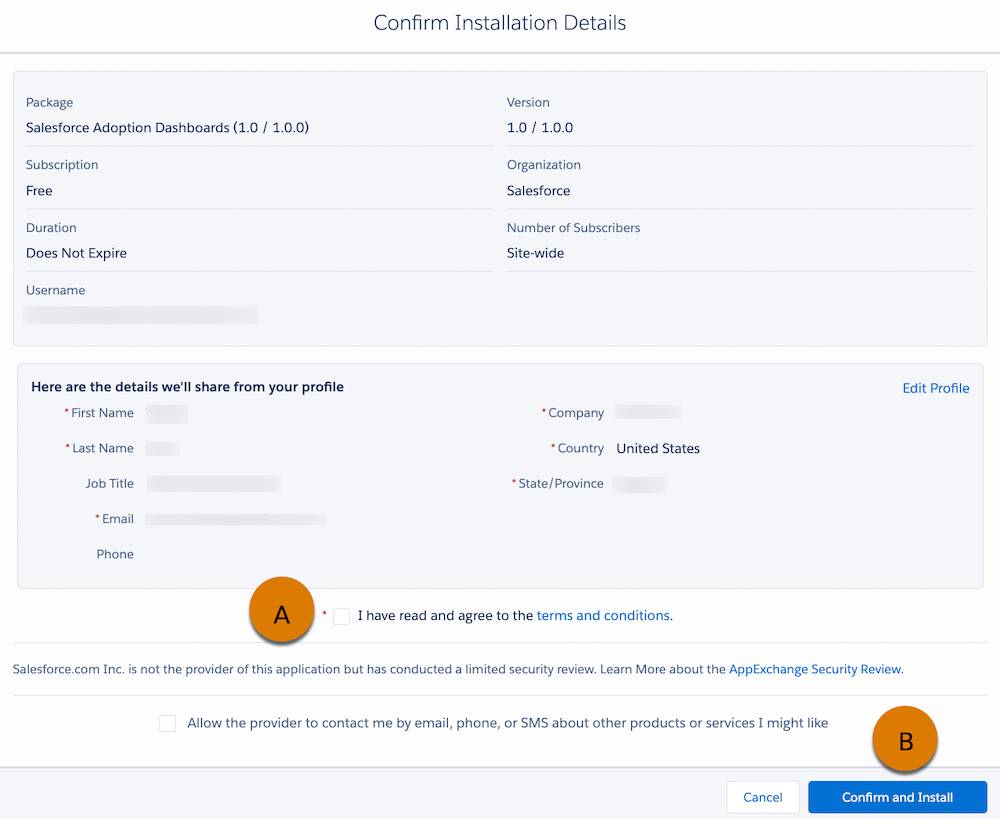
- Check the username on the installation confirmation screen to confirm that you're installing the package in your Trailhead Playground, then select the box (A) to agree to our terms and conditions.

- Click Confirm and Install (B).
- Log in with your Trailhead Playground username and password to log into your production org.
- Select Install for Admins Only.

- Click Install. The package can take a few minutes to install.
- Click Done to view the package in your org.
When the package finishes installing, your org displays the Installed Packages page in Setup. From here, you can view details for individual packages and perform administrative tasks, such as uninstallations. For now, you just want to see the Salesforce Adoption Dashboards’ functionality firsthand. Let’s do that.
View the Salesforce Adoption Dashboard
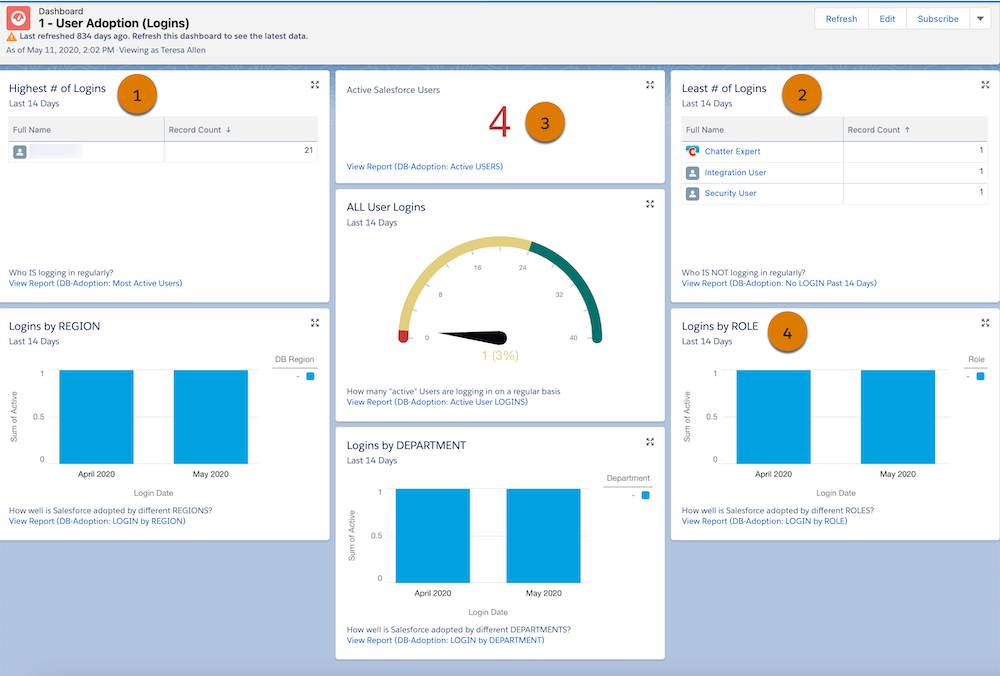
The app includes three dashboards. The first focuses on user behavior, such as the number of logins by region or role. The second focuses on usage of key objects, such as the number of new account records created. The third focuses on sales and marketing data. User adoption data is at the top of your list of requirements, so let’s drill into the first dashboard.
- From the App Launcher (
 ), find and select Dashboards.
- Click All Folders and then click Salesforce Adoption Dashboards.
- Click 1 - User Adoption (Logins) to open the User Adoption dashboard.

Even without production data, you can see that the dashboard provides all the functionality you were looking for in your AppExchange strategy, such as who’s logging in most (1) and least (2). There’s also data that could come in handy down the road, such as total logins (3) and logins by role (4).
Look Ahead to Ursa Major
Because you did things like an AppExchange expert, nothing in the Salesforce Adoption Dashboards required building or configuration on your part. Instead, you can spend that time getting Ursa Major’s sales team to 100% adoption. Speaking of which, let’s see how that might unfold.
Resources
- Salesforce AppExchange: Explore Apps by Business Need
- Salesforce AppExchange: Salesforce Adoption Dashboards
- Salesforce Help: Install a Package
