Get Started with the Salesforce Mobile App
Learning Objectives
Welcome to Salesforce on the Go
Sometimes being a go-getter means, well, getting up and going! With the Salesforce mobile app, your productivity doesn’t suffer just because you’re away from your desk.
The mobile app gives you the same access to your Salesforce data that you have on your desktop. But the app is organized to help you get stuff done in those short, free moments when you're out and about, like waiting for a flight, waiting for your next customer meeting—even when you're in line for a coffee.
Get Access to the Salesforce Mobile App
Alice B. Closing is a new field sales representative who just picked up her brand new shiny mobile device from her IT department. Unfortunately, they didn’t install the Salesforce mobile app for her. Let’s learn about the options for accessing Salesforce from a device.
Log In to Salesforce
Logging in to the Salesforce mobile app is as easy as pie. You need just a couple of key ingredients.
Our field sales rep, Alice B. Closing, knows how to log in to the full Salesforce site when she's working on her desktop. Now she’s finished installing the mobile app on her phone, and it’s her first time logging in. Let’s see how it works.
- Your standard Salesforce username
- Your (super secret) Salesforce password
- The web address (or URL) to your org's Salesforce site
When you have all three key ingredients ready, you're ready to log in. Let's walk through it together.
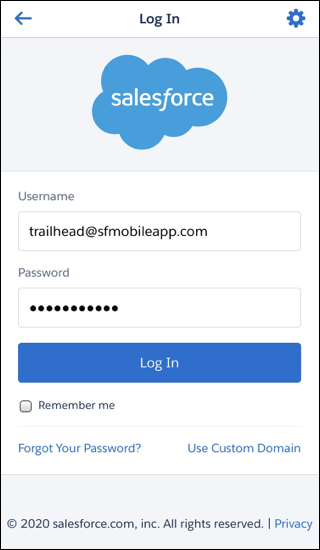
To log in to your production Salesforce site:
- Start the app by tapping the Salesforce icon on your home screen. You see the login page.
- Enter your username and password.
- Tap Log In .
There are a few extra steps to log in to an environment other than production.
For iOS devices:- On the login page, tap
 .
. - To add the new environment, tap + .
- Enter the web address for the environment. And enter a label, like My login page or Sandbox, so you can easily identify the environment.
 Don’t include https:// when typing the web address.
- Tap Done .
- Select the new environment, then log in.
- On the login page, tap
 .
. - Tap Change Server .
- Tap Add Connection .
- Enter the name and web address of the new environment, then tap Apply . The web address must start with https://.
- Select the new environment, then tap Apply .
- Log in.
Get Around in the Salesforce Mobile App
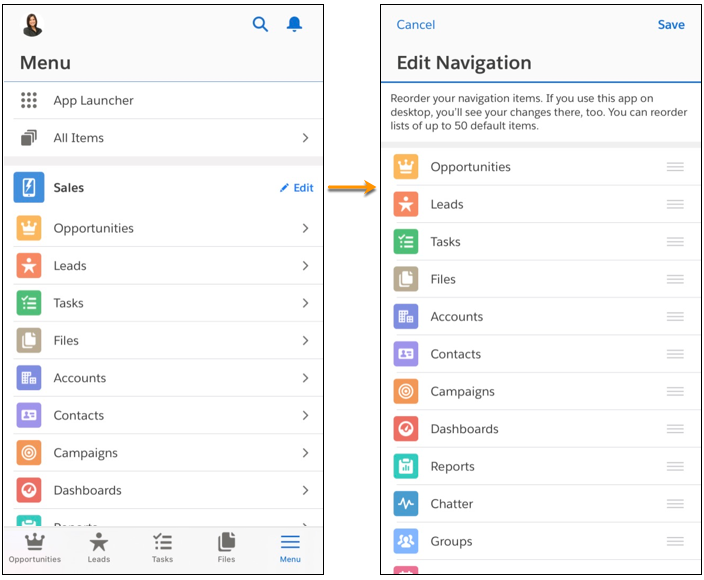
Now that Alice is logged in to Salesforce, she sees a list of navigation items. She notices that there’s a header above these items that says Mobile Only. That header lets her know that she’s in the Mobile Only “app.” Calling it an app makes it sound complicated, but it’s basically just the default set of navigation items. These items are controlled by her admin.
At the bottom of her screen, Alice sees her navigation bar. She notices that the first four items in her Mobile Only navigation bar are the same as the first four items in her navigation menu.

No matter where she goes in Mobile Only, she can always use the navigation bar to conveniently access these key items, as well as return to the navigation menu.
Alice’s org has also enabled Lightning apps for mobile. So she goes to the mobile App Launcher, which is always available from the navigation menu. The App Launcher has all of her Lightning apps that her admin made available for mobile, in the same order as on her desktop.
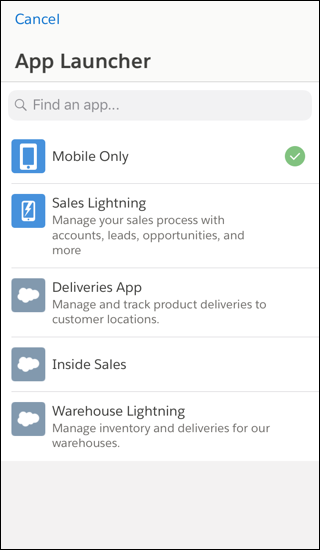
She selects the Sales Lightning App and sees a navigation menu with Sales Lightning in the header. She notices that the navigation menu has the same items that are in the tabs of the desktop version of the Lightning app, in the same order. Just like in Mobile Only, she sees that the first four items of her navigation bar are the same as the first four items in her navigation menu.

If she ever wants to change the order of her navigation items in a Lightning app, any changes she makes on desktop will be mirrored in the mobile navigation menu for that app. All she has to do is refresh.
She can also change the order of navigation items while she’s in the mobile app, by tapping the Edit icon. If she uses the app on desktop, she’ll see her changes there, too.
And if she ever wants to get back to the navigation items in Mobile Only, she can switch back to it using the App Launcher.
Get More Done with Actions
Actions in the Salesforce mobile app save time by letting you quickly and easily create records, log calls, and do other common tasks, from just about anywhere in the app. Let's follow along with Alice as she gets her work done with actions.
Most pages have an action bar (1) at the top of the page, with a set of actions relevant to that page.
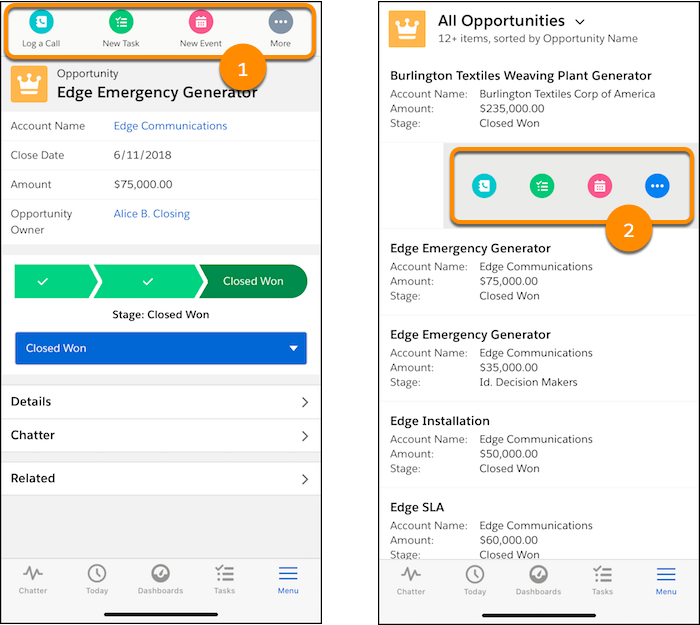
The action bar shows the three or four most relevant actions for the page you’re viewing. To see the complete set of actions that are available, tap ![]() . This opens the action menu.
. This opens the action menu.
List views, task lists, and related lists on records let you perform actions on specific items in the list without having to open any records. To use list item actions, simply swipe left on a record in a list (2).
Switch Accounts, Access Your Favorites, Give Feedback, and Get Help in the Profile Menu
In the new Salesforce mobile app, tap your profile icon at the top of the screen to access your favorites list, update your profile and settings, switch accounts, send feedback to Salesforce, get help, and log out.
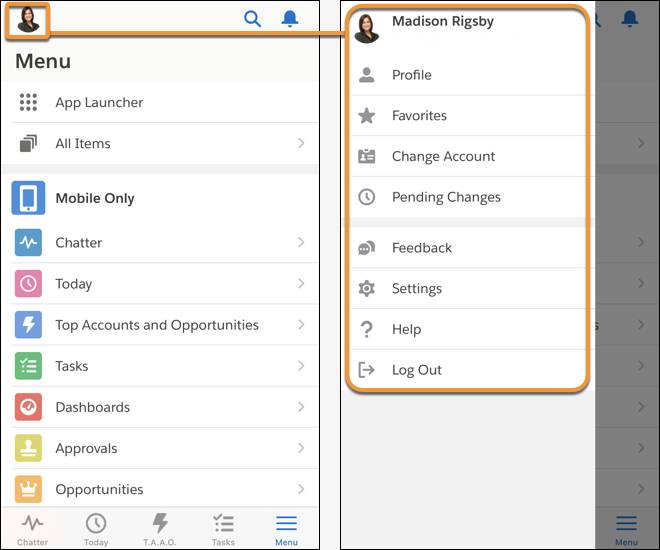
Let’s talk more about switching accounts. If you have more than one Salesforce account that you work in, or if you have accounts in different environments, like your production account for sales activities, your sandbox account for testing, or even your company's customer-facing community, it’s easy to switch among them. In the profile menu, you can set up access to as many accounts as you need, then switch between them with only a few taps.
Alice B. Closing, our determined sales representative, is a member of multiple communities and also has multiple Salesforce accounts. Let's see how she sets up each account so she can toggle between them with ease.
The first step is to log in to her accounts. For each one, Alice needs the same ingredients that she did the first time she logged in to the Salesforce mobile app: her username and password and the web address for the environment where the account exists.
- From the navigation menu, tap your profile icon to open the profile menu.
- Tap Change Account .
- Tap Add new account .
- If the account is in an environment other than production, tap
 (iOS) or
  (Android) on the login page. Then select the correct environment from the list or add the web address for an environment that isn’t already set up, just like you learned about earlier in “Log In to Salesforce.”
 - Enter your username and password.
- Tap Log In .
Repeat these steps to add other accounts to the switcher.
Now that Alice has logged in to all her accounts, she can keep her workflow flowing without missing a beat. Switching to a different account takes just a couple of taps.
- From the navigation menu, tap your profile icon to open the profile menu.
- Tap Change Accounts .
- Tap an account or community.
That’s just a quick tour of how to get around the Salesforce mobile app. Next we’ll dive deeper and learn how to search for different types of information in the app.