Automate the Process
There Once Was a Robot Named Rover, Who Sent a Bunch of Messages Over
Our rover scouts locations on Mars for us, looking for the ideal spot for our Trailhead basecamp. Let’s create a simple way for the rover to tell us what it finds, using an automated process.
- Click the App Launcher (
 ).
).
- In the Search apps and items box, enter
autoand then select Automation.
- In the Flows panel, click New.
- Under Frequently Used, select Record-Triggered Flow.
- In the Objects field, enter
communicationand select Communication (Communication__c).
- Select A record is created.
- Select Any Condition Is Met (OR) from the Condition Requirements dropdown.
- In the Field lookup, search
numberand select the Number field.
- Make sure the Operator is Equals.
- In the Value lookup, enter
1.
- Click Add Condition.
- Add the following:
- Field: Number
- Operator: Equals
- Value:
2
- Click Add Condition.
- Add the following:
- Field: Number
- Operator: Equals
- Value:
3

- Click Save to save the flow.
- Label your new Flow as
Mars.
- Make sure the API Name is Mars.
- Click Save.
Note: disregard any warnings.
Time to add a decision element.
- On the flow canvas, on the Run Immediately path, click
 .
.
- Search and select Decision.
- Label the new decision element as
Mars Messaging.
- Make sure Outcome is selected in the Outcome Order.

- Add
Message 1to the Label and Outcome API Name is Message_1.
- Make sure Condition Requirements to Execute Outcome is set to All Conditions Are Met (AND).
- In the Resource field, select Triggering Communication__c, then select Number.
- Make sure the Operator is Equals.
- In the Value lookup, search
1and select the 1 picklist value.
- Click the plus icon
 next to Outcome Order to add another outcome option.
- Add the following:
- Label:
Message 2 - API Name: Message_2
- Condition Requirements to Execute Outcome: All Conditions Are Met (AND)
- Resource: Triggering Communication__c > Number
- Operator: Equals
- Value: 2
- In the Outcome Order, click Default Outcome.
- Update the Label to
Message 3.
- Click
 .
.
Message Setup
Now we’re ready to set up our actions for each message. We start with Message 1.
- On the Message 1 path, click
 .
.

- Search
chatterand select Post to Chatter.
- Label the new action as
Message from Mars 1.
- Make sure the API Name is Message_from_Mars_1.
- For Message, paste in the following:
Hey, it’s your friendly rover real estate agent here. Today I'm doing some serious {!$Record.Verb__c} over to an area on lower Mount Sharp, heading {!$Record.Direction__c} from my starting location. Since the dune field is an active sand field, it is this Rover's guess that the terrain is {!$Record.Adjective__c} and therefore unsuitable for the Trailblazer basecamp. You know what they say, “Location, location, location.” I will make my final stop for the day at the super {!$Record.Adjective__c} bedrock at the base of Mount Sharp. Roger, Rover. Rover out. P.S. Tell {!$Record.Proper_Noun__c} I said hi. - For Target Name or ID, enter
Life on Mars.
- Toggle Target Type to Include.
- In the Target Type text box, enter
Group.

- Click Save.
Next up, Message 2.
- On the Message 2 path, click
 .
.
- Search
chatterand select Post to Chatter.
- Add the following:
- Label:
Message from Mars 2 - API Name: Message_from_Mars_2
- Message:
New! Mars fixer on majestic Olympus Mons. Bring your hydrospanner and your imagination and make this home your own. What this charmer lacks in curb appeal it more than makes up for in protecting you from the freezing, never ending dust storms. You'll be happier than a {!$Record.Adjective__c} {!$Record.Noun__c} {!$Record.Verb__c} {!$Record.Direction__c}. Drinking water DIY. Serious buyers only. Contact Listing Agent {!$Record.Proper_Noun__c} for details. - Target Name or ID:
Life on Mars - Target Type: Include
- Target Type text box:
Group
- Click Save.
And finally, Message 3.
- On the Message 3 path, click
 .
.
- Search
chatterand select Post to Chatter.
- Add the following:
- Label:
Message from Mars 3 - API Name: Message_from_Mars_3
- Message:
This planet might be cold, but these deals are hot, hot, hot! Today I was {!$Record.Verb__c} {!$Record.Direction__c} over the hill and found a fabulous new listing for you. It's ideally situated, Schiaparelli Crater-adjacent, with lots of potential. Good natural light and in the best area on Mars. Let's talk soon because {!$Record.Proper_Noun__c} is interested, too. This place is better than a {!$Record.Adjective__c} {!$Record.Noun__c} and is priced to move. - Target Name or ID:
Life on Mars - Target Type: Include
- Target Type text box:
Group
- Click Save.

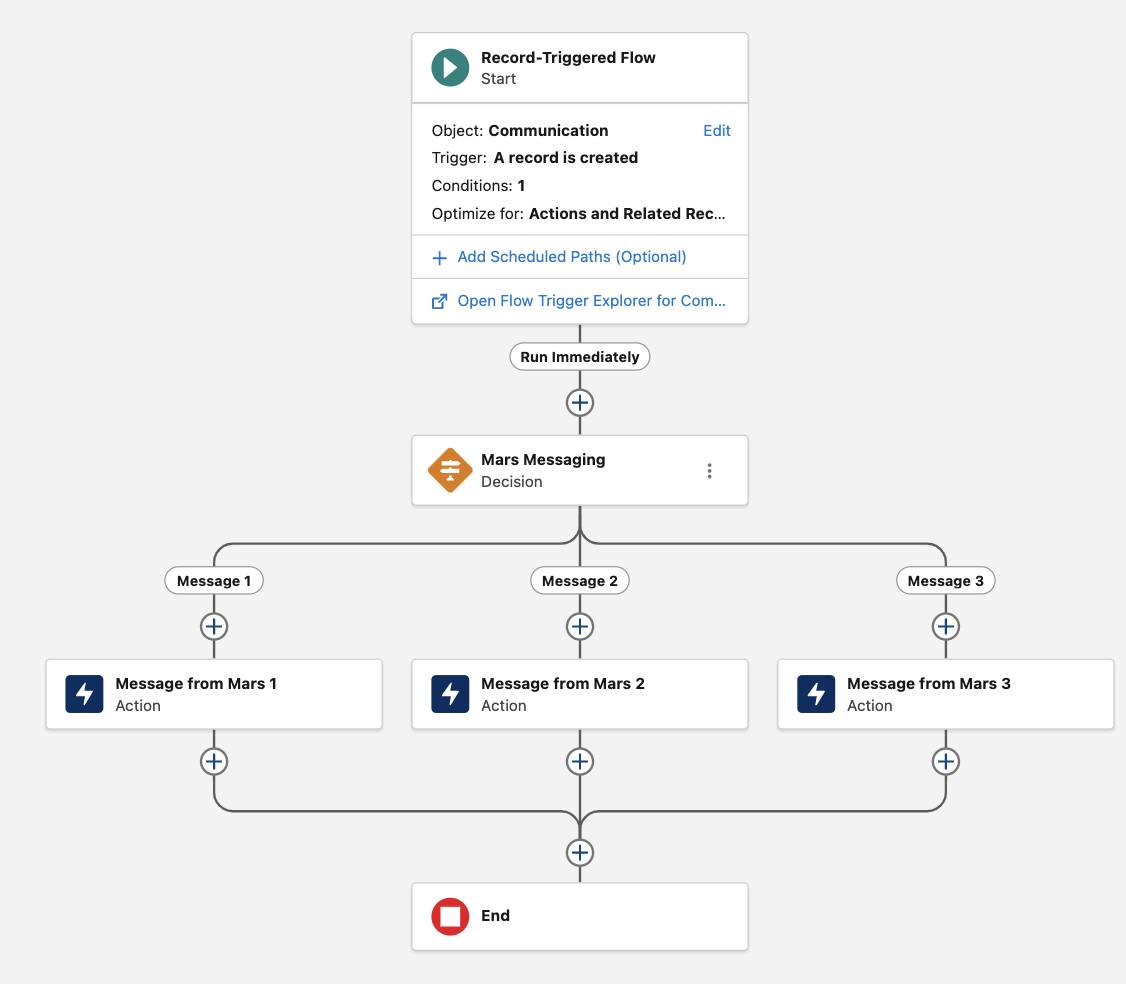
If your flow happens to have an End element after each message action, that's okay! Your flow will still function as intended (and will pass the check for this unit). However, if you want to merge the branches so they converge into one End element, follow these steps. (Please note: this is optional and doesn't affect the functionality of the flow.)
- Directly after the Message from Mars 1 element, click
 .
.
- Select Connect to element.
- Click
 on the Message 2 path's End element.
- Repeat the process to connect the Message from Mars 3 element to the End element now shared by the Message 1 and Message 2 paths.
3, 2, 1… Activate!
Now, it’s time to activate the flow.
- Click Save.
- Click Activate.
- Click the
 in the upper left.