라이브 미리보기를 사용하여 구성 요소 테스트

앞서 이 프로젝트에서 여러분은 스크래치 조직(별칭 scratchOrg), Lightning 앱, Lightning 웹 구성 요소(myFirstWebComponent)를 생성했습니다. 이제 라이브 미리보기를 실행하여 Lightning 앱의 실시간 미리보기를 통해 구성 요소를 확인해 보겠습니다.
데스크톱 환경에서 Lightning 앱을 위한 라이브 미리보기 실행
라이브 미리보기를 사용하여 데스크톱이나 Salesforce 모바일 앱(iOS 또는 Android) 환경에서 Lightning 앱의 실시간 미리보기를 실행할 수 있습니다. 미리보기는 로컬 구성요소가 변경되면 자동으로 업데이트되므로 코드를 배포하거나 브라우저 페이지를 새로 고칠 필요가 없습니다. 데스크톱 미리보기와 모바일 미리보기를 실행하는 데 필요한 명령어 플래그가 다릅니다.
라이브 미리보기를 사용하여 데스크톱 환경에서 Sales Lightning 앱을 미리 보겠습니다. 스크래치 조직은 사용할 수 있는 몇 가지 기본 앱과 함께 제공됩니다.
- Visual Studio Code에서, macOS의 경우 Command + Shift + P를, Windows 또는 Linux의 경우 Ctrl + Shift + P를 클릭한 다음
new terminal(새 터미널)을 입력하고 Terminal: Create New Terminal(터미널: 새 터미널 생성)을 선택합니다.
- 라이브 미리보기 명령이 최신 버전인지 확인하세요. Terminal(터미널) 탭에서
sf update를 입력하고, Enter 키를 누릅니다.
- 업데이트가 완료되면, 동일한 Terminal(터미널) 탭에서
sf lightning dev app --target-org scratchOrg --device-type desktop을 입력하고, Enter 키를 누릅니다.- 라이브 미리보기 명령을 처음 실행하는 경우 터미널에 도구를 활성화하라는 프롬프트가 표시됩니다. 그에 따라 Enter 키를 누르거나
y를 입력하여 활성화합니다.
- 라이브 미리보기 명령을 처음 실행하는 경우 터미널에 도구를 활성화하라는 프롬프트가 표시됩니다. 그에 따라 Enter 키를 누르거나
- 미리보기할 Lightning Experience 앱을 선택하라는 메시지가 표시되면 화살표 키를 사용하여 Sales를 선택한 다음 Enter 키를 누릅니다.
명령어가 성공적으로 실행되면, 브라우저에 새 탭이 열리고, 조직의 판매자 홈 페이지 미리보기가 표시됩니다. 다음은 명령어에 사용한 매개변수입니다.
-
--target-org는 미리보기 하려는 대상 조직을 정의합니다. 이 플래그를scratchOrg로 설정했습니다.
-
--device-type은 미리보기가 실행되는 환경을 정의합니다. 이 플래그를desktop으로 설정하여 미리보기가 데스크톱 환경에서 실행되도록 했습니다.
sf lightning dev app 명령어를 위한 기타 옵션 플래그에 대해 자세히 알아보려면 Lightning Web 구성 요소 개발자 가이드: Lightning 앱 미리보기(정식 출시)를 확인하세요.
이제 구성 요소를 편집하고 라이브 미리보기가 어떻게 실시간으로 업데이트되는지 살펴봅시다.
- 라이브 미리보기 브라우저에서 Accounts(계정) 탭을 클릭하고 Component Developers(구성 요소 개발자) 레코드를 엽니다.
- Visual Studio Code에서 myFirstWebComponent.html을 엽니다.
-
<lightning-card>요소에서,title값을“ContactInformation”에서“Contact Information”으로 변경합니다. 업데이트된 코드 줄은 다음과 같이 확인할 수 있습니다:<lightning-card title="Contact Information" icon-name="custom:custom14"> - macOS에서는 Command + S를, Windows 또는 Linux에서는 Ctrl + S를 눌러 파일을 저장합니다.
브라우저에서 앱 미리보기를 확인하고 로컬 변경에 따라 구성 요소 제목이 어떻게 자동으로 업데이트되는지 확인하세요. 수정 내용을 확인하기 위해 앱을 재배포하거나 페이지를 수동으로 새로 고칠 필요가 없었습니다.
iOS 환경에서 Lightning 앱을 위한 라이브 미리보기 실행(macOS 전용)
라이브 미리보기를 사용하여 iOS 시뮬레이터나 Android 에뮬레이터에서 프로젝트를 볼 수 있습니다. 동일한 Lightning 앱을 iOS 환경에서 미리 보는 방법을 살펴봅시다.
Mac 사용자들은 Xcode를 사용하여 라이브 미리보기용 iOS 시뮬레이터를 실행할 수 있습니다. 아직 Xcode가 설치되어 있지 않은 경우, Mac App Store에서 이를 설치하고 초기 설정 과정을 완료하세요. 반드시 모바일 기기용 iOS 시뮬레이터를 다운로드하시기 바랍니다.
Xcode 설치가 완료되면, Visual Studio Code를 엽니다. iPhone 시뮬레이터에서 Lightning 앱을 실행할 차례입니다.
- Visual Studio Code에서 Command + Shift + P를 클릭한 다음
new terminal(새 터미널)을 입력하고 Terminal: Create New Terminal(터미널: 새 터미널 생성)을 선택합니다.
- 새 터미널 창에서
sf lightning dev app --target-org scratchOrg --device-type ios를 실행합니다.
- 미리보기 할 Lightning Experience 앱을 선택하라는 메시지가 표시되면 Sales를 선택한 다음 Enter 키를 누릅니다.
- 미리보기에 사용할 기기를 선택하라는 메시지가 표시되면 화살표 키를 사용하여 유효한 옵션 목록에서 iPhone을 선택합니다. iOS 시뮬레이터는 최신 모델보다 이전 iPhone 모델에서 더욱 잘 작동할 때도 있습니다.
- Salesforce 모바일 앱을 다운로드 및 설치하라는 메시지가 표시되면
y를 입력하고 Enter 키를 누릅니다.
라이브 미리보기 명령이 성공적으로 실행되면 표시되는 터미널 출력은 다음과 같습니다.
sf lightning dev app --target-org scratchOrg --device-type ios
? Which Lightning Experience App do you want to use for the preview? Sales
✔ Requirements (0.444 sec)
  ✔ PASSED: Checking macOS Environment (0.000 sec)
  ✔ PASSED: Checking Xcode (0.029 sec)
    › Xcode installed: Xcode 16.2 Build version 16C5032a
  ✔ PASSED: Checking Supported Simulator Runtime (0.414 sec)
    › One or more supported simulator runtimes are configured for iOS: iOS 17.0 iOS 18.2
? Which device do you want to use for the preview? iPhone 15 Pro, iOS 17
Booting device iPhone 15 Pro, iOS 17.0.0, DCF7AD98-FAC7-4267-A546-14A80F874209... done
Installing self-signed certificate... done
? Salesforce Mobile App isn’t installed on your device. Do you want to download and install it? yes
Preparing to download... done
Installing app com.salesforce.chatter... done
terminating app com.salesforce.chatter... done
Salesforce 앱이 iPhone 시뮬레이터에서 자동으로 열립니다. 앱의 사용 약관에 동의하세요. 그러면 시뮬레이터에 Salesforce 로그인 페이지가 표시됩니다.

다음 단계에 따라 앱에서 스크래치 조직을 엽니다.
- 시뮬레이터의 오른쪽 상단에서 Settings(설정)(
 )를 클릭하여 Choose Connection(연결 선택) 메뉴를 엽니다.
-
Choose Connection(연결 선택) 메뉴에서 Add(추가)(
 )를 클릭하여 새로운 호스트를 추가합니다.
-
Host 필드 도메인이 스크래치 조직 URL이 됩니다. VS Code 터미널 창에서
sf org display user --target-org scratchOrg를 실행하여 이 URL을 찾을 수 있습니다.
- 터미널 출력에서 인스턴스 URL을 복사하여 다음과 같이 시뮬레이터의 Host 필드에 붙여 넣습니다.

- 그런 다음, iOS 시뮬레이터의 오른쪽 상단에 있는 Done(완료)을 클릭하여 새로운 도메인을 추가하고 Salesforce 로그인 페이지로 돌아옵니다.
-
Username(사용자 이름) 필드에 3단계의 터미널 출력에서 Username(사용자 이름) 값을 복사하여 붙여 넣습니다. 사용자 이름은 test-value@example.com와 같은 형식을 따라야 합니다.
- 이 사용자 이름에 대한 유효한 암호를 얻으려면 VS Code 터미널에
sf org generate password --target-org scratchOrg를 입력하고 Enter 키를 누릅니다.
- 터미널 출력에서 비밀번호를 복사하여 iOS 시뮬레이터의 Password(비밀번호) 필드에 붙여 넣은 다음 Log In to Sandbox(Sandbox에 로그인)를 클릭합니다.
- 필요한 경우 지정된 이메일 주소로 전송된 인증 코드를 입력합니다.
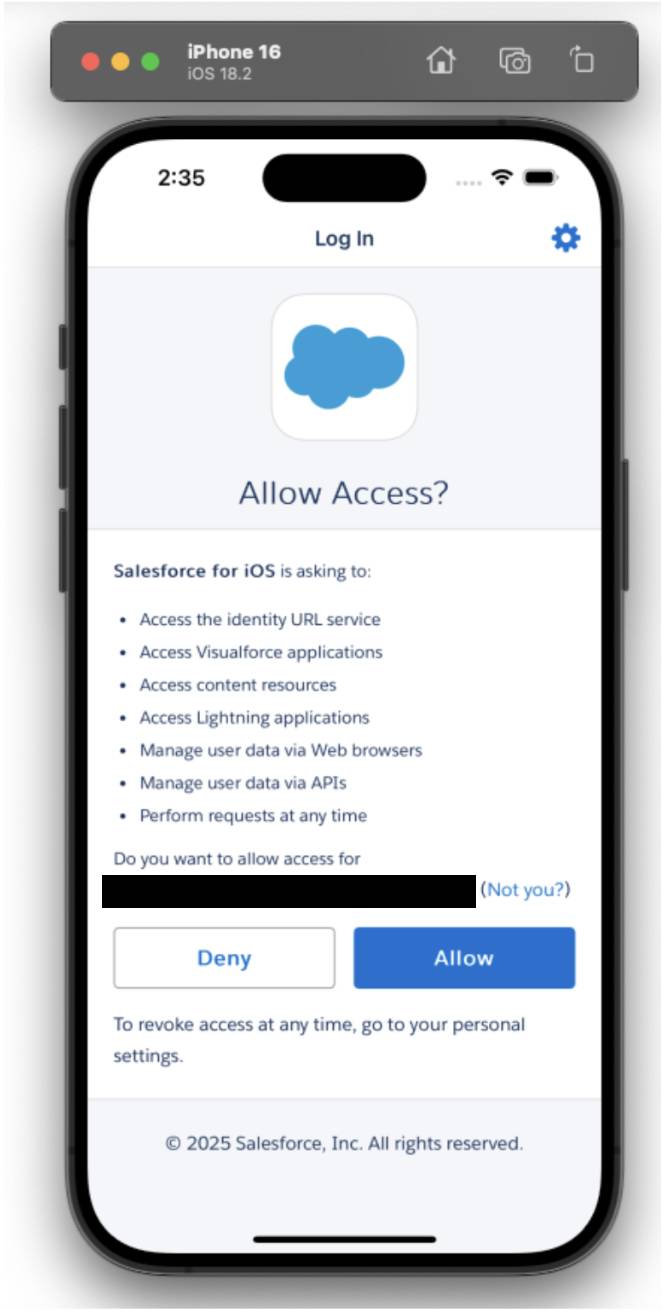
- 만약 앱에 조직에 액세스를 요청하는 메시지가 표시되면, Allow(허용)를 선택합니다.
이제 iOS 시뮬레이터에서 Salesforce 앱을 확인할 수 있습니다. Sales 앱의 Component Developer(구성 요소 개발자) 계정으로 이동하여 라이브 미리보기가 어떻게 사용되는지 확인해 봅시다.
- 앱의 오른쪽 하단에서 Menu(메뉴)를 클릭한 다음 Accounts(계정)를 선택합니다.
-
Recent Accounts(최근 계정) 아래에서 Component Developers(구성 요소 개발자)를 클릭합니다. 페이지에서 myFirstWebComponent LWC를 확인할 수 있습니다.
- Visual Studio Code에서 myFirstWebComponent.html을 엽니다.
-
<lightning-card>요소에서,title값을“Contact Information”에서“Contact Info”로 변경합니다. 업데이트된 코드 줄은 다음과 같이 확인할 수 있습니다:<lightning-card title="Contact Info" icon-name="custom:custom14"> - macOS에서는 Command + S를, Windows 또는 Linux에서는 Ctrl + S를 눌러 파일을 저장합니다.
이제 다시 iOS 시뮬레이터를 살펴보고 구성 요소 제목이 자동으로 업데이트되었는지 확인하세요. 라이브 미리보기를 사용하여 구성 요소를 얼마나 빠르게 반복할 수 있는지 아셨나요?
여기까지입니다! 이 프로젝트에서는 Lightning 웹 구성 요소 개발을 위한 권장 개발자 도구를 설치하고 사용해 보았습니다. 오류가 있는 코드를 복사하고 붙여 넣었습니다(앞으로 그런 경우는 없어야 합니다). 라이브 미리보기를 사용하여 데스크톱 환경에서 Lightning 웹 구성 요소 변경 시 실시간 미리보기를 확인했습니다. 그리고 Mac 사용자인 경우에도 라이브 미리보기를 사용하여 iPhone 환경에서 구성 요소를 미리 보았습니다.
스크래치 조직에서는 작업을 확인할 수 없지만 Verify Step(단계 확인)을 클릭하여 뱃지를 획득할 수는 있습니다. 그리고 Trailhead 샘플 앱과 Lightning 웹 구성 요소 레시피를 확인하여 더 많은 코드 예시를 살펴보고 훌륭한 Lightning 웹 구성 요소를 개발하는 방법을 학습해 보세요.