대화 언어로 데이터를 기반으로 행동하도록 Agentforce 개선

더할 나위 없는 따뜻한 환영
Coral Cloud Resorts에는 매일 전 세계에서 여행을 온 방문객이 도착하며, 방문객들은 보통 빨리 휴식을 취하고 싶어 합니다. 하지만 그 전에 프런트 데스크에서 체크인을 해야 하죠. 그래서 Becca는 방문객들이 휴가를 최대한 빨리 시작할 수 있도록 직원들이 마지막 단계를 최대한 쉽게 처리할 수 있도록 만들려고 합니다.
방문객이 체크인할 때마다 Coral Cloud 직원은 Guest Event(방문객 이벤트)라는 사용자 정의 개체에 레코드를 만들어 이벤트를 기록합니다. 이를 사용하여 방문객이 하우스키핑을 요청하거나 소셜 활동에 참여하는 경우 등 많은 것을 추적할 수 있습니다. 지금은 직원이 체크인 레코드를 수동으로 만들지만, Becca는 이 프로세스의 수준을 높일 수 있는 두 가지 방법을 알고 있습니다. 먼저 Becca는 플로를 사용하여 Data 360의 최신 예약 데이터를 바탕으로 Guest Event(방문객 이벤트) 레코드를 생성합니다. 둘째, Agentforce에게 대화 언어를 통해 플로를 실행하는 방법을 가르칩니다. 따라서 Sofia Rodriguez가 도착하여 숙박을 시작할 때 프런트 데스크에 있는 직원이 Agentforce에게 ‘Sofia Rodriguez 체크인’이라고 요청하기만 하면 나머지는 Agentforce가 알아서 처리합니다!

방문객 이벤트를 기록하는 플로 완료
Data 360 덕분에 Becca는 Sofia Rodriguez와 같이 연락처로 시작하여 예약 데이터에 기반하여 레코드를 생성하는 플로를 만드는 데 필요한 모든 정보를 획득하게 되었습니다. 그러나 이 둘 사이의 경로는 약간 꼬여 있습니다. 이전 유닛에서 배운 것처럼 ID 확인은 관련 데이터 모델 개체를 연결하는 브리지 개체를 자동으로 만듭니다. 체크인 플로를 만들기 위해 Becca는 이러한 브리지 중 하나를 두 번 건너야 합니다.
문제의 브리지의 이름은 Unified Link Individual ccid(통합 링크 개인 ccid)이며, Salesforce의 Sofia를 Reserv-o-matic의 Sofia에 연결합니다. 다음은 이러한 브리지에 있는 데이터의 간소화 버전입니다.
전체 이름 |
데이터 소스 |
소스 ID |
통합 ID |
|---|---|---|---|
Sofia Rodriguez |
Salesforce |
003bn000002FILwAAO [1] |
ca6369777b7dbca79215f46016e74dd6 |
Sofi Rodriguez |
Reserv-o-matic |
10008155 [2] |
ca6369777b7dbca79215f46016e74dd6 |
두 Sofia의 통합 ID가 동일하다는 점에 주목하세요. 따라서 Sofia의 Salesforce ID[1]를 알면 통합 ID를 통해 Sofia의 Reserv-o-matic ID[2]를 찾을 수 있습니다. 예약은 방문객과 Reserv-o-matic ID로만 연결되기 때문에 이 점이 중요합니다. 다음은 이의 간소화 버전입니다.
연락처 ID |
체크인 날짜 |
체크아웃 날짜 |
객실 유형 |
예약 상태 |
|---|---|---|---|---|
10008155 [2] |
2021년 5월 31일 |
2021년 6월 01일 |
스위트 |
완료 |
10008155 [2] |
2023년 10월 19일 |
2023년 10월 21일 |
스위트 |
완료 |
10008155 [2] |
2024년 4월 27일 |
2024년 5월 07일 |
스위트 |
완료 |
이 모든 것을 염두에 두고 플로를 세분화해 보겠습니다.
- Salesforce[1]의 소스 ID를 알면 브리지를 쿼리하여 통합 ID를 찾습니다.
- 통합 ID를 알면 다시 브리지를 쿼리하여 Reserv-o-matic ID[2]를 찾습니다.
- Reserv-o-matic ID[2]를 알면 예약 데이터를 쿼리하여 최근 예약 세부 사항을 찾습니다.
- 최근 예약 세부 사항을 알면 세부 사항으로 플로 변수를 업데이트합니다.
- 변수를 사용하여 체크인에 대한 Guest Event(방문객 이벤트) 레코드를 만듭니다.
작업이 많아 보이지만, 좋은 소식이 있습니다. Trailhead 팀이 이미 대부분의 플로를 만들었습니다. 나머지 부분은 이제 데이터 스트림을 만들고 ID 확인을 설정했기 때문에 존재하는 개체와 관련된 것입니다. 그러면 해당 플로를 완료해 보세요!
-
 아이콘을 클릭하여 App Launcher(앱 시작 관리자)를 실행한 다음, Flows(플로)를 검색하여 선택합니다.

-
All Flows(모든 플로) 목록 보기를 선택합니다.

-
Create Check-in Guest Event(체크인 방문객 이벤트 만들기)를 클릭합니다.
-
Open Flow(플로 열기)를 클릭합니다.
-
Unified Link 1(통합된 링크 1) 요소를 클릭합니다.
- Data Source(데이터 소스)에서 Data Cloud Object(Data Cloud 개체)를 선택합니다.
- Data Space(데이터 공간)에서 default(기본값)를 선택합니다.
- Object(개체)에서 Unified Link Individual ccid(통합 링크 개인 ccid)를 선택합니다. 이름이 비슷한 몇 가지 개체가 있으므로 올바른 개체를 선택했는지 확인합니다.
.
- Filter Records(레코드 필터링) 섹션의 Field(필드)에서 Individual Id(개인 ID)를 선택합니다. 첫 번째 테이블에 있는 소스 ID 열의 실제 이름입니다.
- Value(값)에서 변수 ContactRecordId를 선택합니다. ContactRecordID는 Trailhead 팀에서 사전에 만든 변수입니다. 이는 연락처 레코드의 Salesforce ID를 나타냅니다.

-
Save(저장)를 클릭합니다.
플로가 통합 링크 테이블에서 첫 번째 레코드를 정확히 찾아냈습니다. 이제 해당 레코드의 통합 ID를 사용하여 Reserv-o-matic ID를 찾을 차례입니다.
-
Unified Link 2(통합된 링크 2) 요소를 클릭합니다.
- Data Source(데이터 소스)에서 Data Cloud Object(Data Cloud 개체)를 선택합니다.
- Data Space(데이터 공간)에서 default(기본값)를 선택합니다.
- Object(개체)에서 Unified Link Individual ccid(통합 링크 개인 ccid)를 선택합니다. 첫 번째 요소에서 사용한 것과 실제 동일한 개체입니다.
- Filter Records(레코드 필터링) 섹션의 Field(필드)에서 Unified Individual Id(통합 개인 ID)를 선택합니다. 첫 번째 테이블에 있는 통합 ID 열의 실제 이름입니다.
- Value(값)에
{!Unified_Link_1.UnifiedRecordId__c}를 복사하여 붙여 넣습니다. 첫 번째 쿼리의 통합 ID에 대한 포인터입니다. Value(값)의 바깥쪽을 클릭하면 텍스트가 자리 표시자로 바뀝니다.

-
Add Condition(조건 추가)을 클릭합니다.
- Field(필드)에서 Data Source Object(데이터 소스 개체)를 선택합니다.
- Operator(연산자)에서 Starts With(시작)를 선택합니다.
- Value(값)에
External(외부)을 입력합니다.

데이터 모델 개체(DMO)는 실제로는 간소화 테이블과 같이 Reserv-o-matic이 아니라 ExternalReservation이라고 합니다. 이 추가 조건을 추가하면 플로가 Sofia의 Salesforce ID를 무시하고 첫 번째 테이블에서 10008155를 찾습니다.
-
Save(저장)를 클릭합니다.
이제 Sofia의 Reserv-o-matic ID를 알고 있으니 Sofia의 가장 최근 예약을 찾을 수 있습니다.
-
Reservation 1(예약 1) 요소를 클릭합니다.
- Data Source(데이터 소스)에서 Data Cloud Object(Data Cloud 개체)를 선택합니다.
- Data Space(데이터 공간)에서 default(기본값)를 선택합니다.
- Object(개체)에서 ExternalReservation을 선택합니다.
- Filter Records(레코드 필터링) 섹션의 Field(필드)에서 Contact ID(연락처 ID)를 선택합니다.
- Value(값)에
{!Unified_Link_2.SourceRecordId__c}를 복사하여 붙여 넣습니다. 이전 쿼리에 대한 포인터입니다.
- Sort Order(정렬 순서)에서 Descending(내림차순)을 선택합니다.
- Sort By(정렬 기준)에서 Check_in_Date_c__c를 선택합니다.
-
Save(저장)를 클릭합니다.
이러한 방식으로 정렬하면 가장 최근 예약이 결과의 맨 위에 표시되며, 나머지 플로에도 사용됩니다. 퍼즐의 마지막 조각은 예약 세부 사항을 사용하여 궁극적으로 Guest Event(방문객 이벤트) 레코드에 배치되는 새 변수(EventSummary) 값을 설정하는 것입니다.
-
Event Summary(이벤트 요약) 요소를 클릭합니다.
- Value(값)에
Check-in date of {!Reservation_1.Check_in_Date_c__c}, check-out date of {!Reservation_1.Check_out_Date_c__c}, for room type {!Reservation_1.Room_type_c__c}({!Reservation_1.Check_in_Date_c__c}의 체크인 날짜, {!Reservation_1.Check_out_Date_c__c}의 체크아웃 날짜, {!Reservation_1.Room_type_c__c}의 객실 유형)을 복사하여 붙여 넣습니다.
- Save(저장) 버튼을 사용할 수 있도록 Value(값) 상자의 바깥쪽을 클릭한 다음, Save(저장)를 클릭합니다.
-
Activate(활성화)를 클릭합니다.
- Flow(플로) 탭을 닫습니다.
플로를 정리하느라 수고하셨습니다. 약간의 노력이 필요했지만, Agentforce가 사용법을 알게 되면 거의 바로 성과를 낼 것입니다.
체크인 Agentforce 작업 만들기
좋은 소식이 하나 더 있습니다. 플로를 사용하도록 Agentforce를 설정하는 일은 매우 쉽다는 것입니다.
-
Setup(설정) 아이콘
 [대체 텍스트: 설정 아이콘]을 클릭하고 Setup(설정)을 선택합니다.
- Quick Find(빠른 찾기)에서 Salesforce Go를 검색하여 선택합니다.
- Search features...(기능 검색...) 텍스트 상자에 Agentforce Studio를 입력하여 선택합니다.

-
Get Started(시작하기)를 클릭합니다.
-
Turn On(활성화)을 클릭합니다.
-
Confirm(확인)을 클릭합니다.
이제 Agent Action(에이전트 작업)으로 이동합니다.
-
 아이콘을 클릭하여 App Launcher(앱 시작 관리자)를 열고, Agentforce Studio를 검색하여 선택합니다.
-
Connect Data 360(Data 360 연결)을 클릭합니다.
-
New Version(새 버전)을 클릭합니다.
- Subagents(서브에이전트) 아래에서 General CRM(일반 CRM)에 마우스 커서를 올리고 +를 클릭합니다.
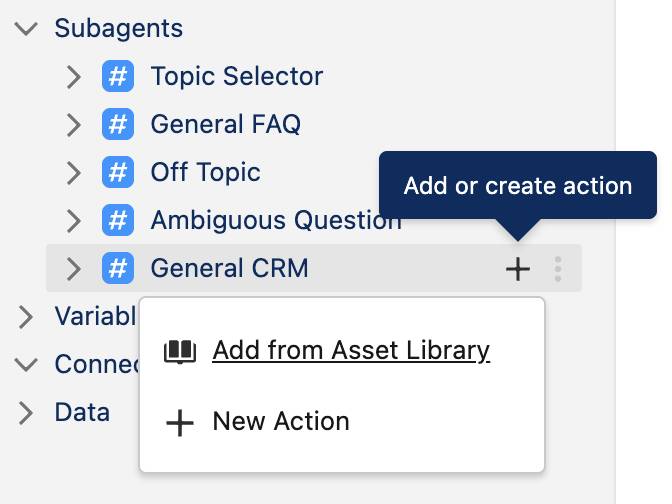
-
New Action(새 작업)을 선택합니다.
- Action Name(작업 이름)에
Create Check-in Guest Event(체크인 방문객 이벤트 만들기)를 입력합니다.
- Description(설명)에
This action creates a Guest Event record to capture when a contact completes check-in for a reservation.(이 작업에서는 연락처가 예약에 대해 체크인을 완료했을 때 이를 기록하기 위해 Guest Event(방문객 이벤트) 레코드를 생성합니다.)을 입력합니다. -
Create and Open(만들기 및 열기)을 클릭합니다.
- Reference Action Type(참조 작업 유형)에서 Flow(플로)를 선택합니다.
- Reference Action(참조 작업)에서 Create Check-in Guest Event(체크인 방문객 이벤트 만들기)를 선택합니다.
- Inputs, ContactRecordId(입력, ContactRecordId)에서 Require Input to execute action(작업을 실행하려면 입력 필요)에 체크합니다.
- Outputs, EventSummary(출력, EventSummary)에서 Show in conversation(대화에 표시)에 체크합니다.
-
Save(저장)를 클릭합니다.
-
Commit Version(버전 커밋)을 클릭합니다.
-
Commit Version(버전 커밋)을 다시 클릭합니다.
-
Activate(활성화)를 클릭합니다.
-
Activate(활성화)를 다시 클릭합니다.
이제 Agentforce가 방문객 체크인을 도울 준비가 되었습니다. 시험해 보는 일만 남았습니다.
- Sales 앱에서 Contacts(연락처) 탭을 클릭합니다.
-
Sofia Rodriguez 연락처로 이동합니다.
- 브라우저 창을 새로 고칩니다.
-
Agentforce 아이콘을 클릭하여 Agentforce 창을 엽니다.

- Agentforce 패널에서
Check in Sofia Rodriguez(Sofia Rodriguez 체크인)라고 입력하고 Enter/Return 키를 누릅니다. 잠시 후 Agentforce 에이전트가 체크인이 완료되었다는 응답과 함께 체크인에 대한 몇 가지 세부 사항을 표시합니다. Guest Event(방문객 이벤트) 레코드도 만들어졌습니다.
- 아래로 스크롤하여 Guest Events(방문객 이벤트) 관련 목록을 찾은 다음, 새로 생성된 GE Record(GE 레코드)를 클릭합니다.

잘 하셨습니다. 체크인 이벤트가 예상한 대로 캡처되었습니다.
- Agentforce 패널을 닫습니다.
Becca의 계획 2단계를 성공적으로 마쳤습니다. 리조트 직원은 방문객 체크인을 손쉽게 완료할 수 있어 정말 만족하고, 소셜 코디네이터는 벌써 Agentforce에게 자신의 활동에 대한 방문객 이벤트를 만드는 방법을 가르칠 수 있도록 알려달라고 Becca에게 요청하고 있습니다.
이제 끝났습니다. Becca는 프로젝트에서 Data 360과 Agentforce를 결합하여 게스트와 직원의 경험을 모두 향상시킨 방식이 꽤 만족스럽습니다. 그리고 Becca는 성공적으로 완료한 프로젝트를 잠시 되돌아본 후 다음 AI + 데이터 모험을 시작하기 위해 소셜 코디네이터를 찾아 떠납니다.