Agentforce SDR 설정
학습 목표
이 프로젝트에서는 다음 작업을 수행합니다.
- Agentforce 세일즈 개발 담당자(SDR)를 활성화합니다.
- 에이전트의 사용자를 만듭니다.
- 사용자에게 에이전트에 대한 액세스 권한을 부여합니다.

완전히 새로운 리드 육성
Salesforce의 신뢰할 수 있는 AI 플랫폼을 바탕으로 구축된 Agentforce SDR은 리드를 육성하고 24시간 내내 파이프라인을 구축하여 영업팀의 확장을 지원합니다. SDR 에이전트는 인바운드 리드의 첫 번째 연락 지점이 될 수 있습니다. 에이전트는 개인 맞춤형 리드 발굴 전략을 수행하고, 고객의 질문에 응답하고, 더 나아가 판매자를 대신하여 회의 일정을 잡을 수도 있습니다.
세일즈 팀은 Agentforce를 활용하여 목표 계정에 집중하고 고객과 더욱 긴밀한 관계를 구축하여 더욱 많은 거래를 더욱 신속하게 성사시킬 수 있습니다.
지원 기능 활성화 및 세일즈 개발을 위한 Agentforce 활성화
Agentforce에서 SDR 에이전트를 활성화하는 프로세스는 간단한 2단계로 이루어집니다.
-
Agentforce에서 SDR | Inbound Nurturing 켜기: 필요한 지원 서비스와 함께 Agentforce의 기능을 활성화하여 SDR 에이전트를 사용할 수 있도록 합니다.
-
에이전트 구성 및 활성화: 에이전트 빌더를 사용하여 비즈니스 요구 사항 및 영업 프로세스에 맞게 에이전트를 조정하세요.
이 단계에서는 첫 번째로 Salesforce Go 환경을 통해 SDR 에이전트를 활성화하는 방법을 배웁니다. Salesforce Go는 Salesforce 기능을 검색, 활성화, 구성 및 모니터링하는 방법을 간소화하는 새로운 설정 경험입니다. 리소스 섹션에서 Salesforce Go에 대해 자세히 알아보세요.
- 톱니바퀴 아이콘
 을 클릭하고 Salesforce Go를 클릭합니다. 그러면 Setup(설정)에서 Salesforce Go 홈 페이지가 열립니다. 또는 이미 Setup(설정)에 있는 경우 Quick Find(빠른 찾기)를 사용하여 Salesforce Go를 검색하고 선택합니다.
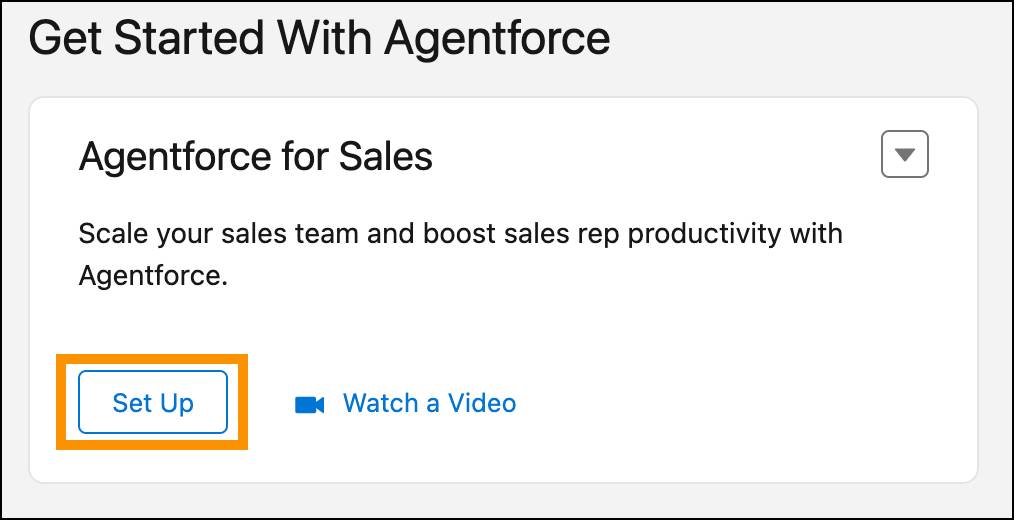
- 아래로 스크롤하여 Get Started with Agentforce(Agentforce 시작하기) 섹션으로 이동한 다음 Agentforce for Sales(세일즈용 Agentforce) 카드에서 Set Up(설정)을 클릭합니다.
-
Turn On(설정)을 클릭하여 조직에서 Agentforce를 활성화합니다.

-
Confirm(확인)을 클릭합니다. Agentforce를 활성화하는 데 시간이 다소 걸릴 수 있습니다. 활성화되면 Agentforce가 자동으로 세일즈 관련 에이전트를 설정할 수 있게 합니다. 예를 들어 세일즈용 Agentforce에는 세일즈 코치와 SDR 에이전트가 포함되어 있습니다. 활성화 후에는 이 페이지에서 이러한 에이전트를 이용할 수 있습니다.
-
SDR Agent | Inbound Nurturing(SDR 에이전트 | Inbound Nurturing)을 토글합니다.
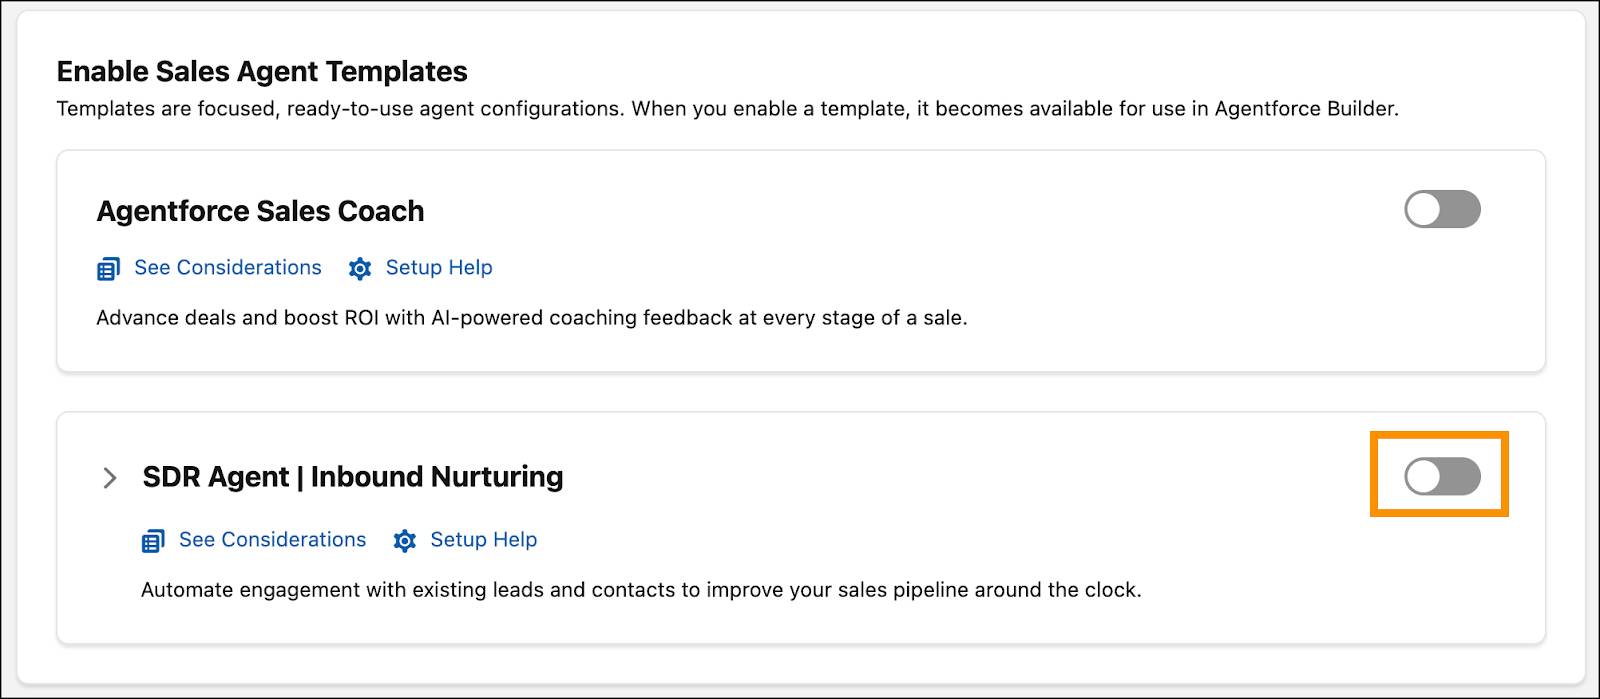
- 대화 상자에서 Confirm(확인)을 클릭합니다. 에이전트가 활성화되기까지 몇 분 정도 걸릴 수 있습니다. 활성화되면 완료해야 하는 설정 단계를 진행할 수 있습니다. 보시는 대로 4가지 필수 단계 중 하나인 에이전트 활성화가 완료되었습니다. 이제 에이전트가 활성화되어 설정할 수 있습니다.
잘하셨습니다! 이번 단계에서는 Agentforce 세일즈 개발 에이전트의 역할을 알아보았으며 Agentforce 세일즈 개발을 위한 Playground를 활성화했습니다. 이제 사용자를 생성한 뒤 에이전트를 만드는 데 필요한 올바른 권한을 부여할 차례입니다.