사용자로부터 연락처 정보 수집
학습 목표
이 프로젝트에서 Flow Builder를 사용하여 다음과 같은 화면 플로를 작성할 수 있습니다.
- 사용자의 정보를 수집합니다.
- 사용자가 입력한 내용과 일치하는 레코드에 대해 Salesforce 조직을 조회합니다.
- 사용자에게 일치하는 레코드를 업데이트할지 또는 아무것도 변경하지 않을지를 묻습니다.
- 레코드를 만들거나 업데이트합니다.
- 업데이트 또는 생성된 레코드에 대한 링크를 제공합니다.

개요
중복 데이터는 단순히 처리하기 번거로운 문제를 넘어, 조직의 무결성 및 Data 360과 같은 고급 기술을 지원하는 역량에 위험이 됩니다. 또한 사용자에게 좌절감과 혼란을 주기도 합니다. 따라서 이러한 중복을 방지하는 데 도움이 되는 기능을 추가하면 매우 유용할 수 있습니다.
이 뱃지에서는 사용자가 새 연락처를 생성할 수 있도록 하면서, 이메일 주소가 동일한 연락처가 이미 존재하는 경우 기존 연락처를 업데이트할 수 있는 옵션도 제공하는 화면 플로를 만듭니다.
Trailhead Playground 실행
Trailhead Playground라는 개인 Salesforce 환경에서 이 실습 프로젝트를 완료할 예정입니다. 먼저 Trailhead에 로그인한 후 이 페이지 하단에 있는 Launch(실행)를 클릭하여 Trailhead Playground를 받으세요. Playground가 새 브라우저 탭이나 창에서 열립니다. 이 뱃지를 진행하는 동안 Playground 창을 열어 두세요. Playground에서 단계를 완료한 후에는 이 창으로 돌아와 이 페이지 하단에 있는 Verify step(단계 확인)을 클릭해야 합니다.
플로 만들기
- App Launcher(앱 시작 관리자)(
 )를 클릭합니다.
- Search apps and items(앱 및 항목 검색) 상자에
auto(자동)를 입력하고 Automation(자동화)을 선택합니다.
- Flows(플로) 패널에서 New(새로 만들기)를 클릭합니다.
- Frequently Used(자주 사용하는 항목)에서 Screen Flow(화면 플로)를 선택합니다.
Flow Builder 캔버스가 열립니다.
연락처에 대한 레코드 변수 만들기
먼저, 플로에서 연락처 데이터를 저장할 레코드 변수를 생성합니다. 이 단일 변수는 하나의 연락처에 대한 모든 필드를 저장합니다. 모든 데이터를 한 곳에 저장하면 나중에 사용하기가 더 쉬워집니다.
- 도구 상자를 보려면
 를 클릭합니다.
- Manager(관리자) 탭에서 New Resource(새 리소스)를 클릭합니다.
- Resource Type(리소스 유형)의 경우 Variable(변수)을 선택합니다.
- API Name(API 이름)의 경우
contact(연락처)를 입력합니다.
- Data Type(데이터 유형)의 경우 Record(레코드)를 선택합니다.
- Object(개체)의 경우 Contact(연락처)을 입력합니다.
-
Done(완료)을 클릭합니다.
이제 도구 모음에서 Manager(관리자) 탭에 contact(연락처)라는 레코드 변수가 포함되어 있습니다.
-
Save(저장)를 클릭하고 다음 값을 입력합니다.
- Flow Label(플로 레이블):
New Contact(새 연락처) - Flow API Name(플로 API 이름):
New_Contact
- Flow Label(플로 레이블):
-
Save(저장)를 클릭합니다.
시작 요소에 연결된 항목이 없어 플로를 실행할 수 없다는 오류 메시지가 표시될 수 있습니다. 이제 해결할 오류이니 걱정하지 마세요.
화면 요소 만들기
다음으로, 잠재적인 새 연락처의 데이터를 수집하기 위한 화면 요소를 생성합니다.
- Start(시작) 요소 다음 경로인 플로 캔버스에서
 을(를) 클릭합니다.
-
Screen(화면)을 선택합니다.
New Screen(새 화면) 창이 열립니다.
- Screen Properties(화면 속성)의 Label(레이블)에
Contact Info(연락처 정보)를 입력합니다.
API 이름은Contact_Info로 자동 설정됩니다.

-
Done(완료)을 클릭합니다.
캔버스에는 Screen Flow Start(화면 플로 시작) 요소, Contact Info(연락처 정보) 화면, End(끝) 요소 세 가지가 표시됩니다.
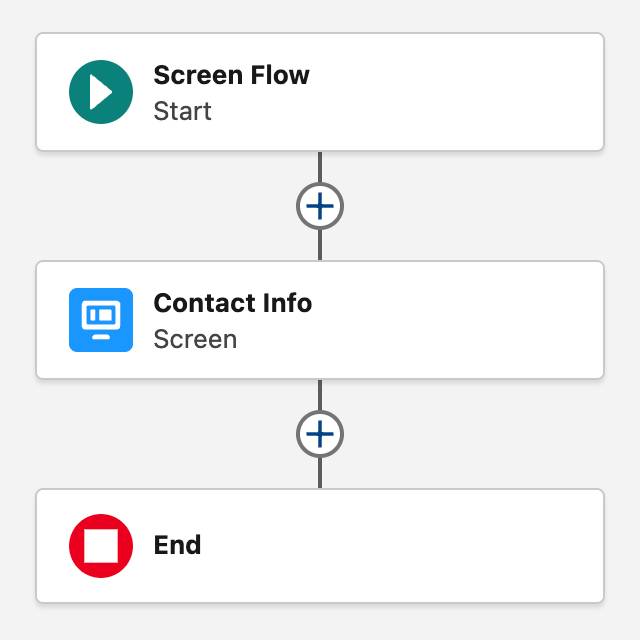
- 플로를 저장합니다.
화면에 이름 구성 요소 추가하기
화면 요소에는 사용자에게 정보를 요청하거나 표시하기 위한 화면 구성 요소가 필요합니다. 이 경우, 화면에는 잠재 고객 연락처의 정보를 입력할 필드가 필요합니다. 연락처의 이름을 수집하는 화면 구성 요소부터 시작해 보겠습니다.
- 캔버스에서 Contact Info(연락처 정보) 요소를 클릭합니다.
Edit Screen(화면 편집) 창이 열립니다. 이 창은 화면 캔버스라고도 합니다.
- Components(구성 요소) 탭에서 Search(검색) 구성 요소 상자에
name(이름)을 입력합니다.
-
Name(이름) 구성 요소를 클릭하여 화면 캔버스에 추가합니다.
이제 속성 창에 Name(이름) 구성 요소가 표시됩니다.
- API Name(API 이름)의 경우 Name(이름) 구성 요소의 속성 창에
contactName을 입력합니다.
- 아래로 스크롤하여 Advanced(고급)를 클릭합니다.
-
Manually assign variables(변수 수동 할당)를 선택합니다.
- Store Output Values to Select Variables(출력 값을 저장하여 변수 선택) 섹션에서 연락처 레코드 변수의 값을 입력합니다.
- First Name(이름)의 경우 contact(연락처) 및 First Name(이름)을 선택합니다.
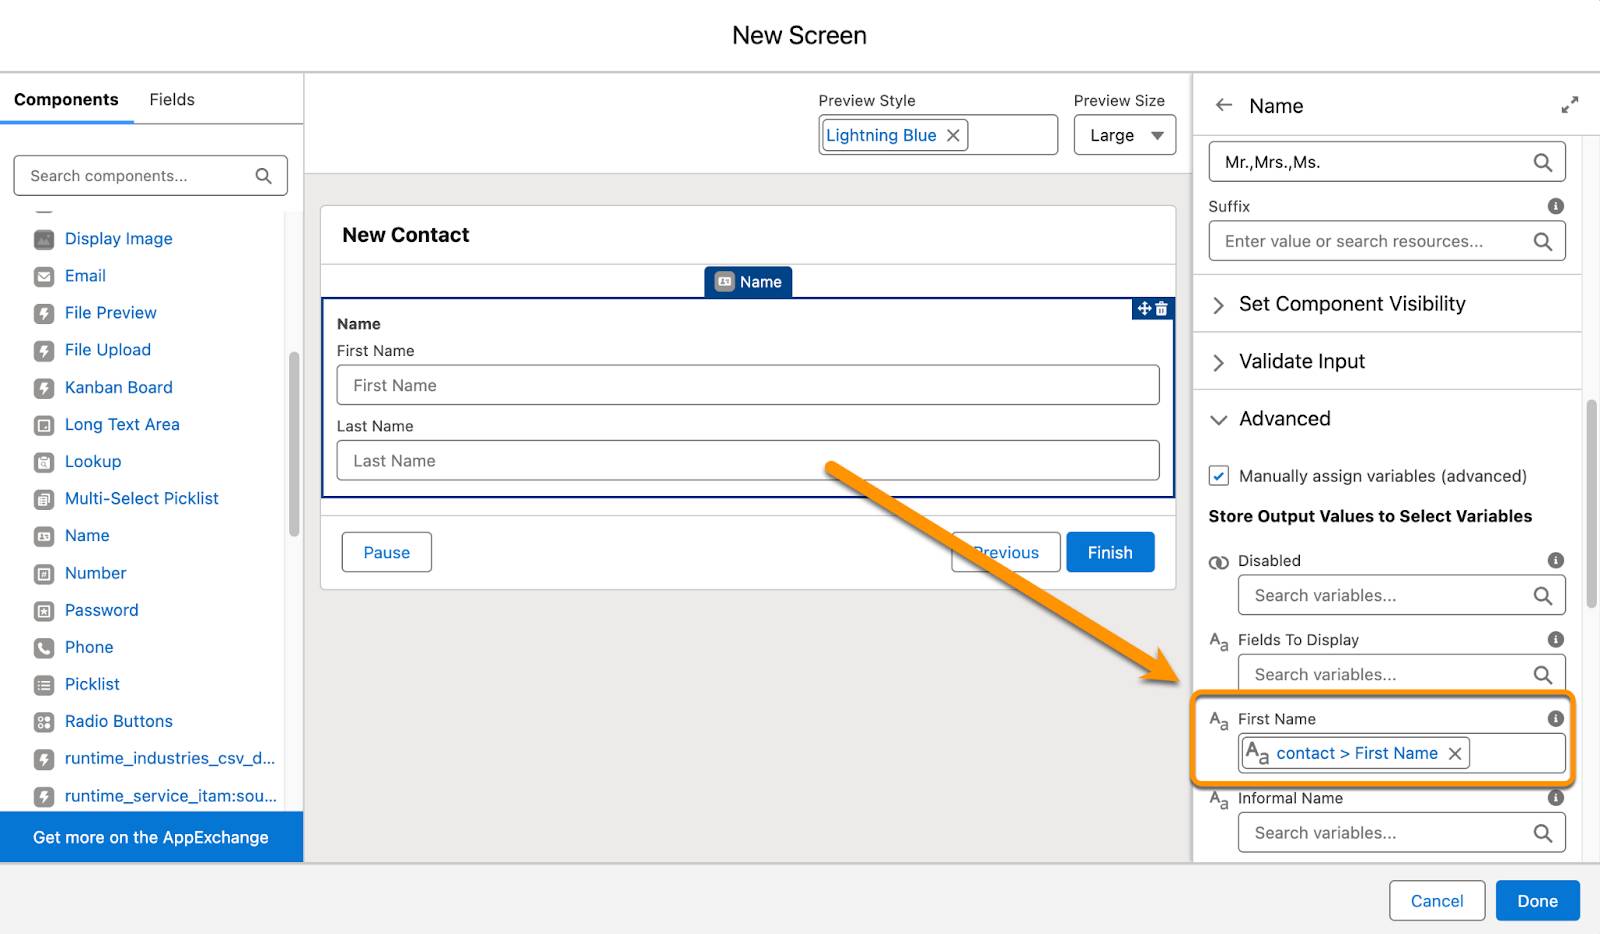
- Last Name(성)의 경우 contact(연락처) 및 Last Name(성)을 선택합니다.
-
Done(완료)을 클릭합니다.
- 플로를 저장합니다.
화면에 선택 조회 구성 요소 추가하기
이제 사용자가 연락처의 상위 계정을 선택할 수 있는 Choice Lookup(선택 조회) 구성 요소를 추가해 보겠습니다.
- 캔버스에서 Contact Info(연락처 정보) 요소를 클릭하여 화면 캔버스를 엽니다.
- Components(구성 요소) 탭에서 Choice Lookup(선택 조회)을 클릭하여 Name(이름) 구성 요소 바로 아래 화면 캔버스에 추가합니다.
이제 속성 창에 Choice Lookup(선택 조회) 구성 요소가 표시됩니다.
- Choice Lookup(선택 조회) 구성 요소의 속성 창에 해당 값을 입력합니다.
- Label(레이블)에
Account(계정)를 입력합니다. API Name(API 이름)은Account로 자동 설정됩니다.
-
Require(필수) 확인란을 활성화합니다.
- Let Users Select Multiple Options(사용자가 여러 옵션을 선택하도록 허용)가 No(아니요)로 설정되어 있는지 확인합니다.
- Label(레이블)에
- Configure Choices(선택 구성) 섹션에서 Choice(선택)의 경우 New Choice Resource(새 선택 리소스)를 선택합니다. 다음 값을 입력합니다.
- Resource Type(리소스 유형)으로 Record Choice Set(레코드 선택 항목 세트)를 선택합니다.
- API Name(API 이름)의 경우
AllAccounts를 입력합니다.
- Object(개체)는 Account(계정)를 선택합니다.
- Condition Requirements(조건 요구 사항)로는 None—Get All Account Records(없음 - 모든 계정 레코드 가져오기)를 선택합니다.
- Sort Order(정렬 순서)에서 Ascending(오름차순)을 선택합니다.
- Sort By(정렬 기준)는 Name(이름)을 선택합니다.
- Choice Label(선택 레이블)은 Name(이름)을 선택합니다.
- Data Type(데이터 유형)은 Text(텍스트)로 선택합니다.
- Choice Value(값 선택)로는 Id를 선택합니다.
- Store More Account Field Values(더 많은 계정 필드 값 저장) 섹션에서 다음 값을 입력하여 사용자가 선택한 계정의 ID를 연락처 레코드 변수에 저장합니다.
- Field(필드)의 경우, Account ID(계정 ID)를 선택합니다.
- Variable(변수)의 경우 contact(연락처) 및 Account ID(계정 ID)(두 번째)를 차례로 선택합니다.
- Field(필드)의 경우, Account ID(계정 ID)를 선택합니다.
- Resource Type(리소스 유형)으로 Record Choice Set(레코드 선택 항목 세트)를 선택합니다.
-
Done(완료)을 클릭하여 New Choice Resource(새 선택 리소스) 창을 닫습니다.
-
Done(완료)을 클릭하여 Edit Screen(화면 편집) 창을 닫습니다.
- 플로를 저장합니다.
화면에 이메일 구성 요소 추가하기
마지막으로 사용자에 대해 Email(이메일) 구성 요소를 추가하여 연락처의 이메일 주소를 입력합니다. 플로에서 이 값을 사용하여 중복 연락처를 찾아야 하므로 필드에 값을 입력해야 합니다.
- 캔버스에서 Contact Info(연락처 정보) 요소를 클릭하여 화면 캔버스를 엽니다.
- Components(구성 요소) 탭에서 Email(이메일)을 클릭하여 화면 캔버스에 추가합니다.
- Email(이메일) 구성 요소의 속성 창에 해당 값을 입력합니다.
- API Name(API 이름)의 경우
contactEmail을 입력합니다.
- Label(레이블)에는
Email(이메일)을 입력합니다.
- Required(필수)의 경우 True(참)를 선택합니다.
- API Name(API 이름)의 경우
- 아래로 스크롤하여 Advanced(고급)를 클릭합니다.
-
Manually assign variables(변수 수동 할당)를 선택합니다.
- Store Output Values to Select Variables(출력 값을 저장하여 변수 선택) 섹션에서 Value(값)에 대해 contact(연락처) 및 Email(이메일)을 차례로 선택합니다.
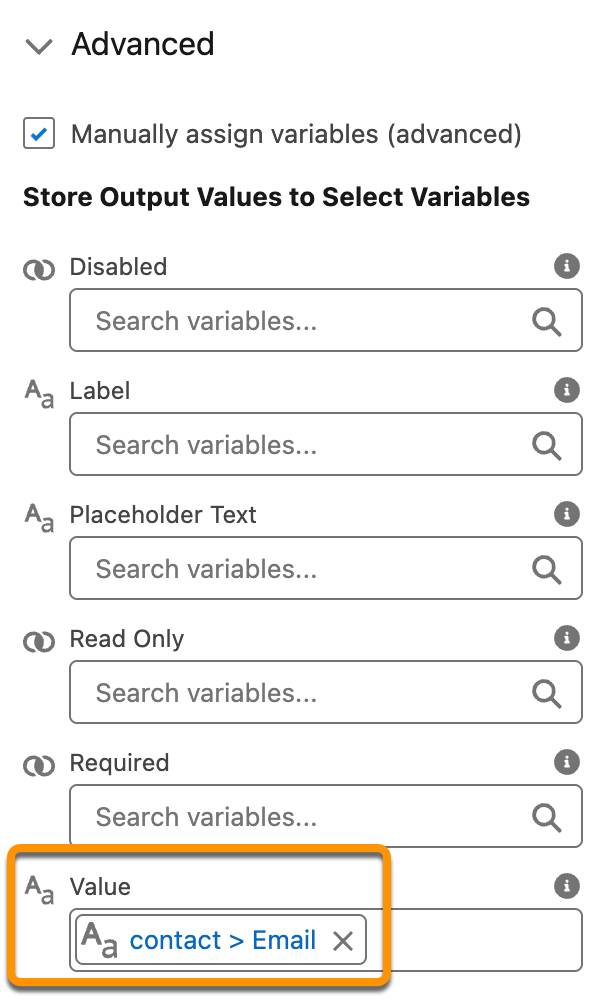
-
Done(완료)을 클릭합니다.
- 플로를 저장합니다.
플로를 실행하여 화면 보기
이때 플로는 사용자에게 연락처 정보를 수집하고 해당 정보를 플로 변수에 저장할 수 있습니다. 플로를 실행하는 사용자에게 화면이 어떻게 표시되는지 살펴보겠습니다.
- 도구 모음에서 Run(실행)을 클릭합니다.
- 원하는 값을 입력하고 목록에서 계정을 선택한 다음 Finish(마침)를 클릭합니다.
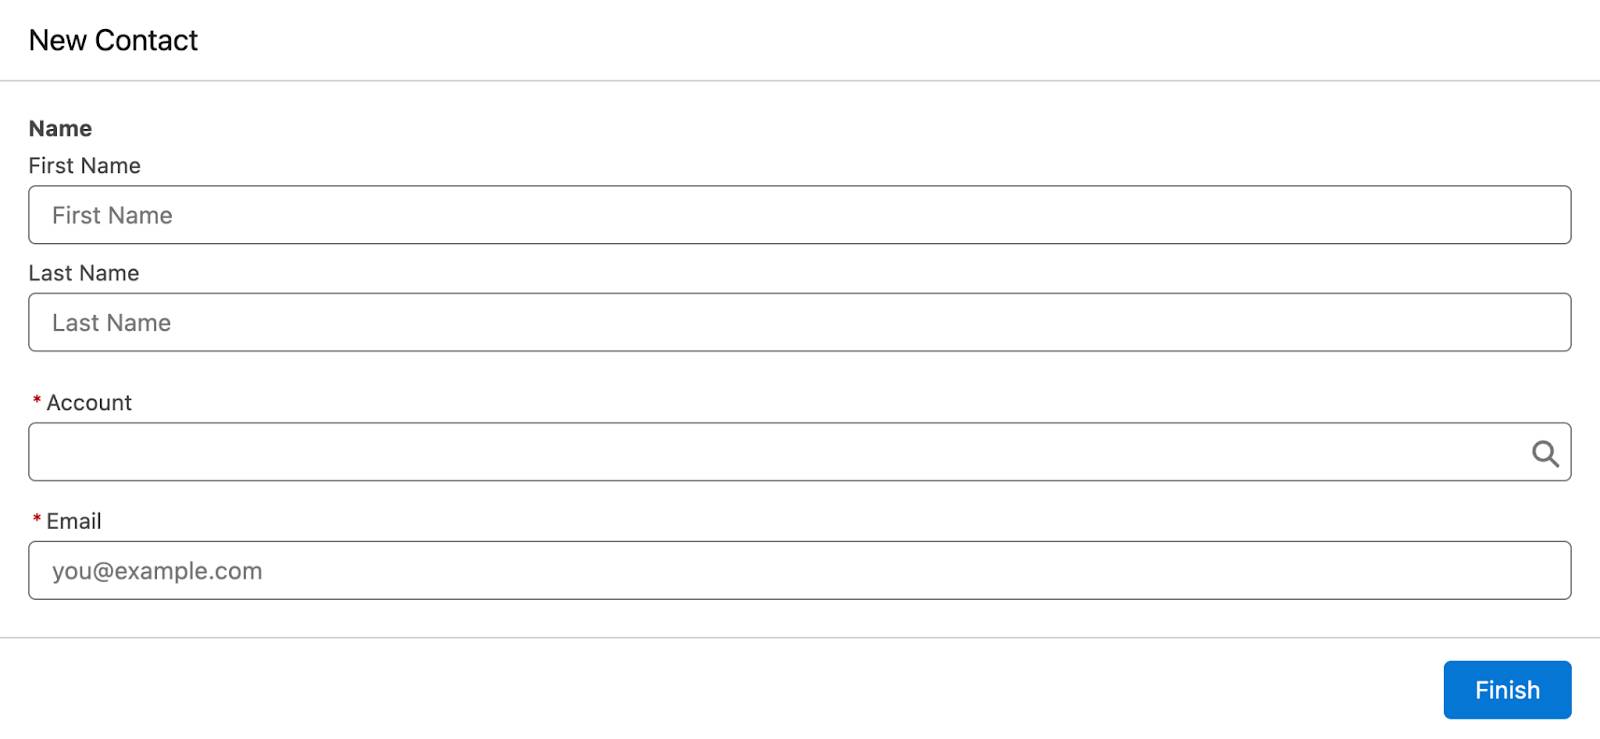
플로는 화면 다음에 실행할 요소가 없으므로 Finish(마침)를 클릭해도 아무 일도 일어나지 않습니다. 이 플로는 단순히 다시 실행되며, 화면이 다시 나타납니다.
지금 플로에는 사용자 입력을 승인하는 화면만 표시됩니다. 다음에는 플로를 구성하여 사용자 입력 일부를 조직의 데이터와 비교해 보겠습니다.