Create a Preview Screen and Send Email Action
Build a Way to Preview Your Email
Now that you set up your email template, add a way to preview it before you send it. While you could set this email to send without a preview, you want to do a final check to make sure all the details are correct before it goes out.
To do this, add another Screen element.
- On the flow canvas, on the path after the Get Opportunity Get Records element, click
 .
.
- Select Screen in the Interaction section.
- In Screen Properties, specify these details:
- Label:
Email Preview - API Name:
Email_Preview(This should automatically generate.)
- Description:
Shows the user a preview of the email before sending it. - Configure Header: Deselect Show Header.
- Configure Footer:
- Next or Finish Button: Use the standard label, the default
- Previous Button: Hide Previous
- Pause Button: Hide Pause
- Like on your first screen, use a Display Text component. Click or drag Display Text from Components onto the New Screen canvas. Enter these details:
- API Name:
displayEmailBody - Click in to the Insert a resource… search bar, then find and select the emailBody text template. This adds
{!emailBody}to the text field.
- Click into the text field after
{!emailBody}and hit the return key twice.
- Add this guidance to the text box:
READY TO SEND THIS EMAIL? If so, click Next. If not, make adjustments to the Opportunity and Primary Contact records and refresh the page. - Optionally, you can style the guidance text so it doesn’t blend in with the email body. Make the guidance text bold.

- Click Done.

Save your work in Flow Builder.
Create an Action to Send the Email
Now it’s time to send the email.
You’ll use the Action element. Salesforce provides several standard types of actions under the Action element, like submitting a record for approval, posting to Chatter, sending a survey, and sending an email.
- On the flow canvas, on the path after the Email Preview screen, click
 .
.
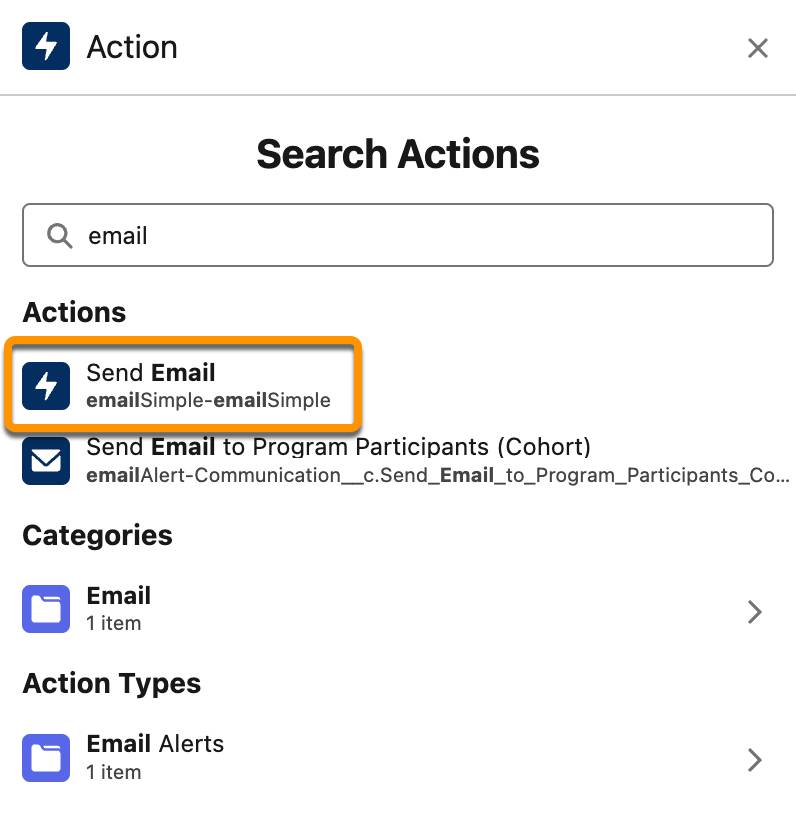
- Select Action in the Interaction group.
- In Action window, find and select Send Email.
- Specify these details:
- Label:
Send Email - API Name:
Send_Email(this text will generate automatically).
- Description:
This element sends the email. - In Set Input Values: Recipient Addresses, find and select Opportunity from Get Opportunity, then Primary Contact, then Email.
- In Configure Sender Details, leave Sender Email Address blank. Without a Sender Email Address, the email will come from the address of the user running the flow. In your Trailhead Playground, that will be the email you use for Trailhead.
- In Configure Email Content: Subject, enter
Thank you for your gift to No More Homelessness!You could also use values from a resource or variable, but let’s keep it simple for now.
- In Configure Email Content: Body, click
 and select Search Resources. Then, use the field to search for and select emailBody.
- In Configure Email Content: Rich-Text Formatted Body, select True in the Global Constants section. This setting tells the Send Email action that you want to format the email body as rich text.
- Label:
- Save the flow.


Now you're set up to send the email. But hold on, because there are a few more elements to add in order to make the most of Salesforce and Nonprofit Success Pack (NPSP). When you send the email you also want to change a few fields on the opportunity record to show that the gift has been acknowledged. You dive into that in the next step.
To complete this step and move on, launch your Trailhead Playground and click Verify to check that your Email Action is configured properly.
Resources