Compose Block Kit Messages
Learning Objectives
After completing this unit, you’ll be able to:
- Compose a Block Kit message using Block Kit builder.
- Use templates to create more custom messages.
- Explain what message payloads are.
Send Block Kit Messages
Behind the scenes, Block Kit messages are JSON payloads that break down the type of blocks that are used. They’re passed between your app and Slack through the Slack Web API. While you can create message blocks manually, there’s a simpler and more intuitive way using Block Kit Builder.
Compose Messages with Block Kit Builder
Now that you know the types of blocks, block elements, and surfaces, let’s learn how to construct both simple and complex Block Kit messages.
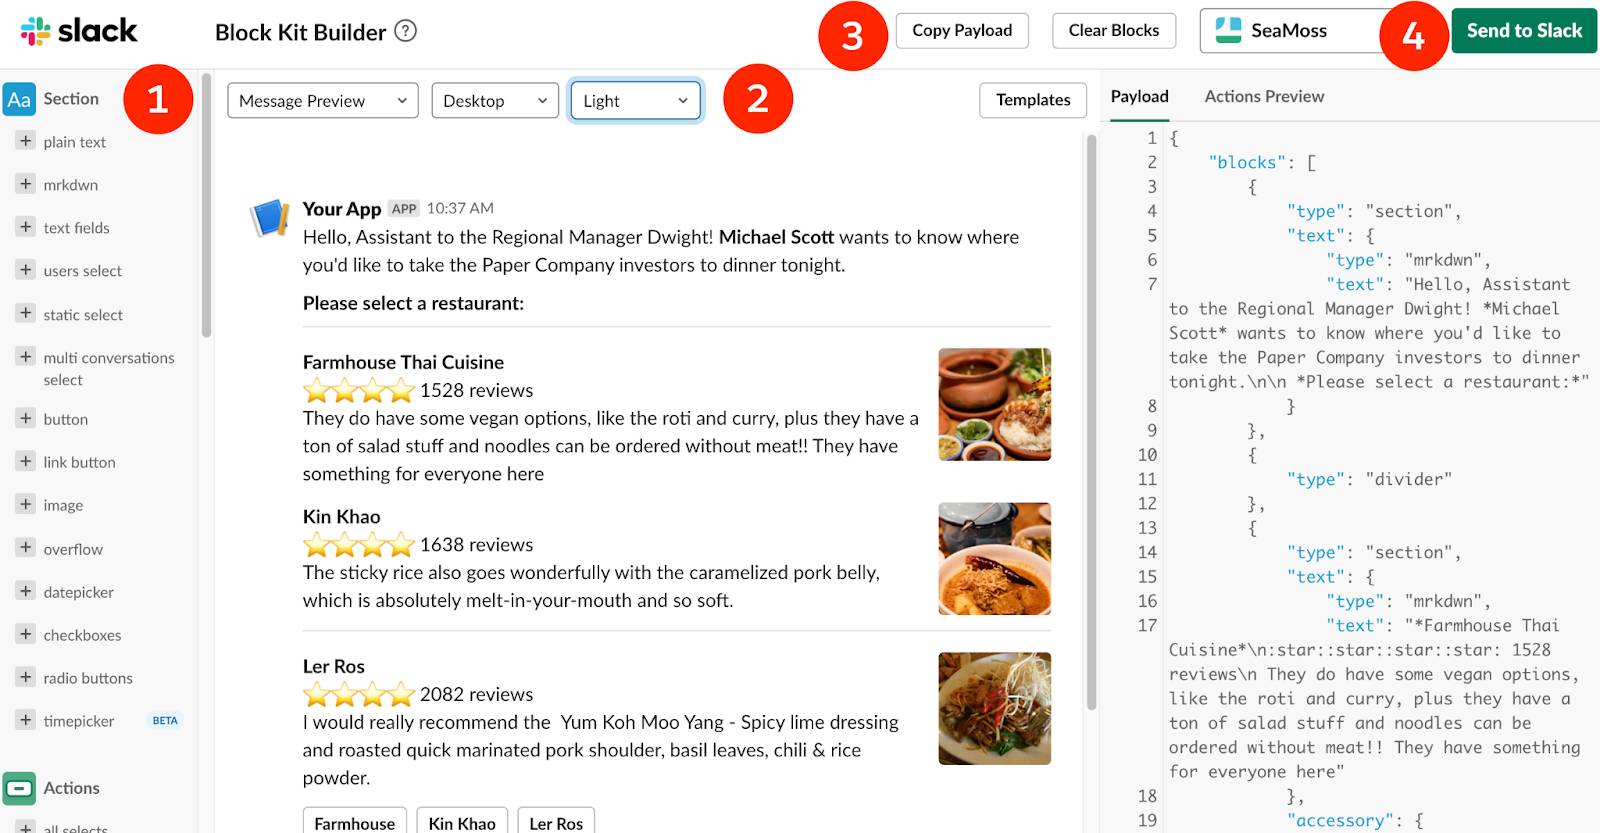
All in one place, Block Kit Builder enables you to choose from blocks in the left pane (1), then drag, drop, and rearrange them to design and preview Block Kit layouts in the center pane (2). Once you’ve built a Block Kit message to your liking, you can copy the JSON array needed for your Slack app (3), or be able to send it directly to Slack with the click of a button (4).

Block Kit Builder also has template messages that you can use as a starting point for such things as approvals, polls, onboarding, and newsletters.
Alternatively you can use the block reference guide to manually generate a complete block array.
Explore the Message Payload Structure
The structure of the message payload, or block statement, is universal. Every block contains a type field—specifying which block type is being used—along with other fields that describe the content of the block.
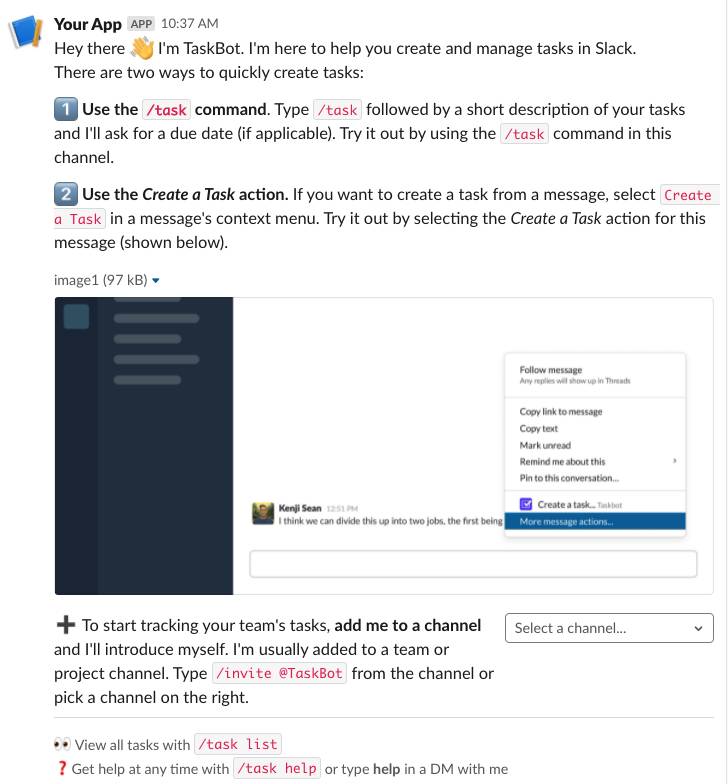
Take a look at the onboarding template below. This message is composed using section, image, and context blocks for the layout. There’s also an interactive element nested in one of the sections, conversations_select. This template can be used as is or be the starting point for a more robust workflow to onboard a new team member.
{
    "blocks": [
        {
            "type": "section",
            "text": {
                "type": "mrkdwn",
                "text": "Hey there 👋 I'm TaskBot. I'm here to help you create and manage tasks in Slack.\nThere are two ways to quickly create tasks:"
            }
        },
        {
            "type": "section",
            "text": {
                "type": "mrkdwn",
                "text": "*1️⃣ Use the `/task` command*. Type `/task` followed by a short description of your tasks and I'll ask for a due date (if applicable). Try it out by using the `/task` command in this channel."
            }
        },
        {
            "type": "section",
            "text": {
                "type": "mrkdwn",
                "text": "*2️⃣ Use the _Create a Task_ action.* If you want to create a task from a message, select `Create a Task` in a message's context menu. Try it out by selecting the _Create a Task_ action for this message (shown below)."
            }
        },
        {
            "type": "image",
            "title": {
                "type": "plain_text",
                "text": "image1",
                "emoji": true
            },
            "image_url": "https://api.slack.com/img/blocks/bkb_template_images/onboardingComplex.jpg",
            "alt_text": "image1"
        },
        {
            "type": "section",
            "text": {
                "type": "mrkdwn",
                "text": "➕ To start tracking your team's tasks, *add me to a channel* and I'll introduce myself. I'm usually added to a team or project channel. Type `/invite @TaskBot` from the channel or pick a channel on the right."
            },
            "accessory": {
                "type": "conversations_select",
                "placeholder": {
                    "type": "plain_text",
                    "text": "Select a channel...",
                    "emoji": true
                }
            }
        },
        {
            "type": "divider"
        },
        {
            "type": "context",
            "elements": [
                {
                    "type": "mrkdwn",
                    "text": "👀 View all tasks with `/task list`\n❓Get help at any time with `/task help` or type *help* in a DM with me"
                }
            ]
        }
    ]
}
The result is a rich, meaningful message helping new Slack users create tasks according to a workflow your team has set up, complete with distinct steps, screenshots, and an interactive element that enables the user to add the bot to a channel.

But how does the user interact with these messages? In the next unit, we discuss how to handle interactivity with a Block Kit payload. Handling user interaction is a crucial step in making functional Block Kit messages and workflows.
Resources
- Slack App: Block Kit Builder (sign in required)