Manage Service Deliveries with Service Schedules
Learning Objectives
After completing this unit, you’ll be able to:
- Use service schedules and attendance tracking to plan and create service deliveries.
- Create service delivery records using the Track Attendance tool.
Understand Service Schedules
Some of your services may be delivered as events—either one-time or recurring—like a class, support group, or cleanup day at a local park.
In those cases, you can manage the recurring services and attendance using service schedule, service participant, and service session records. These records help you create service delivery records quickly without duplicate work.
For example, at the (fictional) nonprofit NMH, client Alex is registered for NMH’s medical career counseling course, in which a group meets once a week for 6 weeks. This is a perfect situation for NMH Program Manager Gia to use service schedules because the class has more than one participant, a list of participants defined in advance, and scheduled sessions.
In this unit, we follow the entire process of how NMH manages this course and its service deliveries with service schedules and related records.
Plan Service Deliveries with Service Schedules
Let’s start by following NMH Program Manager Gia as she sets up a service schedule for the class and adds Alex and other participants.
- In the Program Management app, click the Service Schedules tab in navigation.
- Click New.
- Enter a service schedule name. Gia enters
Winter Medical Careers Course. - Search for and select a related service. Gia finds and selects her Career Counseling Course: Medical service.
- Optionally, enter service providers. Gia selects the contact record for the volunteer who leads the course in the Primary Service Provider field.
- Enter an optional participant capacity. Gia enters
10. This field is only for internal use and won’t limit the number of service participants that can be added. Your admin can add additional internal fields here if there’s other information you’d like to track. - Enter an optional default service quantity to set a standard amount of a service for tracking attendance (more on that in a moment). Gia enters
1.50for this hour-and-a-half class.
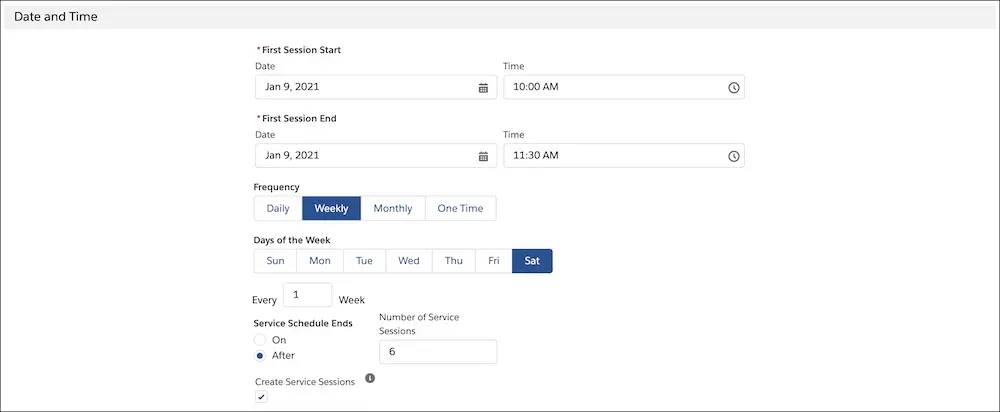
- Select the start and end date and time for the first session. For recurring schedules, the same start and end time will be applied to all service sessions, although you can change this on individual sessions later. (If your work spans time zones, be sure to talk with your admin and check out Work with Services linked in Resources.)
- You can set this service on a recurring schedule by changing One Time to Daily, Weekly, or Monthly under Frequency and filling in the additional information. Gia selects Weekly, then Sat (Saturday) for the day of the week, and then selects After under Service Schedule Ends and enters
6in the Number of Service Sessions field. Note that while we’re selecting one day of the week here, you can select several. -
Create Service Sessions is selected by default to automatically generate service sessions based on the schedule you created. Gia leaves this selected.
- Click Next.
- Review the sessions. You can click Add Service Session to create additional records, remove a record by clicking remove (
 ) on each row , or click Back to change scheduling details (though if you deleted or added any sessions here first, you lose those changes by clicking Back).
- Click Next.
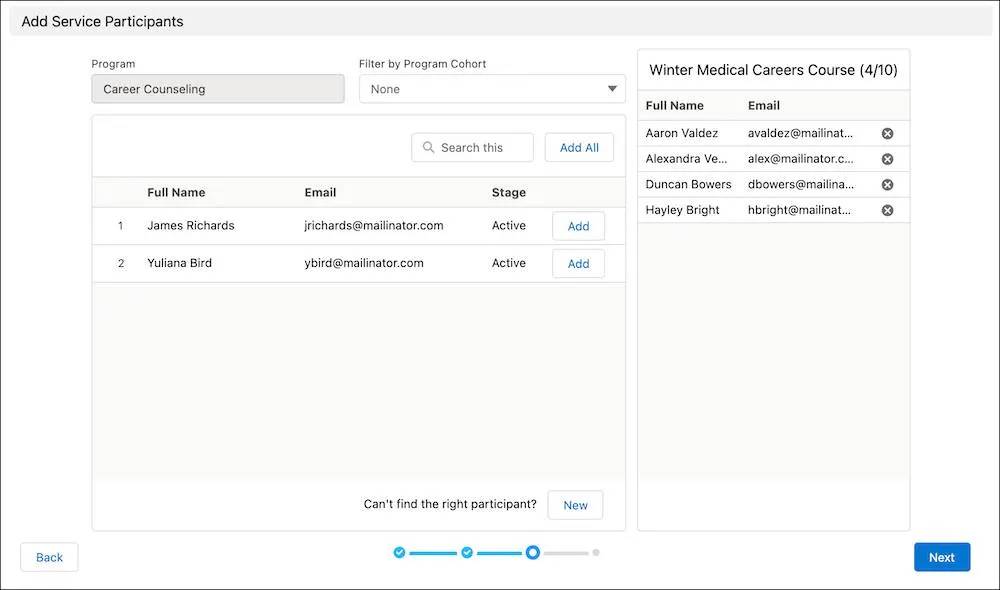
- The next page is a list of clients who have program engagements in the same program as the selected service. You can further filter by program cohort. To select a participant for the service schedule, click Add next to their name. Gia selects Alex and a few other clients. Their names move to the box labeled with the service schedule’s name to show that they are included. (You could also click New to add an existing or new contact to the service schedule if they don't have an existing program engagement.)
- Click Next to review the details of the service schedule.
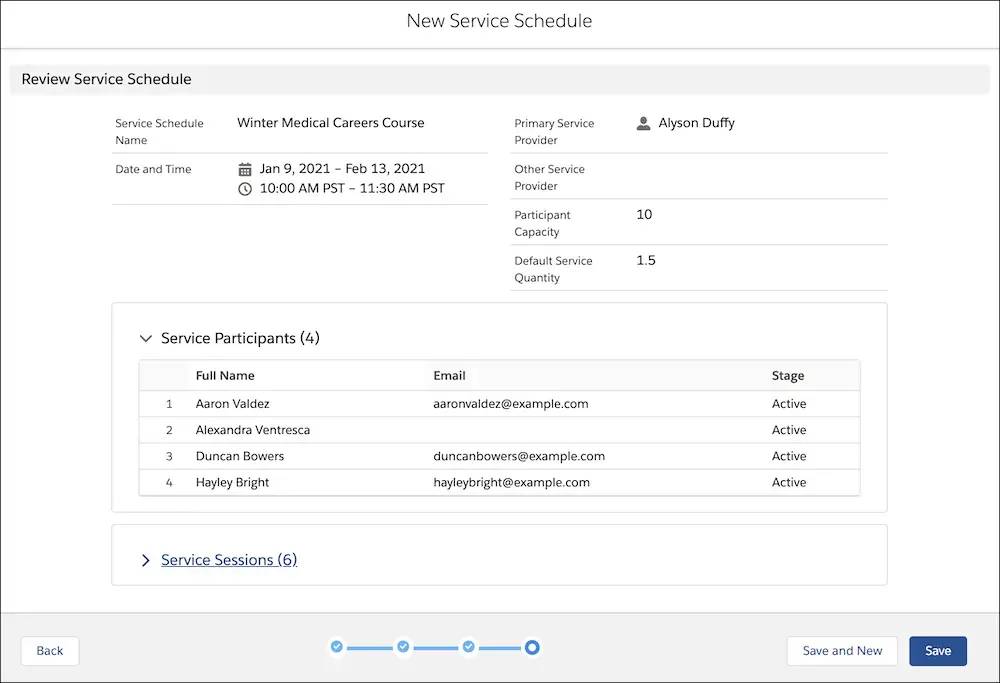
- Click Save.
Let’s review the records that we just created.
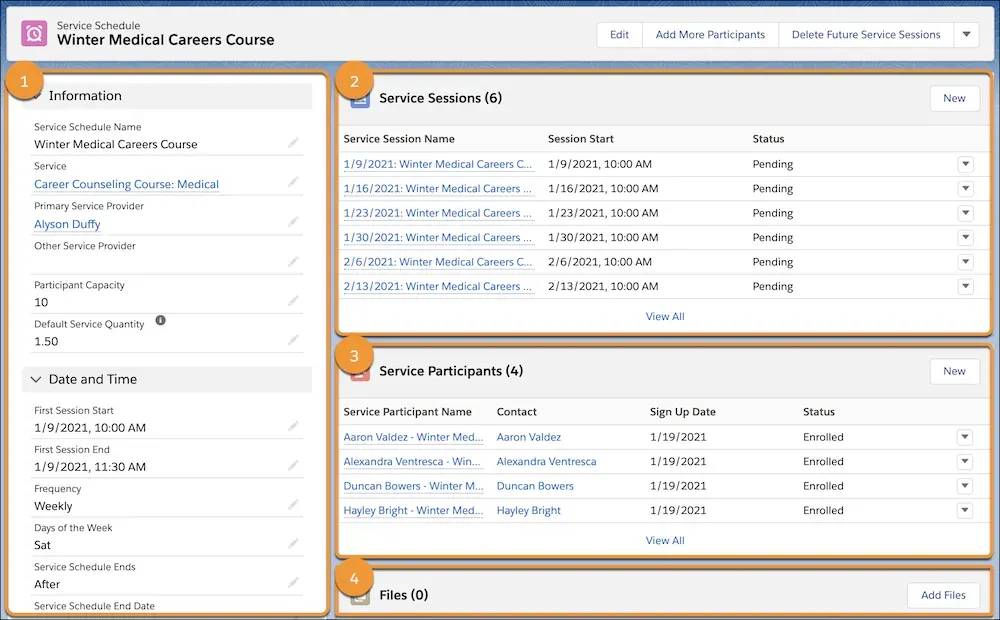
- The Information and Date and Time panel (1) on the service schedule record includes all the details about the service, provider, capacity, and schedule.
- The Service Sessions related list (2) includes all the session records we just created.
- The Service Participants related list (3) includes all the client service participant records that connect contacts, program engagements, and this service schedule.
- And, finally, a Files list (4) allows you to store important files for this service schedule.
If you need to extend the schedule or add more sessions, click the Add More Sessions quick action on the service schedule record. The screen that appears is just like the step-by-step guide that helped you set up the service schedule.
Create Service Deliveries with Track Attendance
As Alex’s class meets at NMH, Gia and her team track attendance. Fortunately, PMM includes the Track Attendance tool to easily create service delivery records.
Let’s follow along as Gia records attendance for a session of the course.
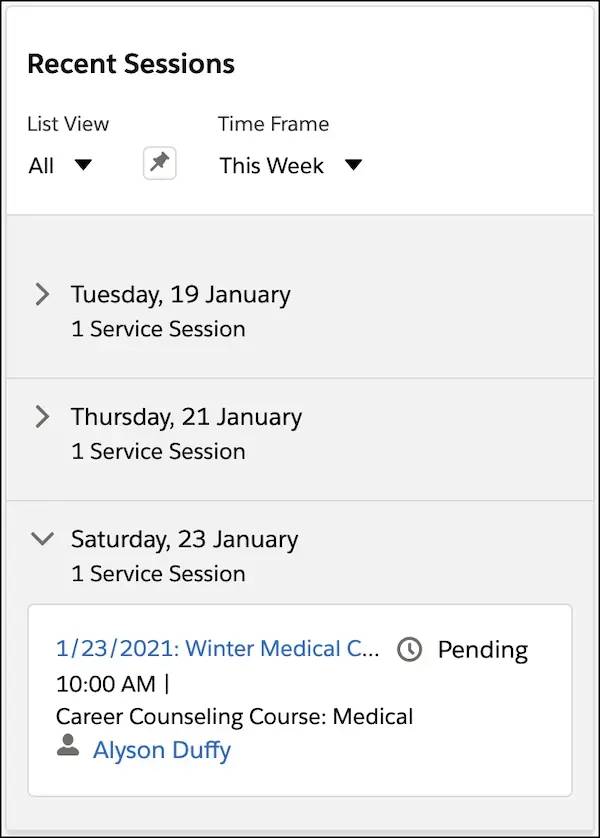
The Recent Sessions component on the Program Management Home tab shows all recent sessions by default, but we’re looking for sessions that are Pending, or have incomplete attendance. Gia clicks the most recent—and pending—Winter Medical Careers Course session. (You could also search for a particular service session or find one through the Service Schedules tab in navigation.)
The service session record shows all the participants enrolled in the course in the Track Attendance area. All participants automatically receive the default service quantity from the service schedule and are marked as Present. Let’s update some of these records.
- One client had to leave early, so change their quantity to 1 hour by clicking in the Quantity field on their row and changing the number. (This label may be different depending on how you measure the service, for example Hours or Sessions.)
- Another client was out sick and let the volunteer teacher know, so set their attendance status to Excused Absence. The Quantity field changes to 0.
- A third client didn’t make it to class and didn’t let anyone know why, so update their attendance status to Unexcused Absence. The Quantity field will change to 0.
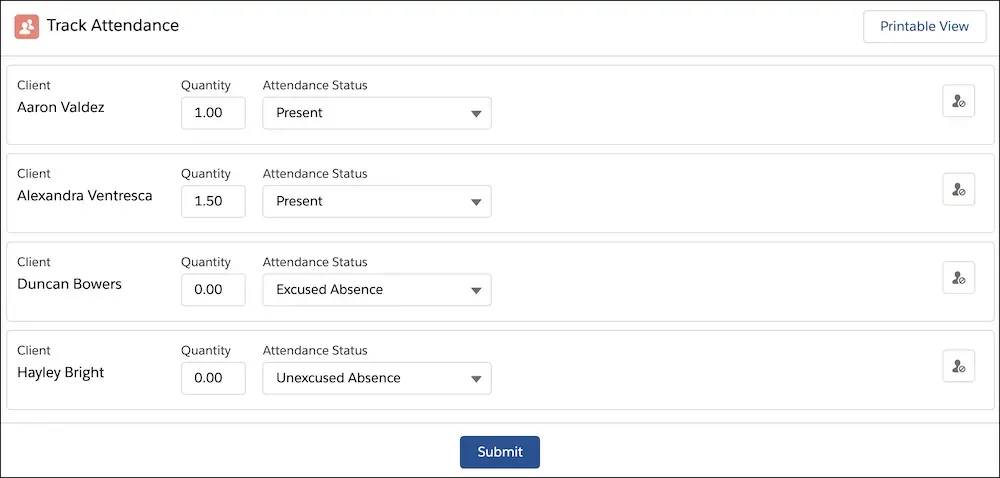
Before we submit attendance, there’s one more button to review: Don’t track attendance for this participant ( ). You use this option when you don’t expect a participant to attend every session, such as for open drop-in sessions or office hours.
That doesn’t apply here, so Gia clicks Submit then refreshes the page to see the newly created service deliveries in the Service Deliveries related list.

If you see something wrong, click Update in the Track Attendance area, make your changes, then click Save. The service delivery records automatically update.
You can also click Printable View in the Track Attendance area of a service session record to see, update, and print an attendance list. For example, Gia often prints attendance lists for volunteer teachers who don’t have user accounts for NMH’s Salesforce org.
Service deliveries, Bulk Service Deliveries, service schedules, and attendance tracking in PMM can help your team become lean, mean, program-tracking machines—or maybe kind program-tracking machines, given the work you do.
Using these tools in your day-to-day operations is great, but the next level is using all the rich data you create for better reporting and program administration. If you want to go deeper on that topic, be sure to check out the Data Analysis with Program Management Module (PMM) badge linked in Resources.
