Test and Send an Email in Account Engagement
Learning Objectives
After completing this unit, you’ll be able to:
- Create a test list.
- Describe A/B testing.
- Set A/B criteria.
- Send an email.
Introduction
You’re almost ready to send your email. But before you send, you must test, test, test. We encourage you to test your templates multiple times. Send to various stakeholders, cross-check multiple email clients, and consider A/B testing to ensure your emails are perfect when they arrive in the inbox. Here’s a list of things to look for.
General Testing Checklist | |
|---|---|
✅ |
Test all links. |
✅ |
Test that all variable tags and dynamic content populate. Verify the dynamic content by creating a test prospect that matches the criteria for each variation. Then add the prospects to a test list. |
✅ |
Test to review the copy for typos or errors. |
✅ |
Test to ensure the design looks sharp and renders across all email clients and screen sizes. |
Create a Test List
Recruit your coworkers and team to help you test your emails! You can place internal recipients on a test list, a special list that lets you review emails as your prospects would see them. Creating your test list is a two-step process: First you make the list, and then you add participants to your list from the Account Engagement user table.
In order for users in your Account Engagement account to be subscribed to a test list, they must have prospect records in Account Engagement. When you add a user to your test list, Account Engagement automatically creates a prospect record with the name and email address from the user’s Account Engagement account. Then the user can receive emails that look the way a prospect’s email would look. This user-associated prospect record doesn’t differ from a normal prospect record in Account Engagement. The only distinction is that the test list you create with these prospects can only be accessed in the Testing step of the email wizard. Let’s walk through creating a test list.
- Navigate to Automations | Segmentation Lists.
- Click + Add List.
- Name the list. We recommend something obvious like
Test List for Campaign XYZ.
- Select Email Test List.
- Click Create List.
- Add test prospects from your users.
- Navigate to Account Engagement Settings | User Management | Users.
- Select users for the test list.
- From the table action dropdown, select Create prospect and add to test list.
- Choose your test list and click Go.
- Click Ok in prompt.
You created your test list and added users as prospects. Now you can use this list for all your email testing.
Create Your Email
First, create a list email to test and send.
- Navigate to Account Engagement Email | Scheduled.
- Click + Send New List Email.
- In the Basic Email Information window, complete all the fields, then click Save.
- Choose an email template and click Apply.
- If you already created your email template, you see it here in your library.
- To edit your email’s content, use the editor in the Building tab.

Test Your Email
- Click the Testing tab.
- Send to test lists (1) or individual email addresses (2).
- If your account has the Advanced Email Analytics Package, check how your message looks on different email clients (3).

A/B Testing
Use A/B testing to send different versions of your emails to a portion of your list and track how engaging each version is. Based on how your recipient interacts with the email, you can use the A/B test’s record of engagement data to determine and send the winning email.

You toggle on A/B testing when you prepare your email draft for sending.
- On the Building tab of an email draft, click Basic Info.
- Select Enable A/B Testing.

- Use the A/B tab to toggle between the email versions.

- When you’re done editing your versions, click the Sending tab.
- Add your recipient and suppression lists. Your audience size for an A/B test must have at least four prospects to give you relevant and accurate results.
- Choose a testing period and the criteria.
- Adjust the percentage slider to choose how much of your audience you want to use for testing.
- Click Schedule to set a date and time for your email to send, or click Send Now to begin the test immediately. In both methods, Account Engagement sends the winning email when the test period ends.

Half of the test audience receives version A, and half of the test audience receives version B. Account Engagement determines the winner based on the criterion you select (clicks or opens). After the test ends, Account Engagement stops counting new link clicks or email opens. If there’s a tie, Account Engagement sends version A.
Let’s take a look at when to test link clicks and when to test email opens.
-
Email opens: If you want to test your sender name or subject line, choose email opens as your test criteria, since these are both elements that drive open rates.
-
Link clicks: If you want to test the CTAs or links in your content, choose link clicks.
Account Engagement assigns colors to any element that changes in A and B email versions. This lets you tell at a glance what you’ve changed across your email elements.
- Version A is always blue.
- Version B is always orange.


The sender name and subject line are the two most important elements when determining whether your recipient opens the email or not: 33% of people open emails based on the subject line alone. The most persuasive subject lines are short and to the point. They direct people to click through and continue to read the email, which should also be concise.
If you’re looking to increase your click-through rates (CTR) in your email’s copy, you can experiment with the wording of your links and their placement. Try an AB test that adjusts the email length. For example, if you notice recipients clicking the first link only and nothing else, then consider shortening your email copy. You can also test where you place the links—high value links should be placed near the top of your email template.
Send Your Email
Now you’re ready for the main event: sending your email. You created your lists, designed your template, and completed your testing rounds. All that’s left is to send that email out to your lucky recipients. Here’s how!
You can send an email to a predefined list, control the From address, and add a different Reply-to address.
- Click the Sending tab (1).
- In the To section, select your recipient lists (2) and suppression lists (3). A suppression list omits prospects from list emails or engagement programs. Prospects on a suppression list don’t receive the email you send.

- In the From section, select a sender (4).
- To get replies at an email address other than the sender’s, select a custom reply-to address (5).
- View the number of mailable prospects on your lists, and schedule or send your email (6).
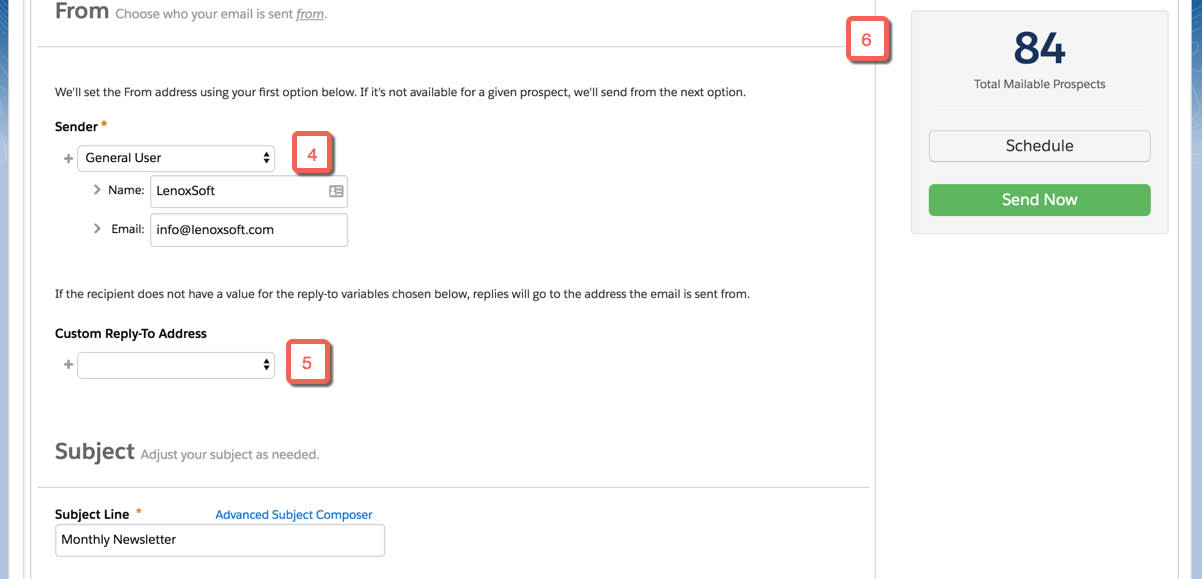
6. Enter a subject line for the email or use the Advanced Subject Composer (7) to add variable tags and dynamic content to your subject.
7. Select and configure completion actions (8).

Now that you’ve learned how to test and send our emails, it’s time to learn how to measure the success of our email campaigns with reporting—no number crunching required.
Resources