Transform External Data
Learning Objectives
After completing this unit, you’ll be able to:
- Build a Data Mapper Transform.
- Add a Data Mapper Transform to your Integration Procedure.
Build a Data Mapper Transform
In the previous unit, you learned how to trim the weather JSON to share only the data node. Great, right? But what do you do when that data isn’t in the format you want to send to your Flexcard or Omniscript? For example, the city and state may be on separate lines, and most people prefer to see them together on one line.
A Data Mapper Transform helps you manipulate JSON before you share it. Let’s explore how the tabs in this Data Mapper can help you do this.
Define formulas in the Formulas tab to add or manipulate data to the output of a Data Mapper. Most types of Data Mappers—Extract, Transform, and Load—support formulas.
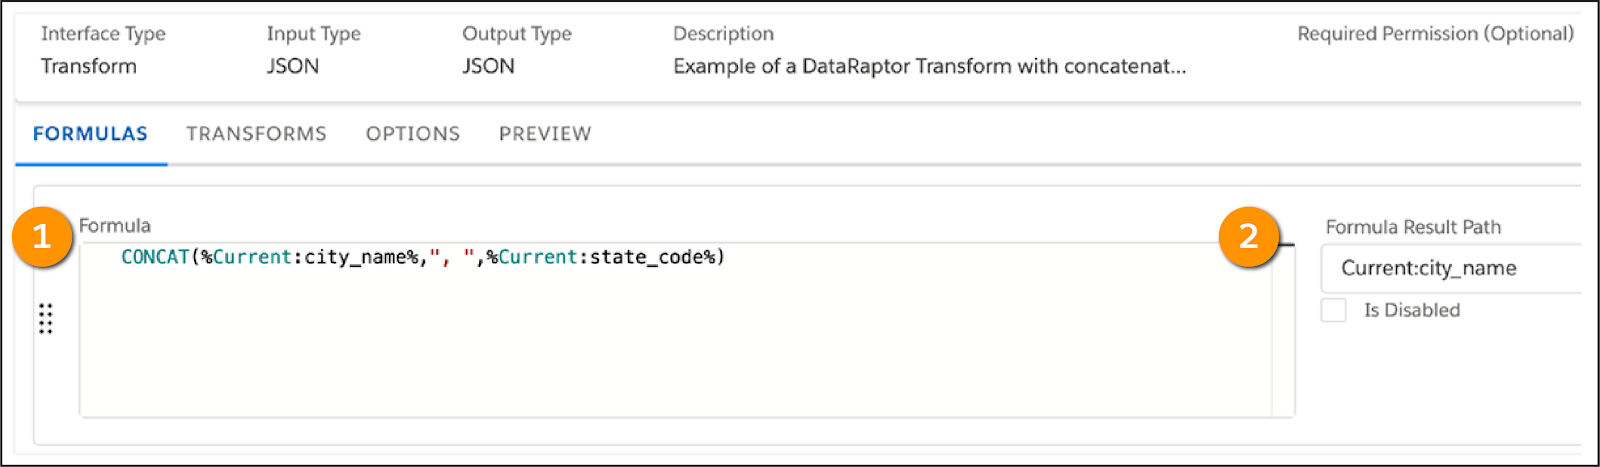
Use the Formula field (1) to specify the desired logic. In this example, you create a formula to concatenate—or join together—the city_name and state_code using the CONCAT function.
In the Formula Result Path field (2), specify a JSON node to store the formula result. Here, the concatenated value is stored in the Current:city_name node.
You map data in the Transforms tab in one of two ways:
- Use Quick Match to match values from input JSON with output JSON.
- Specify each mapping individually.
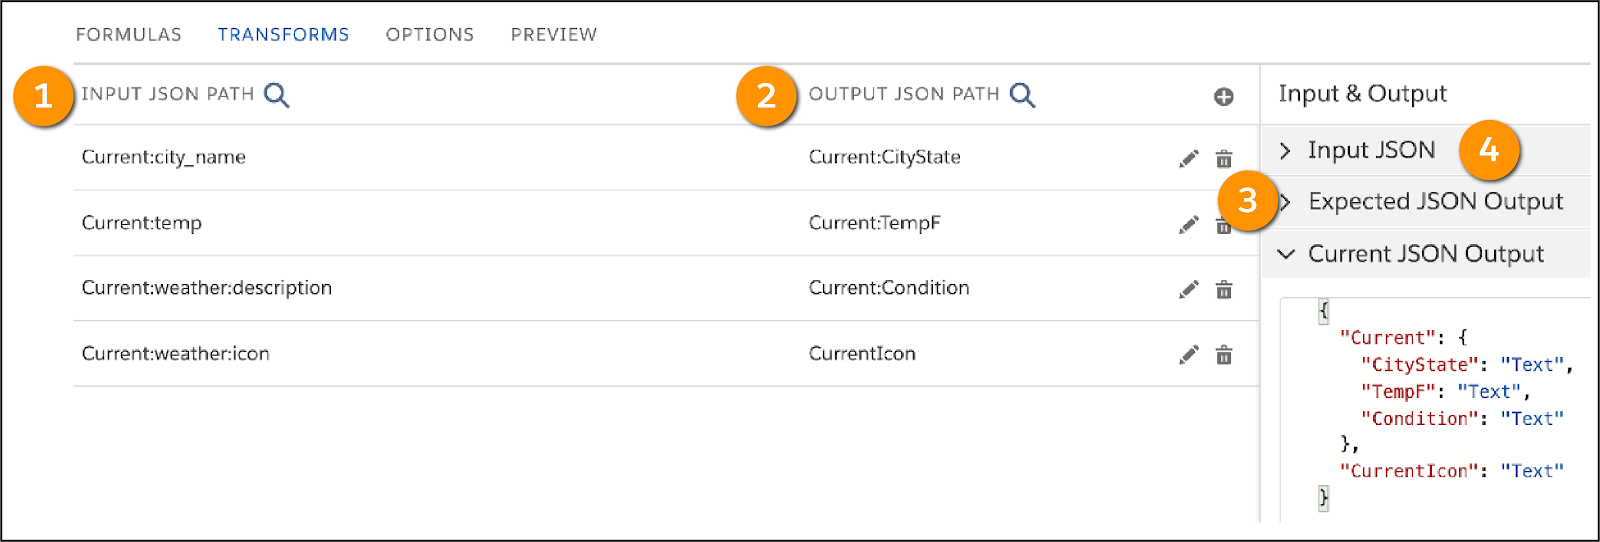
In the Input JSON Path field (1), specify the input path, and in the Output JSON Path field (2), specify the desired output path. For both, use colons to create sub-nodes. For example, Current:Condition and Current:TempF put Condition and TempF in the Current node, but CurrentIcon will be in the root.
Match the Expected JSON Output (3) to the Output Path and the Input JSON (4) to the Input Path.
Use the Preview tab to test the output of the Data Mapper.

In the Input (1) pane, specify the sample input, and select Execute. The Response pane (2) displays the results.
Now that you have your Data Mapper Transform, you’re ready to add it to your Integration Procedure.
Add a Data Mapper Transform to an Integration Procedure
When you're working in an Integration Procedure, successfully adding a Data Mapper Transform requires three components.
- A Data Mapper Transform to transform the data.
- A Data Mapper Transform Action element to use the Data Mapper in your Integration Procedure.
- A Response Action element to send the transformed data back to a Flexcard or Omniscript.
Drag a Data Mapper Transform Action element from the Available Components pane and name it after your newly created Data Mapper Transform.
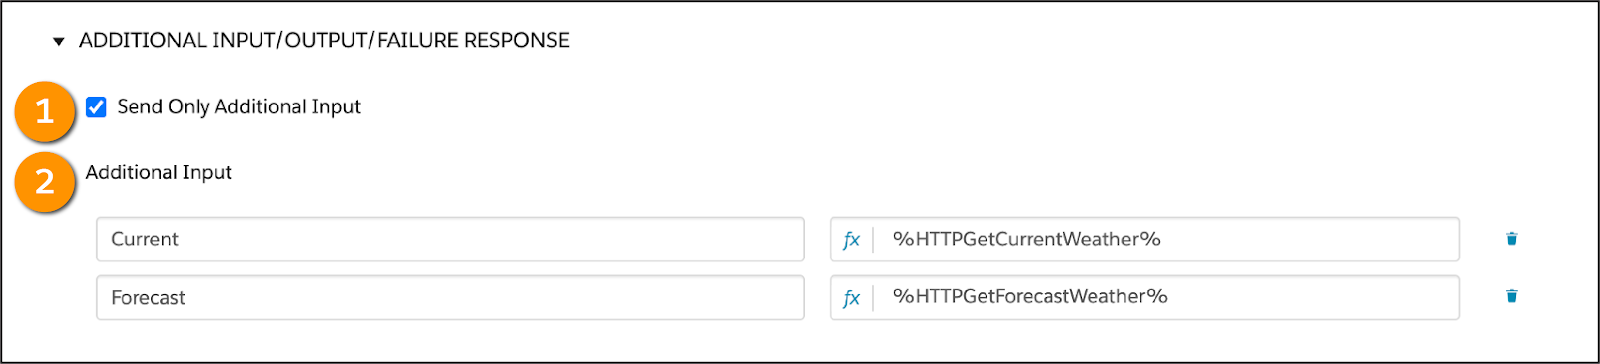
Under the Additional Input/Output/Failure Response section, select Send Only Additional Input (1). Then, add two Additional Input keys (2) and their values. The example configuration in the screenshot sends the JSON from the HTTPGetCurrentWeather element to the Data Mapper on a node named Current. It also sends the JSON from the HTTPGetForecastWeather element to the Data Mapper on a node named Forecast.
Finally, make sure your Response Action sends the JSON that the Data Mapper Transform returns. Do this by entering the name of the Data Mapper Transform element in the Send JSON Path field of the Response Action element.
Remember, if you are getting data from an outside source and need to change it to a different format, a Data Mapper Transform is the best tool to use. Then, you should use it in an Integration Procedure.
With what you learned here, you’re ready to try it yourself in Omnistudio for Managed Packages. See the Resources section for additional details.
Resources
- Salesforce Help: Integration Procedures (Omnistudio for Managed Packages)
- Salesforce Help: Omnistudio Data Mapper Transform Overview (Omnistudio for Managed Packages)
- Salesforce Help: Omnistudio Data Mapper Transform Action for Integration Procedures (Omnistudio for Managed Packages)
- Salesforce Help: Set Values for Integration Procedures (Omnistudio for Managed Packages)
- Salesforce Help: Omnistudio Data Mapper Extract Action for Integration Procedures (Omnistudio for Managed Packages)
- Salesforce Help: HTTP Action for Integration Procedures (Omnistudio for Managed Packages)
- Salesforce Help: Response Action for Integration Procedures (Omnistudio for Managed Packages)