Create a Heroku Pipeline and Run Review Apps
Learning Objectives
After completing this unit, you’ll be able to:
- Describe options available to pipelines.
- Describe some benefits of Review Apps.
Pipeline Stages
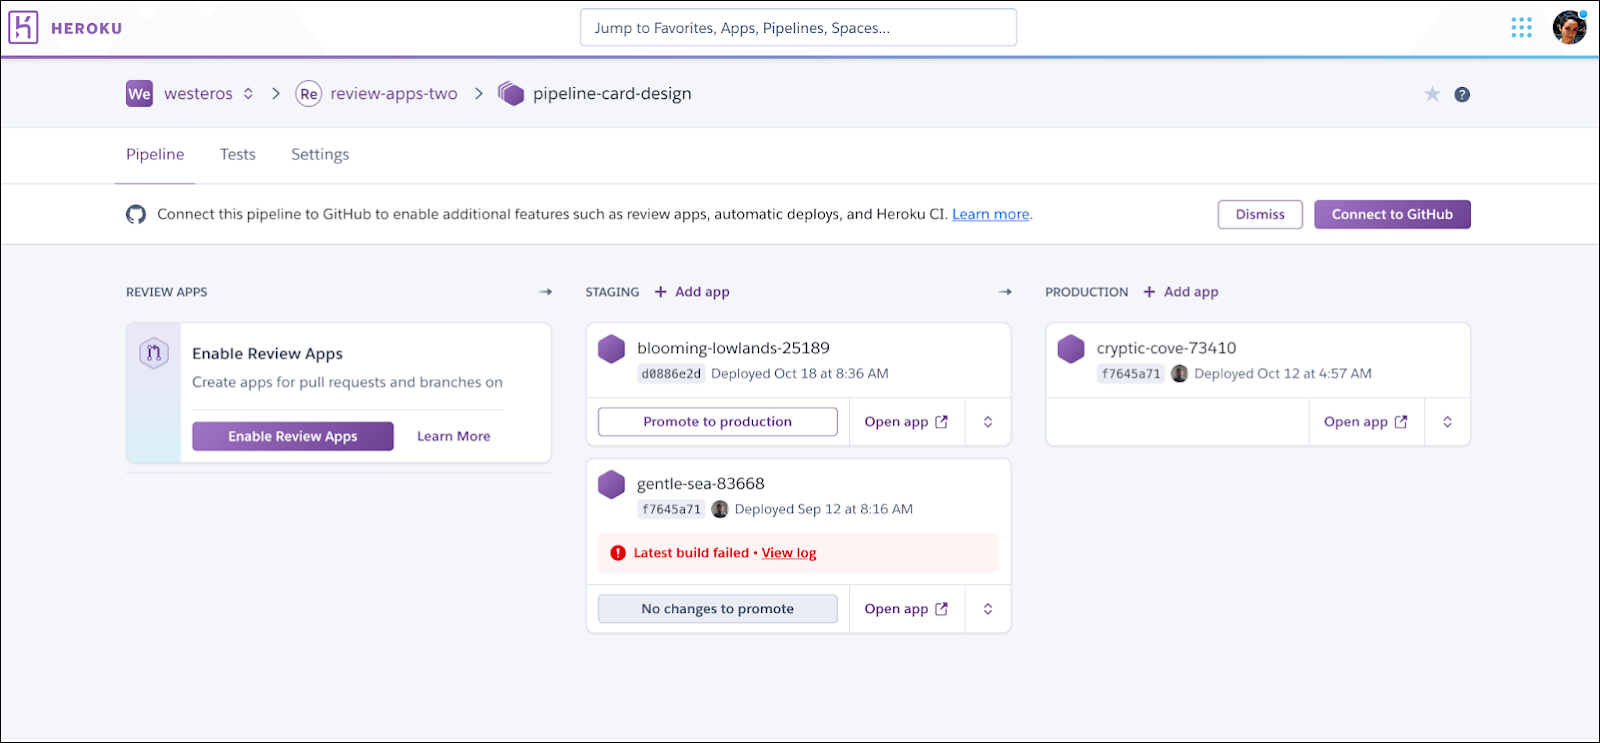
Each app in a pipeline represents one of these steps in a continuous delivery workflow: review, development, staging, and production.
The two stages most developers are familiar with are:
-
Staging: Staging tests changes in a production-like environment before deploying them to production.
-
Production: Apps in the production environment are available to their end users.
In addition to these two stages, developers commonly use at least one other stage to check individual code changes and pull requests more easily. Most use one of the following stages for this type of testing:
-
Review Apps: This option is only available if you use the GitHub integration and enable the Review Apps feature on the pipeline. A developer pushes their changes to create a temporary, shareable app to test a specific pull request. Without this feature, developers can push changes to the Development stage to share them instead.
-
Development: A developer makes and tests code changes on their local machine. They can optionally push this code to the Development stage of a pipeline on Heroku to share with others.
You can have more than one app in each stage of a pipeline. For example, you can have two production apps with the same codebase, but deployed to different regions to reduce latency.
To create a pipeline and add apps to it, see Pipelines in the Heroku Dev Center.
Enable and Use Review Apps
If your code is in GitHub, you can connect to your repo and enable Review Apps for your pipeline. You can then choose to manually or automatically spin up a temporary test app every time someone opens a new pull request. Review apps are automatically destroyed when a PR closes; you can also choose when stale apps are deleted to further reduce your usage. See instructions and costs associated with this feature in the Heroku Dev Center.
Review Apps use an app.json file to set up your apps. Add this file to your code before enabling Review Apps. See the configuration section and app.json schema in the Heroku Dev Center for more details.
The app.json file is included in your code on GitHub, so don't add configuration variable values you want to keep secret. Instead, set those values as configuration variables in the pipeline's Settings tab.
Like all Heroku apps, each review app has its own URL that you can type in your browser to view it. You can also click Open app in browser next to the review app on the pipeline’s page to quickly preview your changes. You can choose to use either a random or predictable URL pattern when setting up your review apps. With a predictable URL, Heroku uses your chosen prefix and the pull request number to create your app. For example, if you choose the prefix example-prefix, opening PR #123 creates a review app at example-prefix-pr123.herokuapp.com.
Enable Heroku CI
Heroku’s native CI feature is available to enable on each pipeline. Dynos and add-ons used during CI test runs incur additional costs.
The GitHub integration is required to use Heroku CI. Connect your pipeline to your repo and enable Heroku CI in the Settings tab.
Configure your Heroku CI environment by including an app.json manifest in your repository’s root directory. During CI test runs, any keys defined in this file’s test environment take precedence over any matching keys in your app’s base configuration.
Set Up Automatic Deploys to Staging
With continuous delivery, every change is pushed to staging. Enable automatic deploys on your staging app to automate this step whenever code is merged to a specific branch.
If you’re using the GitHub integration, you can set up automatic deploys in the app’s Deploy tab. If you use Heroku CI, you can configure it so that automatic deploys happen only when Heroku CI passes. See GitHub Integration for more information.
Promote from Staging to Production
We recommend that you deploy using pipeline promotion only for apps with stateless builds. When promoting to production, Heroku copies the pre-complied application logic from staging without making any changes. It’s not rebuilt for production. Builds that compile configuration variable values into the application image can experience issues when promoted. For apps with stateful builds, use Heroku’s standard Git-based deployment or GitHub deploys instead.

The pipeline page helps you visualize your apps’ progress, along with meta-information about the status of each stage. For example, you can see whether your production app is running different code than staging. Click Promote to production on the staging app you want to promote.
You just learned about how to work with apps on a pipeline. Next, we’ll learn about the Release Phase and how releases work.
Resources
- Heroku Dev Center: Pipelines
- Heroku Dev Center: GitHub Integration
- Heroku Dev Center: Review Apps
- Heroku Dev Center: Heroku CI