Share Views
Learning Objectives
After completing this unit, you'll be able to:
- Share your view with others via email.
- Share your view with people over chat messaging.
- Embed a view in web pages.
If you completed the Data Visualization with Tableau Cloud module, you learned how to create views and data insights to share with your team. Now your team wants to access the views and explore the data further to get additional insights. Tableau Cloud makes it easy to do that. In this module, you learn how to share views with your colleagues via links in an email and other applications, and embed views directly into web pages, wikis, and web applications.
To access the content you share with them, users must have an account and permission to view the content in Tableau Server or Tableau Cloud.
Watch this short video to see an overview of the different sharing options and how they can help you collaborate with your colleagues.
Share Directly with Other Users
In this unit we show you the steps you would take to share views in Tableau Cloud. In the next unit, you'll get hands-on and try out commenting in Tableau Cloud using the Trailhead Simulator. Don't try to follow these steps in your Trailhead Playground. Tableau isn't available in the Trailhead Playground.
When you share content directly with other users on your site, Tableau emails them a link to that content and adds the content to their Shared with Me page, so they can easily find it later.
Here’s how to share content directly.
- Open the view and click the Share option.

- In the Share with people field, enter at least one user name. When you type, names that match your text appear.

- In the Message field, enter an optional note to your recipients.
- Click the Share button.
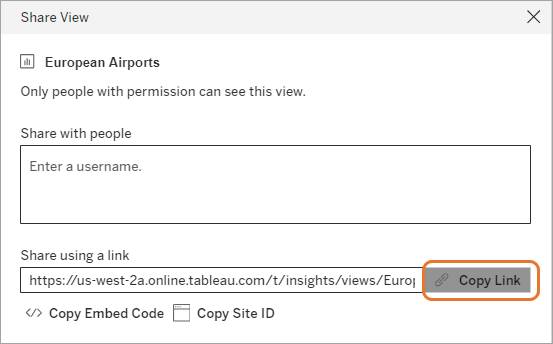
Share a Link in an Application
You can also share content directly in applications that you and your colleagues use, such as an instant messaging application like Slack. To share an interactive view in an application without sending an email to specific users, take the following steps.
- Open the Actions (…) menu for the content you want to share.
- Select Share from the menu.
- Click the Copy Link button, then paste the link into an application to share it with others.
Embed Views
In addition to the sharing options listed above, Tableau gives you a few unique options when you click the Share button on the toolbar for a view.
- You can share a view that you have modified.
- You can copy the embed code for a view, paste it into the source code of a web page, and allow a wider audience to interact with the view once it’s embedded on the page.
If you modify a view by selecting marks or filters, Tableau captures these modifications and generates a new unique link when you click the Share button. To share a custom view that you have saved, simply open the custom view and use any sharing option.
To embed views:
- Click Share in the toolbar for the view you want to embed.
- Click Copy Embed Code, then paste the embed code into the source code for the page where you want to embed the view.
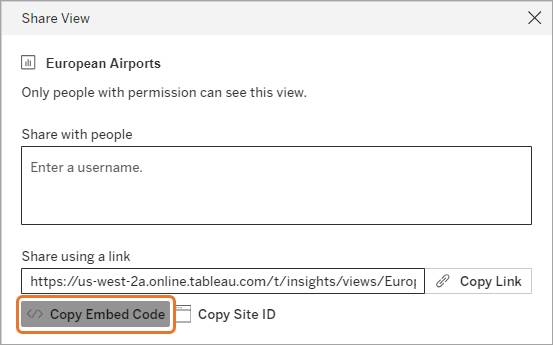
It’s as easy as that.
Great! You can now share your views with your colleagues and set them up to explore the views further and get additional insights.