신규 리드 육성 에이전트 활성화
학습 목표
이 유닛을 완료하면 다음을 수행할 수 있습니다.
- 리드 육성을 활성화할 수 있습니다.
- 안내 설정 환경을 사용하여 에이전트를 설정할 수 있습니다.

소개
이전 단계에서 Agentforce를 활성화했습니다. 이제 액세스를 설정하고 데이터 라이브러리를 구성해 보겠습니다.

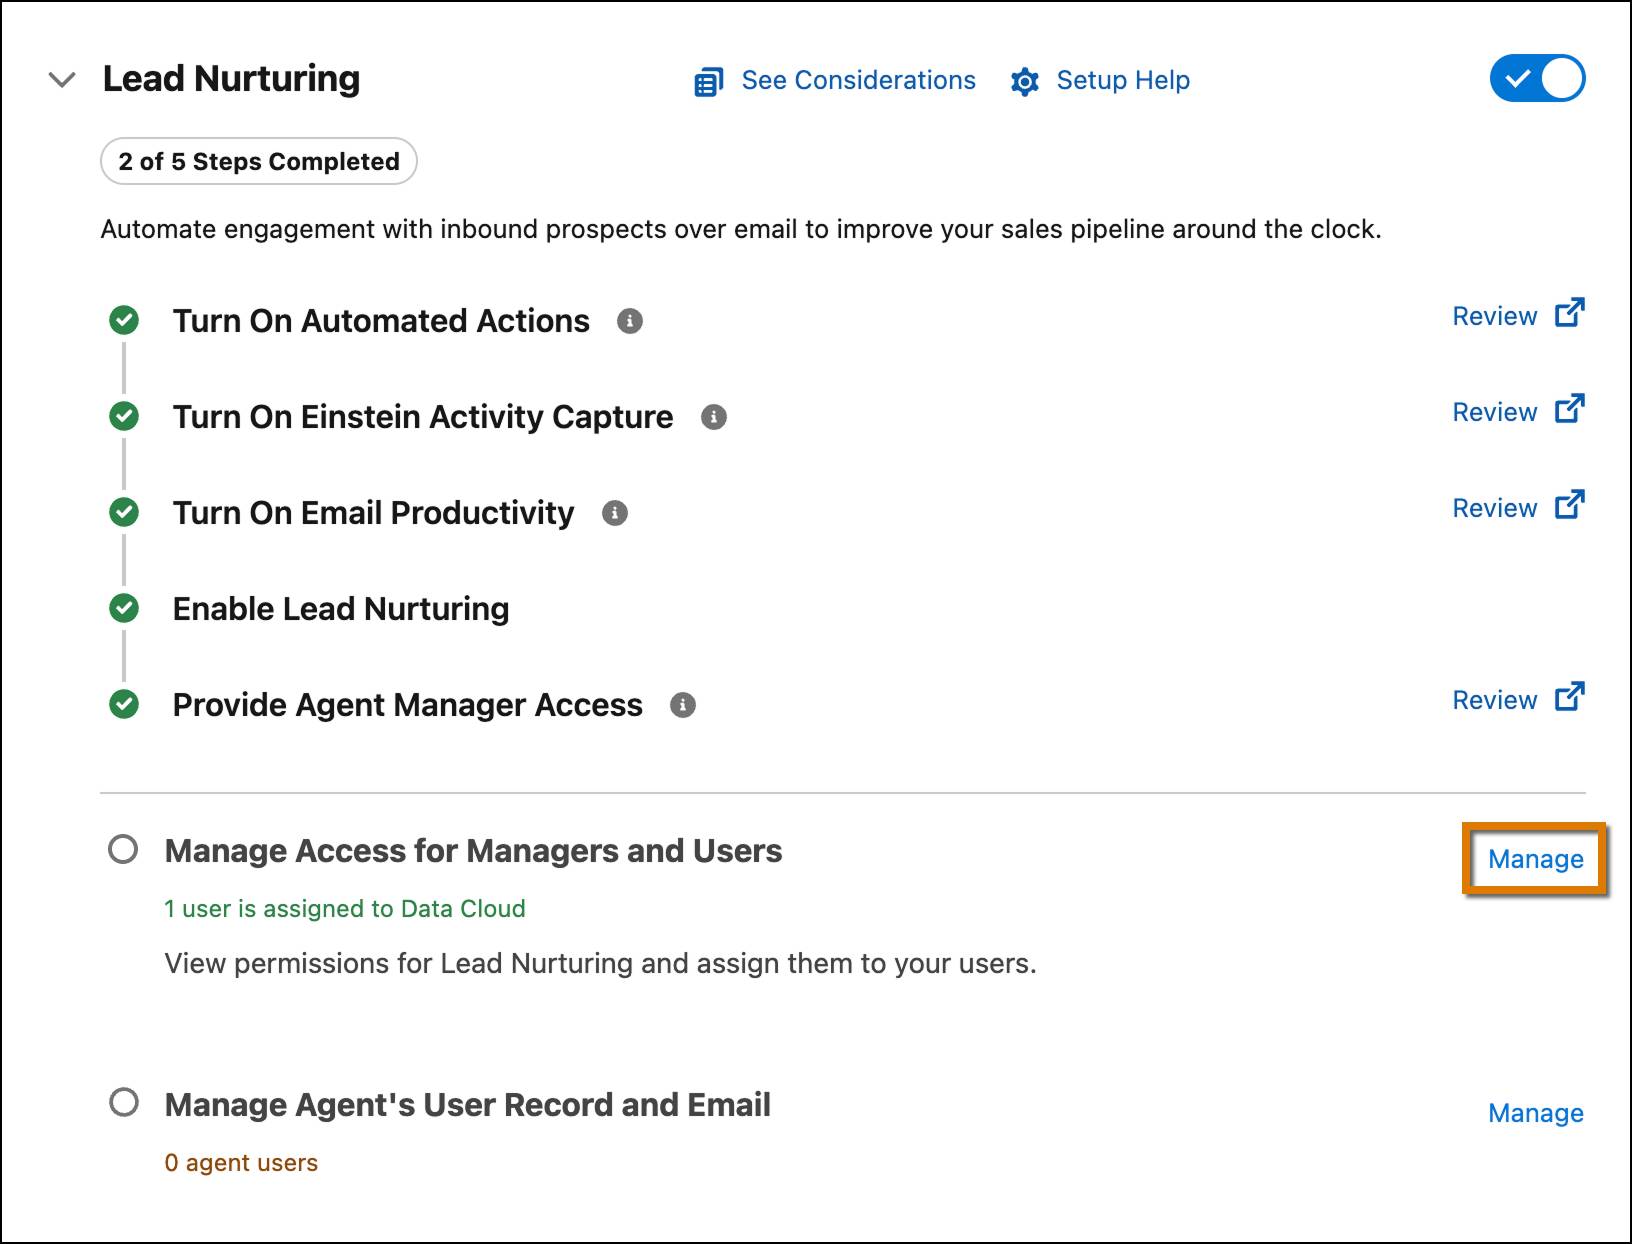
리드 육성 활성화
먼저 리드 육성 에이전트를 설정합니다.
- 세일즈용 Agentforce 페이지에서 Start with an Agent Template(에이전트 템플릿으로 시작) 아래에 있는 Lead Nurturing(리드 육성) 토글을 활성화합니다.
- 메시지가 표시되면 대화 상자에서 Confirm(확인)을 클릭합니다. 에이전트가 활성화되기까지 몇 분 정도 걸릴 수 있습니다. 에이전트가 활성화되면 카드에 설정 단계가 순차적으로 표시되며, 각 단계를 안내해 주는 링크도 함께 제공됩니다. 이렇게 하면 여러 섹션을 오갈 필요 없이 전체 설정 과정을 체계적으로 완료할 수 있습니다. 이는 Salesforce Go가 지원하는 간소화된 설정 환경입니다.

이제 에이전트 템플릿이 활성화되어 설정 준비가 되었습니다.
Salesforce Go 안내 설정을 이용하면 필요한 지원 기능을 하나씩 활성화할 필요 없이 모두 한 번에 간편하게 활성화할 수 있습니다. 이러한 기능을 활성화하면 에이전트가 작업을 수행하는 데 필요한 기반이 마련됩니다. 목록에 제시된 기능 중 이미 활성화된 기능 옆에는 체크 기호가 나타납니다.
Agentforce Lead Nurturing(리드 육성)을 켜면 에이전트 사용자 레코드를 생성할 수 있고, 권한을 할당할 수 있으며, Agentforce 빌더에서 에이전트를 구성할 수 있습니다.
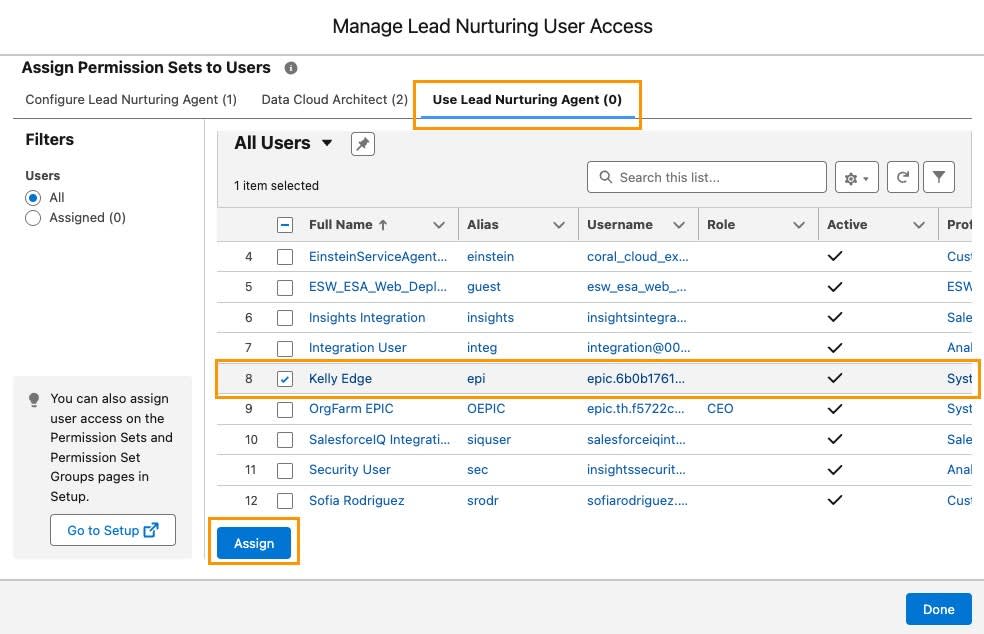
관리자 및 사용자 액세스 관리
이제 에이전트가 활성화되었으므로 다음 단계는 영업 담당자들이 에이전트를 이용해 작업할 수 있도록 권한 세트를 할당하는 것입니다. 이 프로젝트의 경우 여러분은 자기 자신에게 액세스를 할당합니다.
- Lead Nurturing(리드 육성) 설정 영역에서 Manage Access for Managers and Users(관리자 및 사용자 액세스 관리) 옆에 있는 Manage(관리)를 클릭합니다.
-
Use Lead Nurturing Agent(리드 육성 에이전트 사용) 탭에서 Recently Viewed(최근 조회 항목) 드롭다운을 클릭하고 All Users(모든 사용자)로 변경합니다.
- 자신의 이름을 찾아 그 옆의 확인란을 선택합니다.
-
Assign(할당)을 클릭합니다.
-
Done(완료)을 클릭합니다.
에이전트의 사용자 레코드 및 이메일 관리
프로세스의 다음 단계는 에이전트의 사용자 레코드 및 이메일을 설정하는 것입니다. 이 단계가 매우 중요한 이유는 에이전트 사용자가 Salesforce 사용자로 기능하며, 작업을 안전하게 수행하는 데 필요한 모든 권한을 가지기 때문입니다. 아래 단계에 따라 Salesforce Go에서 설정을 직접 완료하세요.
- Lead Nurturing(리드 육성) 설정 영역에서 Manage Agent’s User Record and Email(에이전트의 사용자 레코드 및 이메일 관리) 옆에 있는 Manage(관리)를 클릭합니다.

-
Agent’s User Record(에이전트의 사용자 레코드) 드롭다운을 클릭하고 + New User(+ 신규 사용자)를 선택합니다. 참고: 신규 사용자를 선택할 수 없는 경우 페이지를 새로 고칩니다.
- 다음 정보를 입력합니다.
- First Name(이름):
sales(영업 담당자) - Last Name(성):
agent(에이전트)
- First Name(이름):
-
Create(만들기)를 클릭합니다. 에이전트 사용자가 생성되고 모든 필수 구성이 자동으로 적용됩니다.
-
Next(다음)를 클릭합니다. 잠시 후에 팝업 창이 열립니다. . 이 창에서는 Inbox 및 Einstein 활동 수집 설정 과정을 안내합니다.
-
Connect Account(계정 연결)를 클릭합니다.
- 확인란을 선택하여 약관을 읽고 이해했음을 확인합니다.
-
Next(다음)를 클릭합니다.
- 연결 옵션 중 하나를 클릭하고 이메일 계정과 캘린더를 Salesforce에 연결한 다음 설정을 완료합니다.

이 단계를 완료한 후 설정 환경으로 리디렉션되며 한 명의 에이전트 사용자가 추가되었다는 확인 메시지가 표시됩니다.
에이전트 데이터 구성하기
어떤 에이전트든 데이터는 매우 중요합니다. 에이전트가 질문에 답변하고 작업을 올바르게 완료하는 데 필요한 컨텍스트를 제공해 주기 때문입니다. 이번 마지막 단계에서는 데이터 라이브러리를 설정합니다.
- Lead Nurturing(리드 육성) 설정 영역에서 Configure Data for Your Agent(에이전트 데이터 구성) 옆에 있는 Go to Agentforce Data Library Setup(Agentforce 데이터 라이브러리 설정으로 이동)을 클릭합니다. 그러면 새 탭에서 해당 페이지가 열립니다.

-
New Library +(새 라이브러리 +)를 클릭합니다.
- 팝업 창에서 다음을 입력합니다.
- Name(이름):
Welo Customer Policies Library(Welo 고객 정책 라이브러리) - API Name(API 이름): 자동 생성됨
- Description(설명)에 다음을 붙여 넣습니다.
A collection of Welo’s official customer-facing documents, including return policies, warranties, service terms, and support guidelines.(Welo의 공식 고객용 문서 모음으로 반품 정책, 보증, 서비스 약관 및 지원 가이드라인이 포함되어 있습니다.)
- Name(이름):
-
Save(저장)를 클릭합니다. 이제 데이터 라이브러리가 설정되어 소스를 추가할 준비가 되었으며, 에이전트가 비즈니스에 적합한 정확한 맞춤형 응답을 제공하는 데 필요한 정보를 제공합니다.
- 이 프로젝트의 경우 웹 소스를 추가해 봅시다. 에이전트는 이러한 유형의 데이터를 이용해 관련 웹 사이트를 검색하여 Knowledge를 보강하고 더 정확한 결과를 전달할 수 있습니다. Data Type(데이터 유형) 드롭다운을 클릭하고 Web(웹)을 선택합니다.

-
Turn on Web Search(웹 검색 활성화) 버튼을 켜고 해당 기능을 활성화합니다.

-
Save(저장)를 클릭합니다.
이제 데이터 라이브러리를 사용할 수 있습니다. 에이전트가 추가된 데이터 소스를 사용하여 작업을 수행할 수 있습니다.