리드 육성 에이전트 구성 및 활성화
학습 목표
이 유닛을 완료하면 다음을 수행할 수 있습니다.
- 새 에이전트를 구축할 수 있습니다.
- 에이전트 응답을 테스트할 수 있습니다.

소개
이전 유닛에서는 에이전트 구축 및 관리를 지원하는 시스템을 설정했습니다. 이제 에이전트를 설정해 보겠습니다.

새 세일즈 에이전트 구축
Salesforce Go의 안내 설정 환경은 에이전트 생성, 테스트, 활성화를 간소화합니다. 단계를 따라 리드 육성 에이전트를 설정하세요.
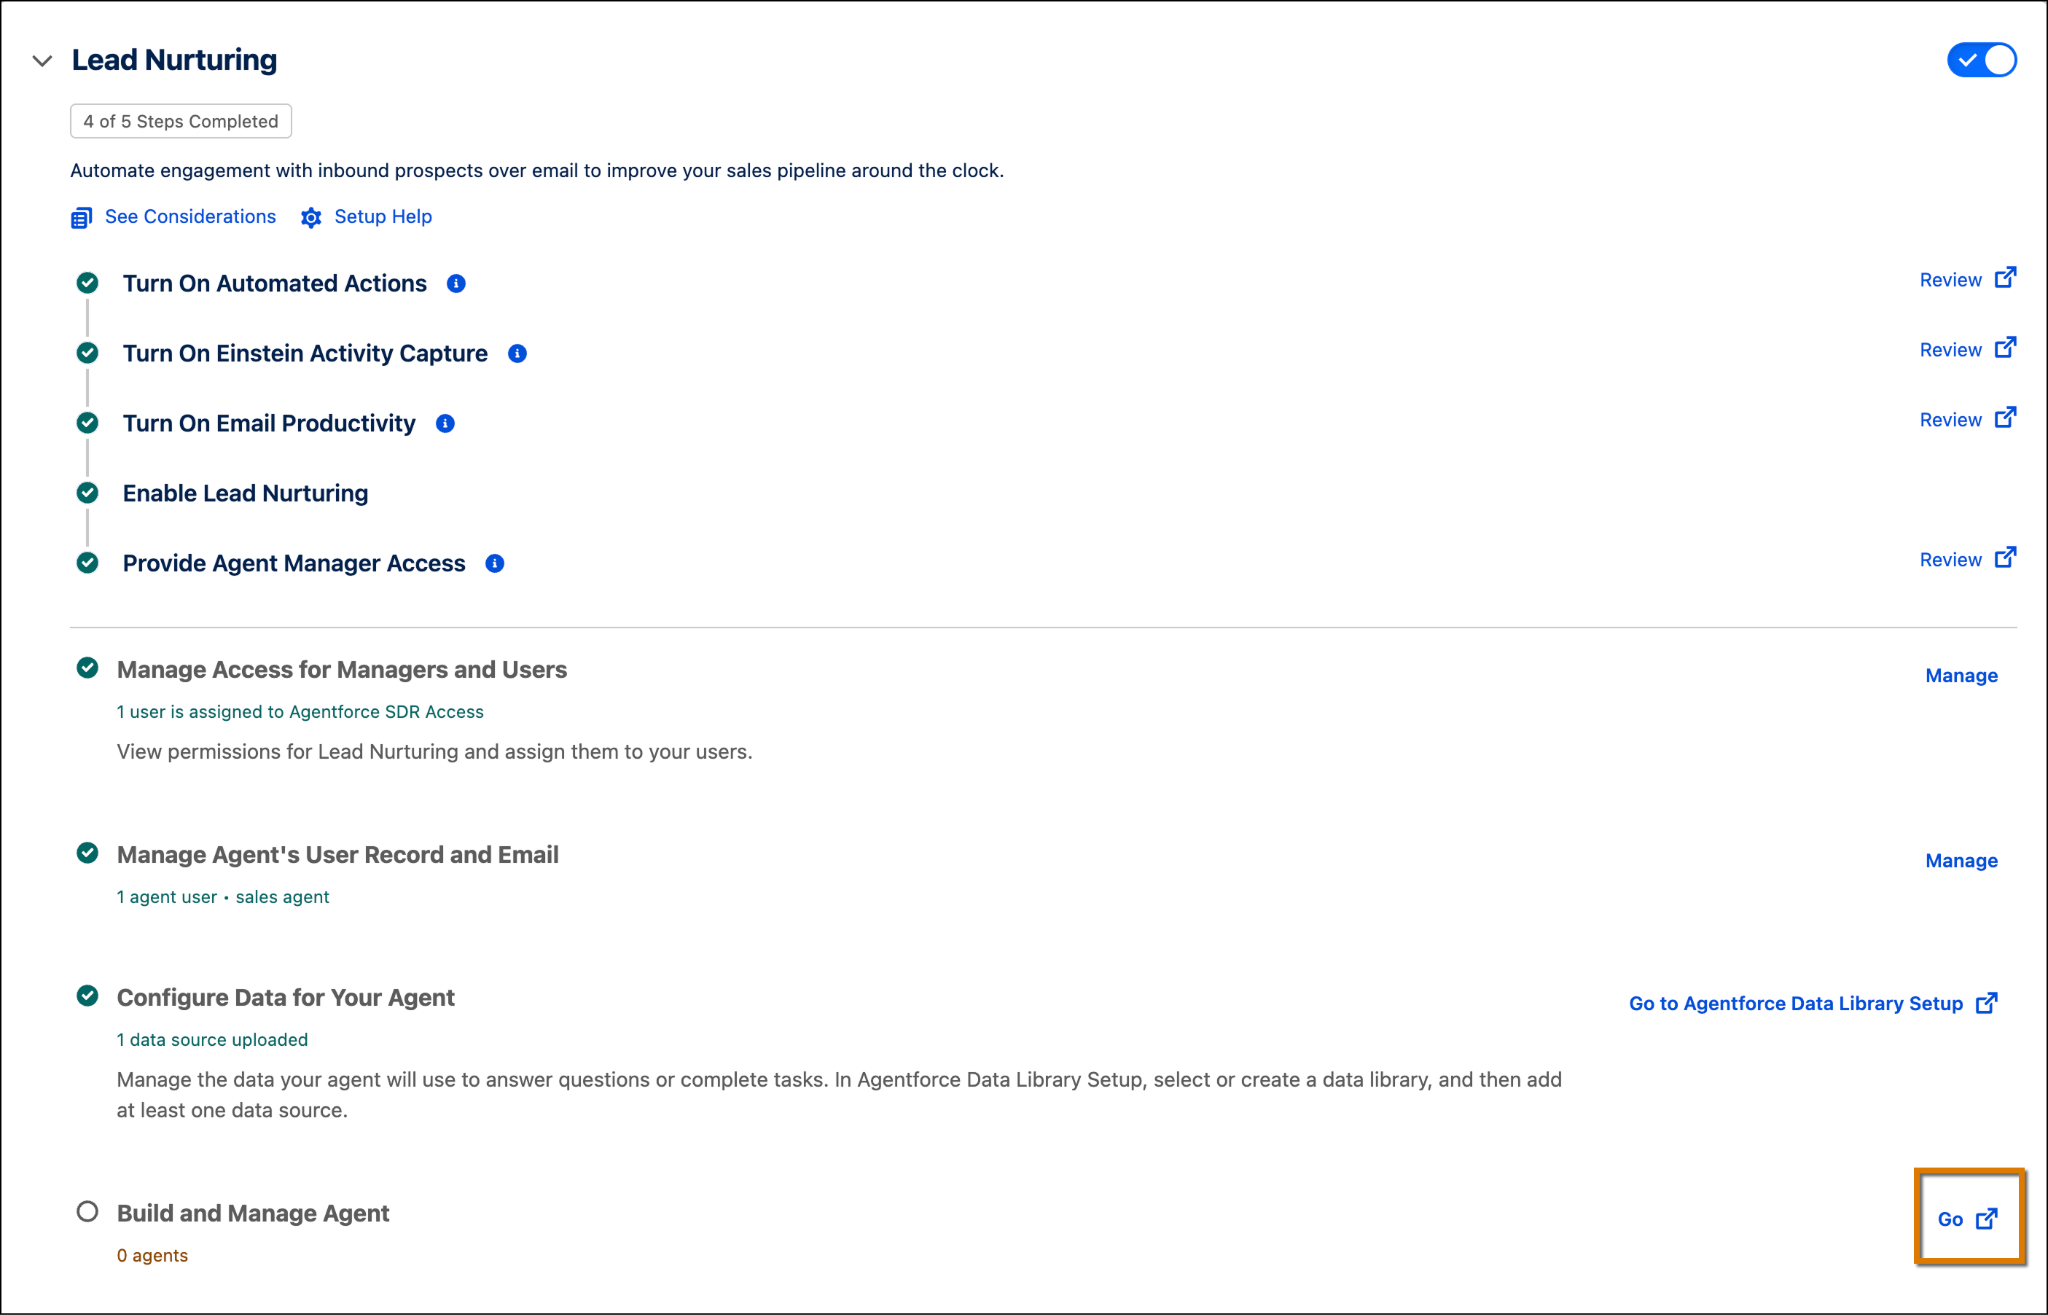
- Lead Nurturing(리드 육성) 설정 영역에서 Build and Manage Agent(에이전트 구축 및 관리) 옆에 있는 Go
 아이콘을 클릭합니다. 이 단계는 새 Agentforce Studio 기능에서 열립니다.
- 그러면 안내 설정 환경이 열립니다. Let’s Get Started(시작하기)를 클릭합니다.
 [대체 텍스트: Agentforce 빌더 설정 마법사의 새 세일즈 에이전트 구축 화면]
-
Lead Nurturing(리드 육성) 템플릿을 클릭합니다.
-
Continue(계속)를 클릭합니다.
보안 기본 사항
단계를 따라 에이전트 주요 세부 사항을 설정합니다.
- Getting Started(시작) 페이지에서 User Record(사용자 레코드) 필드는 이전에 생성한 에이전트 사용자로 미리 채워져 있습니다. 여러 에이전트 사용자를 생성한 경우 모두 여기에 표시되며, 원하는 항목을 선택할 수 있습니다. 다음 세부 사항을 입력합니다.
- Agent Name(에이전트 이름):
Lead Nurturing(리드 육성) - Company Name(회사 이름):
Welo - Description(설명)에 다음을 붙여 넣습니다.
- Agent Name(에이전트 이름):
Welo is a premier provider of IT solutions and services, specializing in cutting-edge hardware and comprehensive services for managing data centers.

-
Save and Continue(저장 및 계속)를 클릭합니다.
이메일 설정 구성
에이전트는 각 잠재 고객에게 초기 아웃리치 이메일을 보내고 회신이 없는 경우 적시에 행동 유도 이메일을 보냅니다. Email Settings(이메일 설정)에서 주요 가치 제안, 증명 자료, 행동 유도 설정, 메시지 어조를 추가하여 핵심 메시지를 설정합니다. 방법은 다음과 같습니다.

- Primary Value Proposition(주요 가치 제안)에 다음을 붙여 넣습니다.
Welo offers top-tier IT solutions and services, specializing in hardware and services for managing data centers. Our commitment to excellence and innovation ensures we deliver unparalleled services that empower businesses to thrive and innovate.
- Key Achievements(주요 성과)에 다음을 붙여 넣습니다.
Customer Satisfaction Rate: Welo boasts a 95% customer satisfaction rate, reflecting our commitment to delivering exceptional solutions.
Transforming Retail Operations: Partnered with a major retail chain to implement a custom CRM solution, resulting in a 30% increase in sales and a 25% improvement in customer retention.
Streamlining Healthcare Services: Collaborated with a healthcare provider to develop an integrated patient management system, reducing administrative costs by 20% and improving patient satisfaction scores by 15%.
- 행동 유도와 추가 설정은 그대로 둡니다. 이제 에이전트의 초기 아웃리치 이메일을 테스트할 준비가 되었습니다.
- Preview Email(이메일 미리보기) 섹션에서 Search Recipients(수신자 검색) 필드를 클릭하고
Sandra Eberhard를 검색합니다.
-
Generate Preview(미리보기 생성)를 클릭합니다. 이제 응답이 리드의 계정 이름과 제공된 정보를 기반으로 하는 것을 확인할 수 있습니다. 이 미리보기를 통해 안내 설정 환경에서 다음 단계로 넘어가기 전에 응답을 검토할 수 있습니다
-
Continue(계속)를 클릭합니다.
에이전트 응답 테스트
초기 아웃리치 이메일을 설정하고 테스트했으니, 에이전트의 응답을 고객의 답장과 문의에 맞게 구성할 차례입니다. 이 안내 설정 단계에는 데이터 라이브러리를 생성하고 데이터 소스를 추가하는 옵션이 있습니다. 이전에 데이터 라이브러리를 설정했으니 해당 항목을 사용해 보겠습니다.
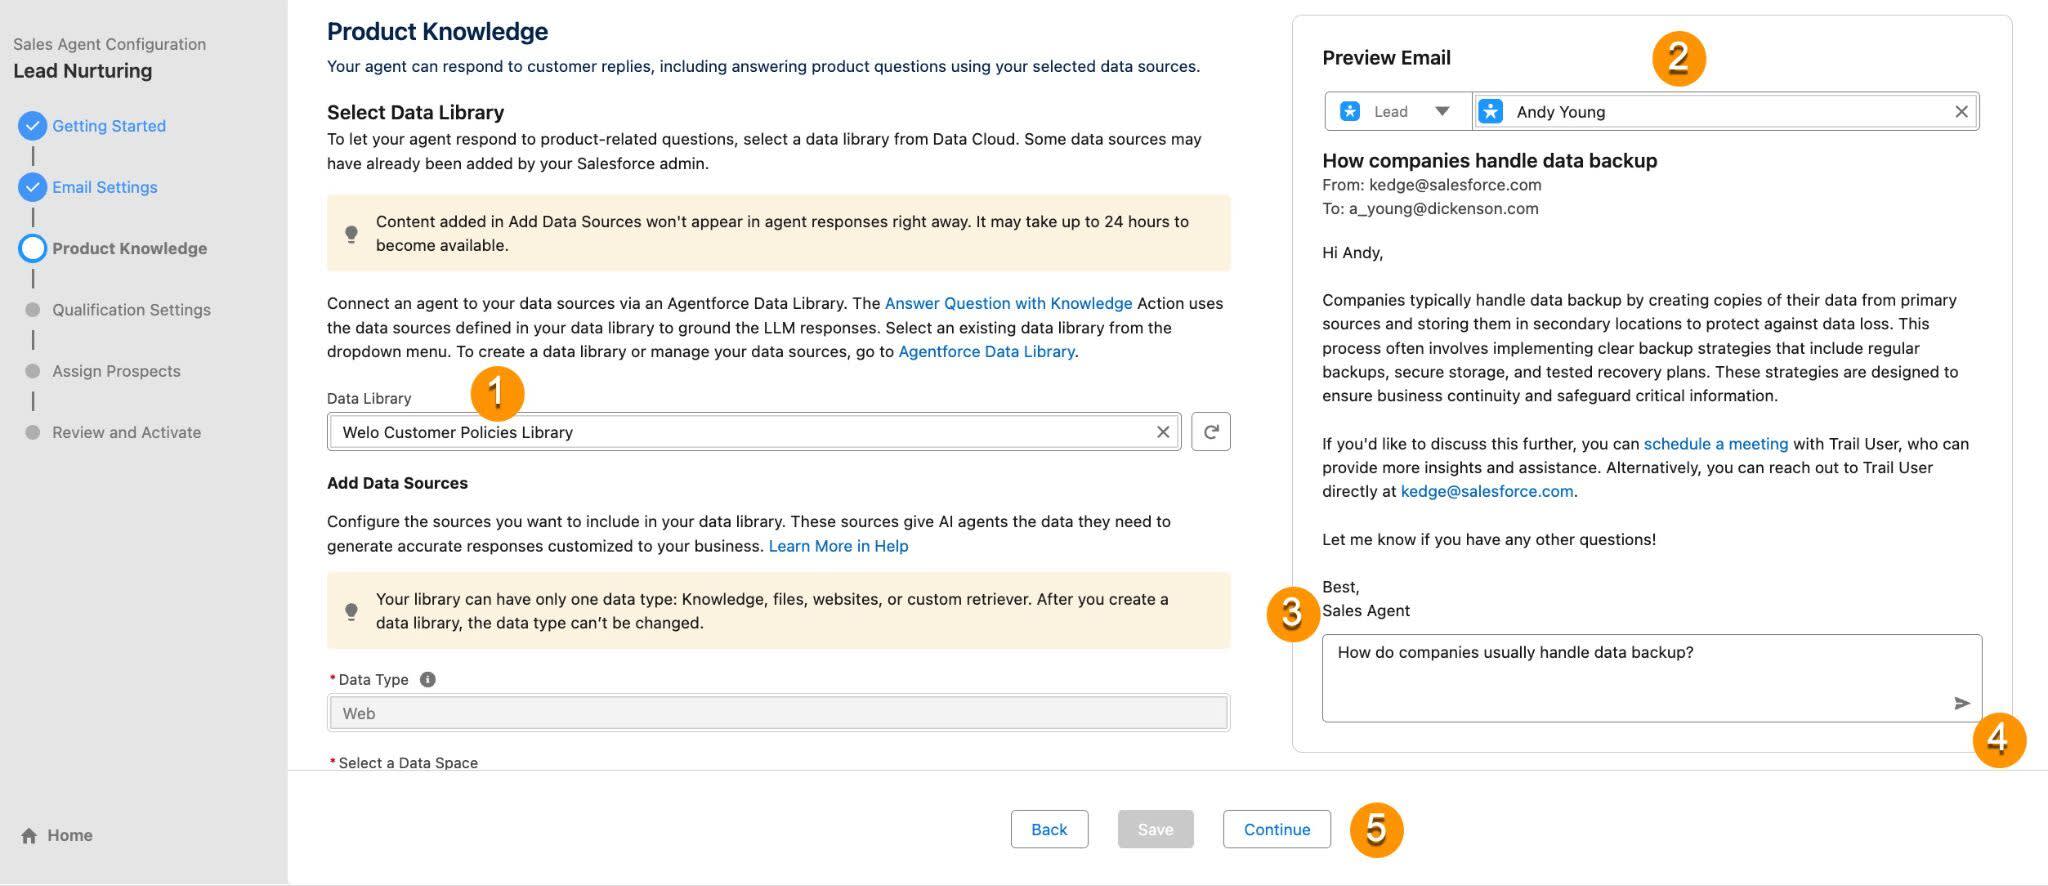
- Data Library(데이터 라이브러리) 드롭다운을 클릭하고 Welo Customer Policies Library(Welo 고객 정책 라이브러리)를 선택합니다.
- Preview Email(이메일 미리보기) 섹션에서 Search Recipients(수신자 검색) 필드를 클릭하고
Andy Young을 검색합니다.
- 다음과 같은 샘플 고객 질문을 붙여 넣고 에이전트가 어떻게 응답하는지 살펴보세요.
How do companies usually handle data backup?
-
 을 클릭합니다.
- 응답을 검토한 후 Continue(계속)를 클릭합니다.
웹 데이터 소스를 선택했으므로 에이전트는 웹을 검색하여 해당 질문에 답변합니다. 같은 방식으로 파일 데이터 소스를 사용하여 회사의 반품 정책과 제품 데이터를 업로드하고 에이전트가 한곳에서 환불 또는 제품 관련 문의에 답변하도록 할 수 있습니다. 데이터 소스로 추가된 콘텐츠 파일은 에이전트 응답에 표시되기까지 24시간 정도 걸릴 수 있음을 참고하세요.
에이전트에 잠재 고객 할당
잠재 고객 할당 단계에서는 에이전트에 잠재 고객을 자동으로 할당하여 아웃리치와 후속 조치를 더 쉽게 관리할 수 있습니다.
IT 솔루션과 데이터 센터 서비스를 제공하는 선도적인 공급자로서 여러분은 안전하고 확장 가능한 인프라가 특히 중요하게 요구되는 금융 서비스 산업을 주요 타겟으로 삼고 있습니다. 또한 데모나 가격 책정에 참여하는 등의 방식으로 이미 구매 의도를 보여 준 잠재 고객에 집중하고 있습니다. 여기에서 자격을 갖춘 잠재 고객을 특정 기준에 맞게 이 에이전트에 자동으로 할당하도록 할 수 있습니다. 다음 단계에 따라 설정해 보세요.

- Assign Prospects(잠재 고객 할당) 아래에서 Leads(리드) 버튼을 활성화합니다.
- Assign Lead to Agent When(리드를 에이전트에 할당하는 시점) 아래에서 Lead is created or updated(리드 생성 또는 업데이트)를 체크합니다.
- Take Action When(작업 실행 시점) 드롭다운을 열고 Custom Logic (AND, OR, NOT)(사용자 정의 논리(AND, OR, NOT))을 선택합니다.
-
+ Add Condition(+ 조건 추가)을 세 번 클릭하여 세 개의 조건 행을 생성합니다.
- 다음과 같이 조건 행을 구성합니다.
- 행 1: Field(필드) = Industry(산업); Operator(연산자) = Equal(같음); Value(값) = Finance(금융)
- 행 2: Field(필드) = Rating(등급); Operator(연산자) = Equal(같음); Value(값) = Warm
- 행 3: Field(필드) = Rating(등급); Operator(연산자) = Equal(같음); Value(값) = Hot
- 행 1: Field(필드) = Industry(산업); Operator(연산자) = Equal(같음); Value(값) = Finance(금융)
- 사용자 정의 논리 식을
1 AND (2 OR 3)으로 설정합니다. -
Save(저장)를 클릭한 다음 Continue(계속)를 클릭합니다.
에이전트 검토 및 활성화
마지막 단계는 모든 구성을 검토하고 에이전트가 어떻게 초기 아웃리치를 처리하고, 행동 유도를 보내고, 고객 문의에 응답하는지 테스트하는 것입니다. 이 작업은 이메일 미리보기 섹션에서 수행할 수 있습니다. 모든 결과에 만족한다면 Activate Agent(에이전트 활성화)를 클릭하여 에이전트를 시작합니다.

마무리!
이제 완료되었습니다! 에이전트를 구축하고 아웃리치와 행동 유도를 설정하고 이를 데이터 라이브러리에 연결했으며, 실제 고객 문의를 어떻게 처리하는지도 테스트해 보았습니다. 모든 구성이 완료된 후 에이전트는 본격적으로 사용자가 잠재 고객과 더 스마트하고 더 빠르고 더 효율적으로 소통할 수 있도록 지원할 준비가 되었습니다. 이제 편안하게 새로운 디지털 팀 동료에게 일을 맡겨 보세요.