Lightning コンソールアプリケーションを作成する
次は、インスタント通知アプリケーションの最初の静的バージョンを定義し、それを Lightning コンソールアプリケーションとしてリリースします。
Lightning Web コンポーネントを作成する
-
notificationConsoleと言う名前で Lightning Web コンポーネントを作成します。- Visual Studio Code で、force-app/main/default の下にある lwc フォルダーを右クリックし、[SFDX: Create Lightning Web Component (SFDX: Lightning Web コンポーネントを作成)] を選択します。
- 新しいコンポーネントの名前として
notificationConsoleと入力します。 -
Enter キーを押してからもう一度 Enter キーを押して、デフォルトの
force-app/main/default/lwcを受け入れます。
-
notificationConsole.js の内容を次のコードで置き換えます。
import { LightningElement, track } from "lwc"; import { ShowToastEvent } from "lightning/platformShowToastEvent"; export default class NotificationConsole extends LightningElement { @track notifications = []; async connectedCallback() { this.dispatchEvent( new ShowToastEvent({ variant: "success", title: "Ready to receive notifications" }) ); this.notifications = [ { id: "id1", time: "00:01", message: "Greetings Trailblazer!" }, { id: "id2", time: "00:02", message: "Congratulations on building this first version of the app." }, { id: "id3", time: "00:03", message: "Beware of the bears." } ]; } handleClearClick() { this.notifications = []; } get notificationCount() { return this.notifications.length; } }コードのポイント:-
notificationsには、受信した通知が格納されます。現時点ではハードコーディングされたサンプル値で初期化されます。 -
connectedCallbackは、アプリケーションが初期化されたことを示すトーストを表示します。
-
- ファイルを保存します。
-
notificationConsole.html を開いて、
templateタグの間に次のコードを追加します。<div class="container"> <!-- Header --> <div class="slds-p-around_x-small slds-border_bottom slds-theme_shade"> <div class="slds-grid slds-grid_align-spread slds-grid_vertical-align-center"> <span class="slds-badge slds-badge_inverse">{notificationCount}</span> <lightning-button-icon onclick={handleClearClick} icon-name="utility:delete" title="Clear notifications" alternative-text="Clear notifications" variant="border-filled" ></lightning-button-icon> </div> </div> <!-- Notification list --> <div class="slds-container_fluid slds-scrollable_y content"> <template for:each={notifications} for:item="notification"> <div key={notification.id} class="slds-p-around_small slds-border_top"> <div class="slds-grid slds-grid_align-spread slds-has-flexi-truncate"> <p>{notification.message}</p> <p class="slds-text-color_weak slds-p-left_x-small">{notification.time}</p> </div> </div> </template> </div> </div>コードのポイント:
コンポーネントには 2 つの部分が含まれています (これらはサブコンポーネントにすることができます)。- 通知カウンターと通知をクリアするためのボタンが含まれるヘッダー。
- メッセージとメッセージの受信時刻が含まれる通知リスト。
- ファイルを保存します。
- コンポーネントを Lightning ユーティリティ項目として使用できるようにするには、
notificationConsole.js-meta.xmlを開いてisExposedタグを次の行に置き換えます。<isExposed>true</isExposed> <targets> <target>lightning__UtilityBar</target> </targets>
コードのポイント:-
isExposedをtrueに設定すると、コンポーネントが Lightning アプリケーションビルダーに公開されます。 - また、
lightning__UtilityBarターゲットにより、コンポーネントが Lightning ユーティリティ項目として追加されます。
-
- ファイルを保存します。
- 次のコードを使用して、
notificationConsoleフォルダーに notificationConsole.css ファイルを作成します。.container { height:100%; } .content { height:calc(100% - 49px); }コードのポイント:- 複数の通知がある場合に垂直スクロールバーでリストを展開してもヘッダーの位置が変わらないように、特別なスタイルルールを設定します。
- ファイルを保存します。
- lwc フォルダーを右クリックし、[SFDX: Deploy Source to Org (SFDX: 組織にソースをリリース)] を選択して、コンポーネントを組織にリリースします。
Lightning コンソールアプリケーションのリリース
- [Setup (設定)] から、[Quick Find (クイック検索)] ボックスに
App Manager(アプリケーションマネージャー) と入力し、[App Manager (アプリケーションマネージャー)] を選択します。 - Lightning 対応のセールスアプリケーションを見つけます。([App Type (アプリケーション種別)] 列が [Lightning] で、その横の [Visible in Lightning (Lightning で参照可能)] にチェックマークがあるものを探します。)右側の下矢印をクリックし、[Edit (編集)] を選択します。
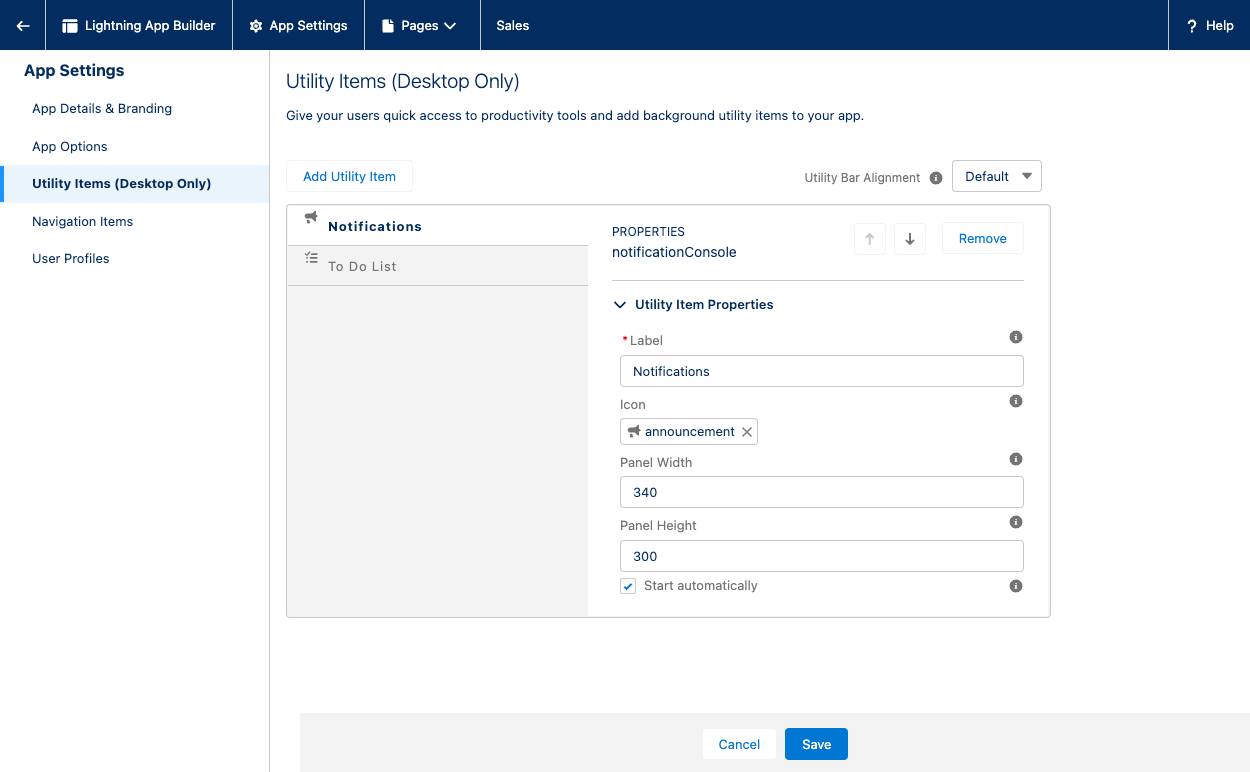
- [Utility Items (Desktop Only) (ユーティリティ項目 (デスクトップのみ))] に移動します。
- [Utility Items (ユーティリティ項目)] の横にある [Add Utility Item (ユーティリティ項目を追加)] をクリックします。
- コンポーネントのリストをスクロールダウンし、[Custom (カスタム)] の下にある [notificationConsole] を選択します。
- コンポーネントのプロパティを次のように設定します。
- Label (表示ラベル):
Notifications(通知) - Icon (アイコン): announcement
- Panel Width (パネルの幅):
340(デフォルト値) - Panel Height (パネルの高さ):
300 - [Start automatically (自動的に開始)] の隣にあるチェックボックスをオンにします。
- Label (表示ラベル):

-
[Save (保存)] をクリックして、[Back (戻る)]
 をクリックします。
アプリケーションランチャー (![]() ) で、[Sales (セールス)] を見つけて選択します。[Ready to receive notifications (通知を受信する準備ができました)] というトーストが表示され、画面下部には [Notifications (通知)] Lightning コンソールアプリケーションが表示されます。[Notifications (通知)] アプリケーションをクリックすると、下に示すように、ハードコードされた 3 つの通知が展開されます。
) で、[Sales (セールス)] を見つけて選択します。[Ready to receive notifications (通知を受信する準備ができました)] というトーストが表示され、画面下部には [Notifications (通知)] Lightning コンソールアプリケーションが表示されます。[Notifications (通知)] アプリケーションをクリックすると、下に示すように、ハードコードされた 3 つの通知が展開されます。

