Agentforce DX の使用開始
学習の目的
このプロジェクトでは、次のことを行います。
- Agentforce DX がエージェントの構築にどのように役立つか説明する。
- Agentforce DX 開発環境を設定する。
- サンプルエージェントを含むリポジトリを DX プロジェクトにコピーする。

Coral Cloud Resorts + Agentforce DX
おめでとうございます! Coral Cloud Resorts の開発チームに採用されたあなたは、早速コーディングを始めようと意気込んでいます。新しいマネージャーから、チームは現在エージェントの開発に精力的に取り組んでいるという説明を受けました。お客様に現地の天気予報やリゾートの営業時間を伝える「ローカル情報エージェント」の開発が始まっており、あなたはそのプロジェクトを引き継ぐことになります。けれども、Salesforce でエージェントを開発したことがないため、基本事項を学ぶトレーニングが必要です。ということで、次のように定義します。
現代の開発者であるあなたは、GitHub のようなバージョン管理システムにエージェントのソースコードを保存することや、エージェントの開発やテストを継続的インテグレーション (CI) ジョブに組み込むことなど、最新の開発ツールには慣れています。ですから、Agentforce DX があなたの役に立ちそうです。

Agentforce DX とは?
これまでは、エージェントの構築に Agentforce Builder UI を使っていたかもしれません。これは、コードではなく、クリック操作でエージェントを作成するローコードの手段です。ただし、AI を最新の DevOps パイプラインに組み込むためには、ブラウザーの域を出て、Agentforce Developer Experience (DX) というプロコードの世界に足を踏み入れる必要があります。DX に移行すると、エージェントのロジックをソースコードとして処理し、リポジトリでバージョンを管理して、各自の Apex や Lightning コンポーネントと共にエージェントを実装できます。
Salesforce 開発者であれば、Salesforce DX をすでにご存じかと思います。Salesforce Platform でアプリケーションを構築してテストし、配信するプロコードのツールセットです。このツールは Agentforce バイブス、Visual Studio Code (VS Code) 拡張機能、Salesforce CLI などで構成されます。Agentforce DX は、こうしたツールをエージェントと連動するように拡張します。
エージェントは、Salesforce のほかのカスタマイズと同じようにメタデータで構成されます。Agentforce DX には、Agentforce Builder UI を使用せずにエージェントを作成、変更、プレビュー、テストできるプロコードツールが用意されています。また、エージェントのメタデータを DX プロジェクトと、使用するスクラッチ組織、Sandbox、本番組織間で移動できます。こうした機能を使用して、エージェントを最新のソフトウェア開発プロセスに組み込むことができます。
Agentforce 用の Developer Edition 組織にサインアップする
このプロジェクトを実行するには、Agentforce とサンプルデータが搭載された特別な Developer Edition 組織が必要です。無料の Developer Edition を入手して Trailhead に接続し、このプロジェクトの Challenge を実行できるようにします。この Developer Edition は、このバッジの Challenge 向けに設計されているため、ほかのバッジでは機能しないことがあります。使用している Trailhead Playground や特別な Developer Edition 組織が推奨されているものであることを必ず確認してください。
-
Agentforce を搭載した無料の Developer Edition 組織にサインアップします。
- フォームに記入します。
- [Email (メール)] に、有効なメールアドレスを入力します。
- [Username (ユーザー名)] に、一意のメールアドレス (例:
yourname@test.com) を入力します。実際のアカウントである必要はありません。
- [Email (メール)] に、有効なメールアドレスを入力します。
- フォームに入力したら [Sign me up (サインアップ)] をクリックします。確認メッセージが表示されます。
- アクティベーションメールを受信したら (数分かかる場合があります)、そのメールを開いて [Verify Account (アカウントを確認)] をクリックします。
- パスワードと確認用の質問を設定して、登録を完了します。
- アクセスしやすいように、ユーザー名、パスワード、ログイン URL を安全な場所 (パスワードマネージャーなど) に保存しておくことをお勧めします。この情報は、後ほど Developer Edition 組織を使用できるように Salesforce CLI を認証するときに必要になります。
- アクセスしやすいように、ユーザー名、パスワード、ログイン URL を安全な場所 (パスワードマネージャーなど) に保存しておくことをお勧めします。この情報は、後ほど Developer Edition 組織を使用できるように Salesforce CLI を認証するときに必要になります。
- Developer Edition にログインした状態になります。
新しい Developer Edition 組織を Trailhead に接続します。
- Trailhead アカウントにログインしていることを確認します。
- このページの最下部にある「Verify Step (ステップを確認)」セクションで、表示されているハンズオン組織をクリックし、[Connect Org (組織を接続)] をクリックします。
- ログイン画面で、設定したばかりの Developer Edition のユーザー名とパスワードを入力します。
-
[Allow Access? (アクセスを許可しますか?)] 画面で [Allow (許可)] をクリックします。
- [この組織をハンズオン Challenge 用に接続しますか?] 画面で [はい! 保存します。] をクリックします。Challenge ページにリダイレクトされたら、このバッジの獲得を目指して新しい Developer Edition を使用できます。
Developer Edition 組織で Agentforce を有効にする
Agentforce DX を使用してエージェントを開発するには、Developer Edition 組織で Agentforce を 有効にします。
- Developer Edition 組織にログインし、右上の設定ギアアイコンをクリックします。
- ドロップダウンメニューの [Setup (設定)] をクリックします。
- [Quick Find (クイック検索)] ボックスに
Einstein Setup(Einstein 設定) と入力し、[Einstein Setup (Einstein 設定)] をクリックします。
-
[Turn on Einstein (Einstein を有効化)] 切り替えが [On (オン)] になっていることを確認します。
![Einstein が有効化されていることを示す [Setup (設定)] の [Einstein Setup (Einstein 設定)] ページ。](https://res.cloudinary.com/hy4kyit2a/f_auto/fl_lossy/q_70/learn/projects/create-an-agent-using-pro-code-tools/get-started-with-agentforce-dx/images/ja-JP/c3b5591539ecc4562e391af7d78d6b58_kix.o1gafd7dnymv.png)
- [Quick Find (クイック検索)] ボックスに
Einstein Bots(Einstein ボット) と入力し、[Einstein Bots (Einstein ボット)] をクリックします。
-
[Einstein Bots (Einstein ボット)] を [On (オン)] に切り替えます。
![Einstein ボットが有効であることを示す [Setup (設定)] の [Einstein Bots (Einstein ボット)] ページ。](https://res.cloudinary.com/hy4kyit2a/f_auto/fl_lossy/q_70/learn/projects/create-an-agent-using-pro-code-tools/get-started-with-agentforce-dx/images/ja-JP/a4703d17949246c3888ba0cc9440d48a_kix.r7zdraqsfne.png)
- [Quick Find (クイック検索)] ボックスに
Salesforce Goと入力し、[Salesforce Go] を選択します。
-
[Search features... (機能を検索...)] テキストボックスに
Agentforceと入力し、[Agentforce (Default) (Agentforce (デフォルト))] を選択します。
-
[使用開始] をクリックします。
-
[Turn On (有効化)] をクリックします。
![[Turn On (有効化)] ボタンが表示されている、Salesforce の [Agentforce (Default) (Agentforce (デフォルト))] 設定ページ。](https://res.cloudinary.com/hy4kyit2a/f_auto/fl_lossy/q_70/learn/projects/create-an-agent-using-pro-code-tools/get-started-with-agentforce-dx/images/ja-JP/0fb60ac8488d2fc8fcbd711095b77779_kix.vphsi2t68gg8.png)
-
[Confirm (確認)] をクリックします。
開発環境を設定する
次に、ローカル開発環境を設定します。Coral Cloud Resorts の開発チームは、VS Code と CLI コマンドの両方を使用してエージェントを構築しています。VS Code は統合開発環境 (IDE) で、コードエディター、ビルド自動化ツール、デバッガー、インテリジェントなコード補完ツールを備えています。
Salesforce 開発者で、Salesforce のプロコードツールを使用しているのであれば、おそらく VS Code (と Salesforce 拡張機能) や Salesforce CLI をすでにコンピューターにインストールしているのではないかと思います。同じ設定を使用できますが、VS Code のすべての機能を必ず最新のリリースに更新してください。Node.js もコンピューターにインストールする必要があります。
次の手順に従って、各自の環境を設定します。
- VS Code をコンピューターにインストールするために、code.visualstudio.com にアクセスして、[Download (ダウンロード)] をクリックします
-
VS Code マーケットプレイスから Salesforce Extension Pack をインストールします。拡張機能のうち、Agentforce DX と Agentforce バイブスの 2 つは自動的にインストールされます。
-
Salesforce CLI をインストールします。
-
Node.js をインストールします。
現時点で Node.js をコンピューターにグローバルにインストールして、この単元の後半で設定スクリプトを実行できるようにします。
サンプルリポジトリをコピーする
前述のとおり、開発チームはローカル情報エージェントの開発に着手しており、ソースコードを GitHub リポジトリにチェックインしています。ソースコードには標準の Salesforce DX プロジェクトが使用され、このプロジェクト構造に従って組織のメタデータ (コードと設定)、サンプルデータ、チームのすべてのテストが整理されています。エージェントは Salesforce 組織のほかの要素と同様にメタデータで構成されているため、エージェントの保存や作業にも DX プロジェクトを使用します。
次の手順に従って、Git を使用してサンプルリポジトリをコピーすれば、エージェントのコーディングを開始できます。
- VS Code を開き、[View (表示)] | [Command Palette (コマンドパレット)] をクリックして、[Git: Clone (Git: コピー)] を選択します。
- リポジトリ URL に
https://github.com/forcedotcom/afdx-pro-code-testdriveと入力します。
- ソースコードを配置するディレクトリに移動して、[Select as Repository Destination (リポジトリの保存先として選択)] をクリックします。
-
[Open (開く)] をクリックします。
VS Code に、afdx-pro-code-testdrive という標準の Salesforce DX プロジェクトが表示されます。既存のコードを自由に確認できます。このバッジの後半で、エージェントに関連するアーティファクトについて説明します。

Developer Edition 組織を認証する
Developer Edition 組織のユーザー名とパスワードを使用してその組織をローカルで認証し、VS Code と CLI コマンドを組織で使用できるようにします。
- VS Code で、[View (表示)] | [Command Palette (コマンドパレット)] をクリックして [SFDX: Authorize an Org (SFDX: 組織を認証)] を選択します。
-
[Product (製品)] をクリックします。
- 組織の別名として
agentforceと入力します。
- 開いたブラウザーウィンドウで、ログイン情報を使用して Developer Edition 組織にサインインします。
-
[Allow (許可)] をクリックします。これにより、Salesforce CLI が組織にアクセスできるようになります。
[Authentication Successful (認証に成功しました)] メッセージを確認します。
- ブラウザーウィンドウを閉じます。
これで、Developer Edition 組織が認証され、デフォルト組織として設定されました。
スクリプトを実行して、組織に必要なアーティファクトを作成してリリースする
コピーしたサンプルリポジトリには、新しいローカル情報エージェントを実装するアーティファクト (Apex クラス、プロンプトテンプレート、フローなど) のソースファイルが含まれます。こうしたアーティファクトの説明はこのモジュールの範疇を超えていますが、 この Trailhead バッジを続行するためには、Developer Edition 組織にこうしたアーティファクトが必要なため、コピーしたリポジトリにスクリプトが用意されています。
このスクリプトを実行すると、ソースファイルがリリースされ、権限が割り当てられ、エージェントユーザーが作成されます。Agentforce エージェントは、「Einstein エージェントユーザー」プロファイルを有する専用ユーザーとして実行されます。このユーザーがエージェントのランタイム ID になります。
-
VS Code 統合ターミナルから、設定スクリプトを実行します。
./setup(macOS または Linux)setup.cmd(Windows)
- このスクリプトが実行する手順を示し、各ステップが正常に完了すると緑のチェックマークが表示されます。
重要: このスクリプトで作成される一意のユーザー名は次の単元で必要になるため、保存しておきます。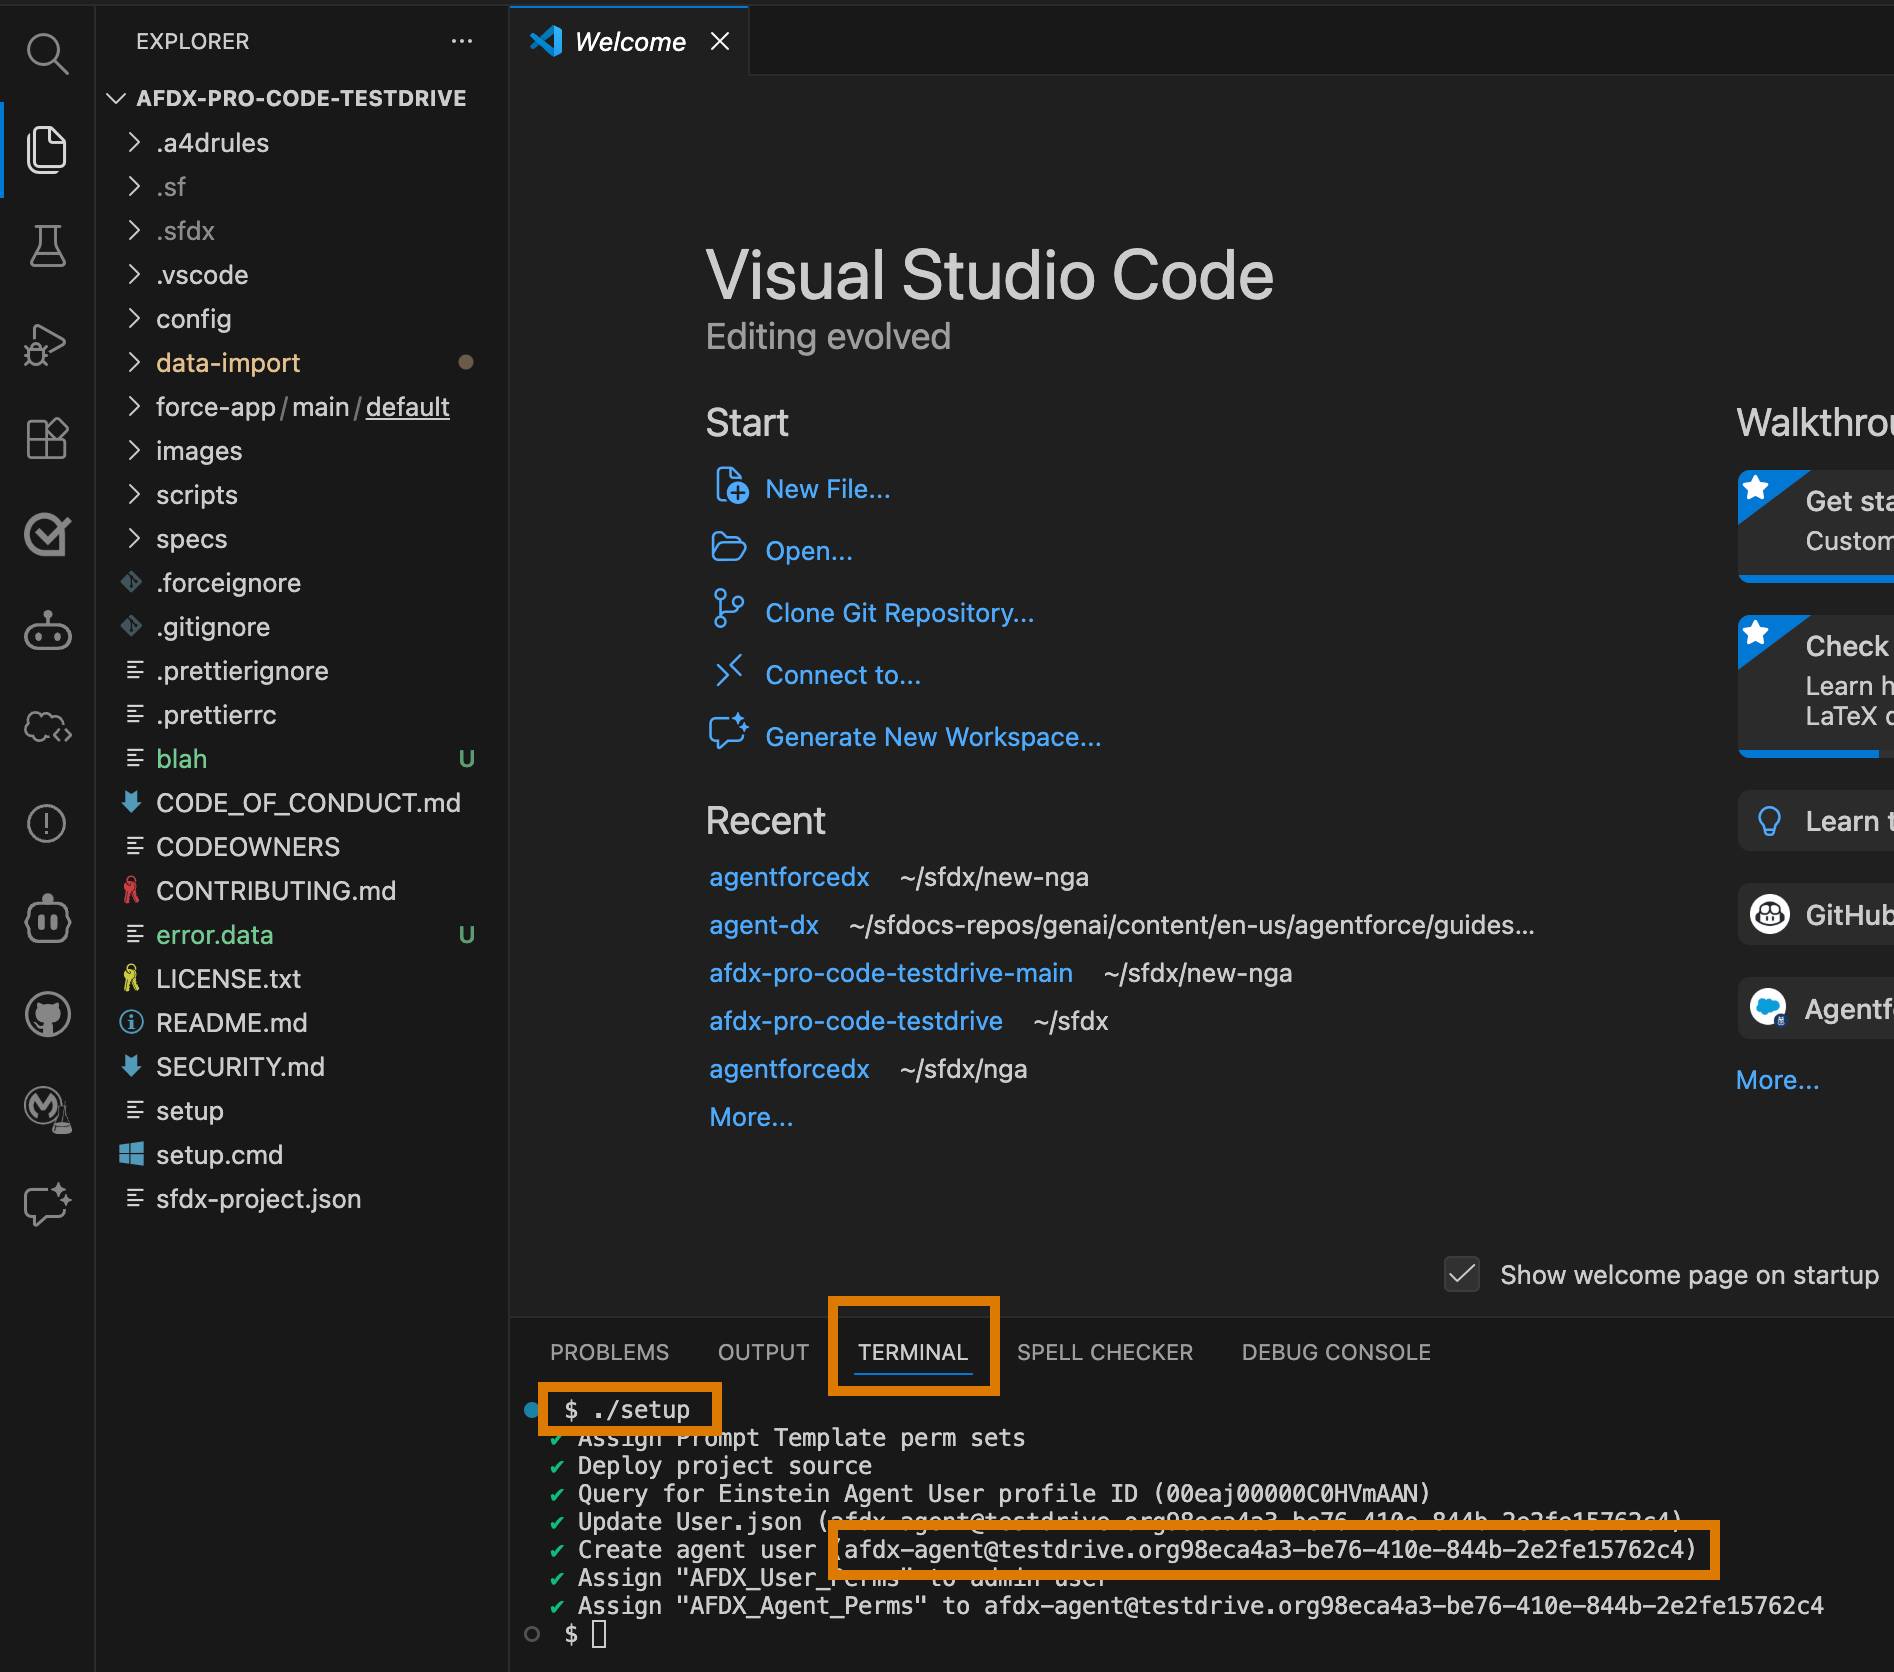
エージェントコマンドを表示する
agent コマンドを使い始める前に、その内容を確認します。CLI コマンドの大半は、VS Code のコマンドパレットに相当するものがあり、そうしたコマンドも使用します。すべての CLI コマンドを確認すれば、Agentforce DX で何ができるのかをざっと理解することができます。
- VS Code 統合ターミナルから
sf searchCLI コマンドを実行すると、使用可能な agent コマンドがすべて表示されます。リストをスクロールしていくと、下部にコマンドの概要が示されます。
次のコマンドを実行すると、agentコマンドを含む Salesforce CLI プラグインの技術的な情報が示されます。sf plugins inspect agent - コマンドに
--helpフラグを付けて実行すると、そのコマンドの詳しい説明 (フラグ、使用法の例など) が表示されます。-hを使用すると、簡潔な説明が表示されます。sf agent validate authoring-bundle --help
この Trailhead バッジでは、agent validate authoring-bundle と agent publish authoring-bundle という CLI コマンド、またはこの 2 つに相当する VS Code コマンドを中心に説明します。
Agentforce DX について学習し、開発環境を設定したところで、「エージェントのコーディング」というお楽しみに進みましょう。
リソース
- Salesforce Developers: Build Agents with Agentforce DX (Agentforce DX を使用したエージェントの構築)
- Salesforce Developers: Salesforce CLI Command Reference, agent Commands (Salesforce CLI コマンドリファレンス、agent コマンド)
- Salesforce Developers: Agentforce バイブス拡張機能
- Salesforce Developers: How Salesforce Developer Experience (DX) Tooling Changes the Way You Work (Salesforce Developer Experience (DX) ツールは開発業務をどう変えるのか)
- Salesforce 開発者: Visual Studio Code 向け Salesforce 拡張機能
- Salesforce Developers: Salesforce CLI Setup Guide, Quick Start (Salesforce CLI 設定ガイド、クイックスタート)
- Salesforce ヘルプ: Design and Implement Agents (エージェントの設計および実装)
- Trailhead: 新しい Agentforce Builder について知る