子から親に通信する
学習の目的
このプロジェクトでは、次のことを行います。
- 相互に通信する Lightning Web コンポーネントを作成する。
- 子コンポーネントから親コンポーネントに通信する。
- 親コンポーネントから子コンポーネントに通信する。
- 関連しないコンポーネント間で通信する。

このプロジェクトは、Lightning Web コンポーネントを作成した経験がある Salesforce 開発者向けに設計されています。まだ Lightning Web コンポーネントに慣れていない場合は、このプロジェクトを続行する前に、「Lightning Web コンポーネントの作成」トレイルでいくつかのバッジを獲得することをお勧めします。
コンポーネントが通信するしくみ
複数の Lightning Web コンポーネントを使用してアプリケーションを作成する場合、コンポーネント間で情報を共有させたいと思うことがよくあります。あるコンポーネントから別のコンポーネントに通信させる方法は、コンポーネント間の関連付けの有無と関連性によって異なります。コンポーネント内に別のコンポーネントを配置すると、親子リレーションが作成されます。親が子に通信する方法と子が親に通信する方法は異なります。また、その 2 つの方法は、関連していないコンポーネント (別個の DOM サブツリーにあるコンポーネント) が相互通信する方法とも異なります。
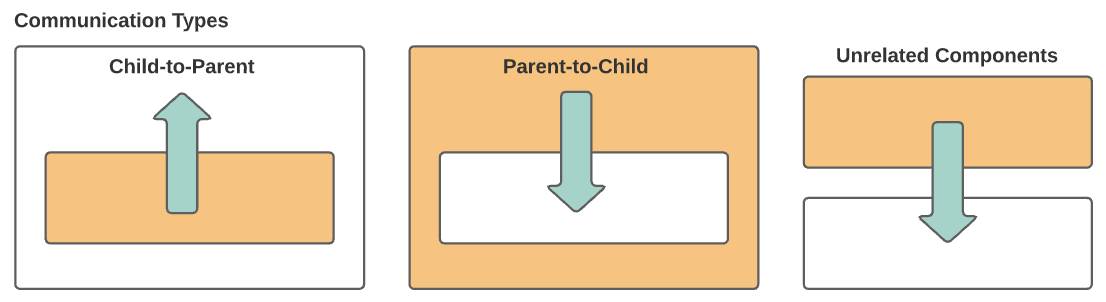
このプロジェクトでは、上記のリレーションが存在しているコンポーネント間で、それぞれ通信を確立していきます。
始める前に
すでに Salesforce DX 開発環境が整っていて、その環境で Lightning Web コンポーネントを作成して組織にリリースできることを前提とします。まだこのプロセスに不慣れな場合は、このプロジェクトの前に「クイックスタート: Lightning Web コンポーネント」プロジェクトを修了してください。
新しい Trailhead Playground を作成する
このプロジェクト用に、新しい Trailhead Playground を作成する必要があります。このページの一番下までスクロールして Playground 名をクリックし、[Create Trailhead Playground (Trailhead Playground を作成)] をクリックします。新しい Trailhead Playground を作成するには、通常 3、4 分かかります。
Trailhead Playground のユーザー名とパスワードを取得する
では始めましょう。Trailhead Playground に移動します。(Playground がまだ開いていない場合は、このページの一番下までスクロールして [Launch (起動)] をクリックします。)組織に [Get Your Login Credentials (ログイン情報を取得する)] というタブが表示されている場合は、ステップ 1 まで進みます。表示されていない場合は、アプリケーションランチャー ( ) で [Playground Starter] をクリックして手順に従います。
-
[Get Your Login Credentials (ログイン情報を取得する)] タブをクリックし、ユーザー名をメモします。
-
[Reset My Password (パスワードのリセット)] をクリックします。これにより、ユーザー名に関連付けられているアドレスにメールが送信されます。
- メール内のリンクをクリックします。
- 新しいパスワードを入力し、確認して、[Change Password (パスワードを変更)] をクリックします。
プロジェクトを設定する
- Visual Studio Code で、
Event Comms(イベント通信) という名前の Salesforce DX プロジェクトを作成します。
- Trailhead Playground を承認します。
カスタムイベントを使用して通信する
まずシンプルなシナリオから始めましょう。子コンポーネントが、親コンポーネントの更新をトリガーするカスタムイベントをディスパッチします。
イベントを送信する場合、データを送信するように選択でき、イベントが DOM ツリー内で上に伝達されることを許可できます。まずシンプルなシナリオから始めましょう。子コンポーネントが、親コンポーネントの更新をトリガーするカスタムイベントをディスパッチします。
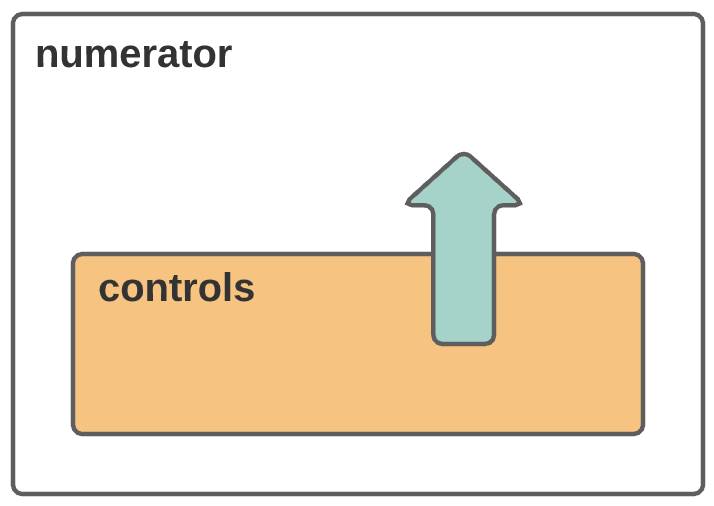
controls コンポーネントから numerator コンポーネントに通信する
-
Event Comms(イベント通信) という名前の 3 つの範囲の Lightning アプリケーションページを作成します。
- 組織 (Trailhead Playground) で [Setup (設定)] を開きます。
- [Quick Find (クイック検索)] ボックスに
Lightning アプリケーションビルダーと入力し、[Lightning App Builder (Lightning アプリケーションビルダー)] を選択します。
-
[New (新規)] をクリックします。
- [App Page (アプリケーションページ)] が選択された状態で、[Next (次へ)] をクリックします。
- [Label (表示ラベル)] に
Event Comms(イベント通信) と入力して、[Next (次へ)] をクリックします。
-
[Three Regions (3 つの範囲)] を選択して、[Done (完了)] をクリックします。
-
[Save (保存)]、[Activate (有効化)]、[Save (保存)]、[Skip and Save (スキップして保存)] の順にクリックします。
-
 をクリックして、Lightning アプリケーションビルダーを終了します。
-
numeratorという名前の親 Lightning Web コンポーネントを作成します。
- Visual Studio Code で、force-app/main/default の下にある lwc フォルダーを右クリックし、[SFDX: Create Lightning Web Component (SFDX: Lightning Web コンポーネントを作成)] を選択します。
- 新しいコンポーネントの名前として
numeratorと入力します。
-
Enter キーを押してからもう一度 Enter キーを押して、デフォルトの
force-app/main/default/lwcを受け入れます。
- numerator コンポーネントファイルをコーディングします。
-
numerator.js の
Numeratorクラス内に次のコードを貼り付けます。counter = 0; handleIncrement() { this.counter++; } handleDecrement() { this.counter--; } - ファイルを保存します。
-
numerator.html を開き、
templateタグの間に次のコードを追加します。<lightning-card title="Numerator" icon-name="action:manage_perm_sets"> <p class="slds-text-align_center slds-var-m-vertical_medium"> Count: <lightning-formatted-number value={counter}></lightning-formatted-number> </p> <!-- controls go here --> </lightning-card> - ファイルを保存します。
- numerator コンポーネントを Lightning アプリケーションページで使用できるようにするには、numerator.js-meta.xml を開いて
isExposedタグを次の行に置き換えます。<isExposed>true</isExposed> <targets> <target>lightning__AppPage</target> </targets> - ファイルを保存します。
- numerator コンポーネントを Event Comms アプリケーションに追加します。
-
lwc フォルダーを右クリックし、[SFDX: Deploy This Source to Org (SFDX: 組織にこのソースをリリース)] を選択して、lwc フォルダーを組織にリリースします。
- Playground のアプリケーションランチャー (
 ) で、[Event Comms] を見つけて開きます。
-
 をクリックし、[Edit Page (ページを編集)] を選択して、編集する Event Comms アプリケーションページを開きます。
- ([Components (コンポーネント)] リストの [Custom (カスタム)] の下にある) [numerator] コンポーネントをページの左の領域にドラッグします。
-
[Save (保存)] をクリックします。
-
 をクリックして、Lightning アプリケーションビルダーを終了します。
-
controlsという名前の子コンポーネントを作成してコーディングします。
- Visual Studio Code に戻り、
controlsという名前の Lightning Web コンポーネントを作成します。
-
controls.js の
Controlsクラス内に次のコードを貼り付けます。handleAdd() { this.dispatchEvent(new CustomEvent('add')); } handleSubtract() { this.dispatchEvent(new CustomEvent('subtract')); } - ファイルを保存します。
-
controls.html を開き、
templateタグの間に次のコードを追加します。<lightning-card title="Controls" icon-name="action:upload"> <lightning-layout> <lightning-layout-item flexibility="auto" padding="around-small"> <lightning-button label="Subtract" icon-name="utility:dash" onclick={handleSubtract}> </lightning-button> </lightning-layout-item> <lightning-layout-item flexibility="auto" padding="around-small"> <!-- buttons go here --> </lightning-layout-item> <lightning-layout-item flexibility="auto" padding="around-small"> <lightning-button label="Add" icon-name="utility:add" onclick={handleAdd} icon-position="right"> </lightning-button> </lightning-layout-item> </lightning-layout> </lightning-card> - ファイルを保存します。
- 子コンポーネント (controls) を親コンポーネント (numerator) に追加します。
-
numerator.html を開き、
controls go here(controls はここに配置) というコメントを次のコードで置き換えます。<c-controls class="slds-show slds-is-relative" onadd={handleIncrement} onsubtract={handleDecrement}> </c-controls> - ファイルを保存します。
- 通信を確認します。
- 変更内容を Salesforce で見るには、lwc フォルダーをリリースして Trailhead Playground 組織で Event Comms アプリケーションページを更新します。
-
[Add (加算)] をクリックすると、数が増えます。
-
[Subtract (減算)] をクリックすると、数が減ります。
これで、子コンポーネント (controls) から add イベントが親コンポーネント (numerator) に送信され、親コンポーネント (numerator) で handleIncrement 関数がトリガーされるようになりました。

カスタムイベントを使用してデータを送信する
次に、イベントを使用してデータを子から親に渡しましょう。ビジネスユニットは、この数を数倍に増やしたいと考えています。複数のオプションを提供します。データを子から親に渡すカスタムイベントを使用します。
- 乗算ボタンと乗算関数を子コンポーネント (controls) に追加します。
-
controls.html を開き、2 つ目の
lightning-layout-itemタグ内のbuttons go here(ボタンはここに配置) というコメントを次のコードで置き換えます。<lightning-button label="2" data-factor="2" icon-name="utility:close" onclick={handleMultiply}> </lightning-button> <lightning-button label="3" data-factor="3" icon-name="utility:close" onclick={handleMultiply}> </lightning-button> - ファイルを保存します。
-
controls.js を開き、
handleSubtract関数の後に次のhandleMultiply関数を追加します。handleMultiply(event) { const factor = event.target.dataset.factor; this.dispatchEvent(new CustomEvent('multiply', { detail: factor })); }onclickイベントをhandleMultiply関数に渡し、event.target.dataset.factorによってdata-factorボタンが取得されます。その後、新しいカスタムイベント (multiply) と共にfactorを親コンポーネント (numerator) に渡します。
- ファイルを保存します。
- 親コンポーネント (numerator) を更新します。
-
numerator.html を開いて、
c-controlsタグに次の属性を追加します。onmultiply={handleMultiply} - ファイルを保存します。
-
numerator.js を開き、次の
handleMultiply関数をhandleDecrement関数の後に追加します。ここで、handleMultiply(event) { const factor = event.detail; this.counter *= factor; }handleMultiply関数は渡されたonmultiplyイベントを取得し、そのデータ (event.detail) を使用して件数 (counter) を更新します。
- ファイルを保存します。
- 通信を確認します。
- 変更内容を Salesforce で見るには、lwc フォルダーをリリースして Event Comms アプリケーションを更新します。
-
[Add (加算)] をクリックすると、数が増えます。
-
[X 2] をクリックすると、件数が 2 倍になります。
-
[X 3] をクリックすると、件数が 3 倍になります。
controls コンポーネントから、multiply カスタムイベントと共にデータ (data-factor) が親 (numerator) に渡されます。

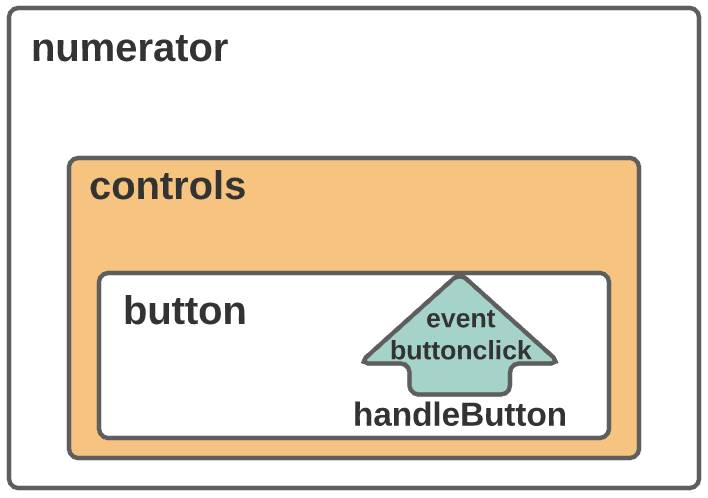
カスタムイベントが上位に伝達されるのを許可する
2 つの乗算ボタンの作成は成功しました。ビジネスユニットは乗算オプションを増やしたいと考えています。必要な数のボタンを簡単に追加できるようにしましょう。ボタン用に別の Lightning Web コンポーネントを追加します。通信を通過できるようにするには、イベントバブルを使用します。バブルによって、ボタンコンポーネントからのカスタムイベントが DOM ツリー内で上位に伝達されるようになります。
-
button(ボタン) という名前のコンポーネントを作成します。
-
button(ボタン) という名前の Lightning Web コンポーネントを作成します。
-
button.js の
Buttonクラス内に次のコードを貼り付けます。@api label; @api icon; handleButton(event) { this.dispatchEvent(new CustomEvent('buttonclick',{ // bubbles: true })); } -
lwcモジュールからapiデコレーターをインポートします。import { LightningElement, api } from 'lwc'; - ファイルを保存します。
-
button.html を開いて、
templateタグの間に次のコードを追加します。<lightning-button label={label} data-factor={label} icon-name={icon} onclick={handleButton}> </lightning-button> - ファイルを保存します。
- ボタンコンポーネントを controls コンポーネントの子にします。
-
controls.html を開き、2 つの
lightning-buttonタグを含むlightning-layout-itemを削除します。
- その場所に、次のコードを貼り付けます。
<lightning-layout-item flexibility="auto" padding="around-small" onbuttonclick={handleMultiply}> <template for:each={factors} for:item="factor"> <c-button key={factor} label={factor} data-factor={factor} icon="utility:close"> </c-button> </template> </lightning-layout-item>lightning-layout-itemのhandleMultiply関数コールがonbuttonclickハンドラーに移動したことに注目してください。これにより、すべてのボタンにハンドラーを追加することがなくなり、より迅速かつクリーンなコードになります。
- ファイルを保存します。
-
controls.js を開き、
Controlsクラス内に次のfactorsプロパティを追加します。factors = [0,2,3,4,5,6];
- ファイルを保存します。
- 通信を確認します。
- 変更内容を Salesforce で見るには、lwc フォルダーをリリースして Event Comms アプリケーションページを更新します。
-
[Add (加算)] をクリックすると、数が増えます。
-
[X 2] をクリックしても、何も起こりません。なぜでしょうか? デフォルトでは、カスタムイベントはホストより上に伝達されません。
[代替テキスト: カスタムイベントはコンテナの先に伝達されない。]
イベント (buttonclick) がlightning-layout-itemに伝達されることを許可するには、CustomEvent内にbubbles:trueを追加します。
-
button.js を開き、
bubbles:trueをコメント解除 (前の//を削除) します。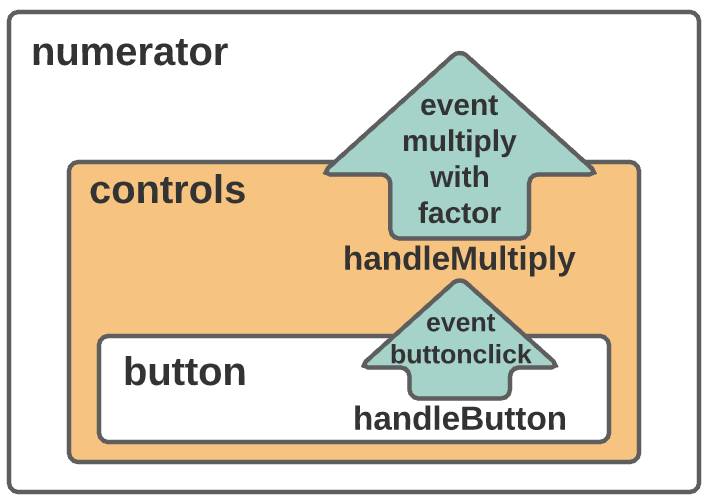
[代替テキスト: カスタムイベントがコンテナより上に伝達されるようになった。]
- ファイルを保存し、再度リリースします。
- Event Comms アプリケーションページを更新します。
-
[Add (加算)] をクリックして件数を「1」に設定します。
-
[X 2] をクリックすると、件数が 2 倍になります。
-
[X 6] をクリックすると、件数が 6 倍になります。
-
[X 0] をクリックすると、件数がゼロにリセットされます。
- 次のとおりクリックしてみましょう。[Add (加算)]、[X 2]、[X 5]、[X 2]、[Add (加算)]、[X 2]。または、[Add (追加)]、[X 3]、[X 2]、[X 2]、[Subtract (減算)]、[X 2]、[Subtract (減算)]、[X 2]。他にも、独自の組み合わせを試してみてください。
チャレンジ (省略可能 — このコードの確認は行いません)
ボタンコンポーネントの 2 つ目のインスタンスを controls コンポーネントに追加して、numerator コンポーネントに表示される除算ボタンを作成してください。
まとめ
このステップでは、カスタムイベントを使用して子コンポーネントから親コンポーネントへの通信を確立しました。イベントのみを渡す場合とイベントとデータを渡す場合の通信を作成し、バブルが子-親通信にどのように影響するかを確認しました。次のステップでは、親-子通信をサポートします。
リソース
- Trailhead: クイックスタート: Explore the LWC Recipes Sample App (LWC Recipes サンプルアプリケーションについて知識を深める)
- Lightning Web Components Dev Guide (Lightning Web コンポーネント開発者ガイド): Create and Dispatch Events (イベントの作成とディスパッチ)
- GitHub: LWC レシピ: eventSimple
- GitHub: LWC レシピ: eventWithData
- GitHub: LWC レシピ: eventBubbling
- MDN web docs: イベントの作成と起動
- Salesforce 開発者ブログ: Inter-Component Communication Patterns for Lightning Web Components (Lightning Web コンポーネントのコンポーネント間の通信パターン)
- Salesforce 開発者ブログ: How Events Bubble in Lightning Web Components (Lightning Web コンポーネントでのイベントバブルの仕組み)