Build the Flow
Understand Types of Flows
Flows are versatile tools for automating your processes.
For this project, you want users to click a quick action to start the process, so you create a screen flow. A screen flow requires user interaction—clicking a button, entering information into a form, and so on—and can guide users through a process.
If you wanted this flow to send an automated message when a new program engagement is created, choose a record-triggered flow. If you wanted to batch send an email to all new program engagements at a set time each day, choose a schedule-triggered flow. Those are worth experimenting with on your own—and you can learn more about different types of flows through the links in Resources—but let’s stick with a screen flow in this project.
Create Your Screen Flow
Start by creating a new flow.
- Click the App Launcher (
 ).
).
- In the Search apps and items box, enter
autoand then select Automation.
- In the Flows panel, click New.
- Under Frequently Used, select Screen Flow.
On your new flow, your page includes only two elements: Start and End with one  icon between them.
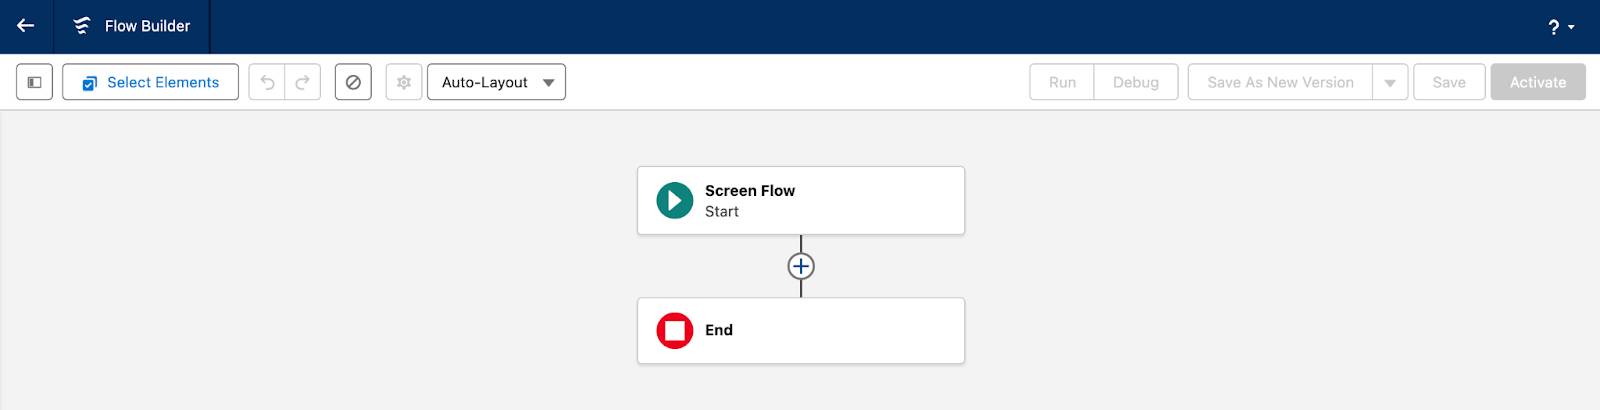
Get Records
Let’s start building!
Begin by adding a Get Records element to the flow. This element finds your program engagement records and stores data in the flow, allowing us to use that data for different actions.
In this case, you need information about the program engagement and your program participant, or client.
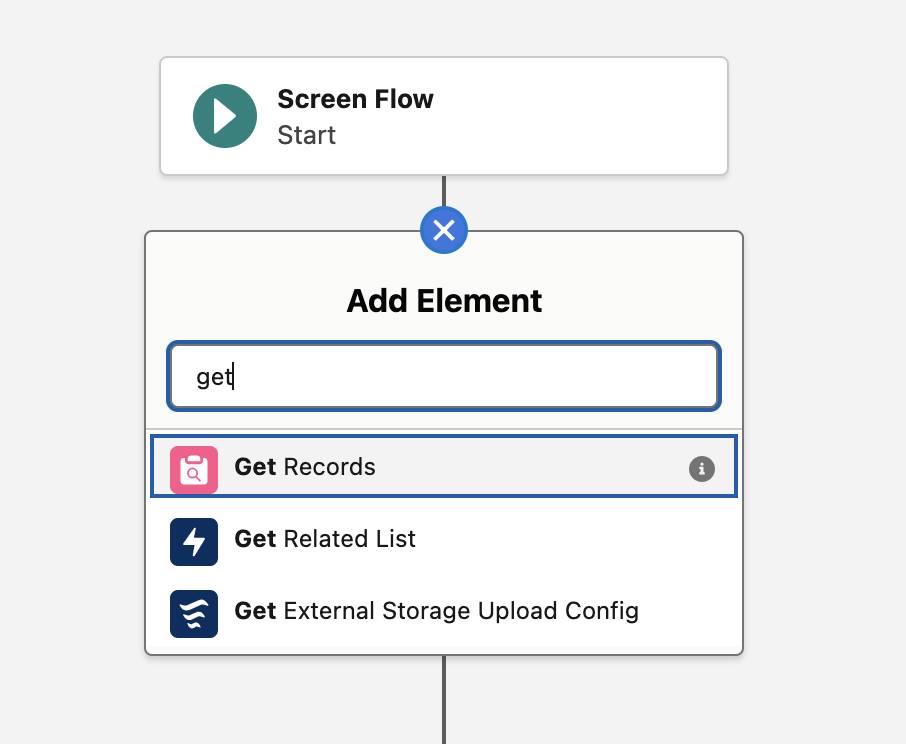
- On the flow canvas, on the path after the Start element, click
 .
.
- Search for or find and select Get Records in the Data group.
- In Label, enter
Get Program Engagements. The API Name should automatically populate asGet_Program_Engagements.
- In Description, enter
Gets and stores data from a program cohort's related active program engagement records. Fill in your flow’s description fields to describe exactly what each element does. It helps you—and other admins—update the flow later.
- In the Object field, select Program Engagement (pmdm__ProgramEngagement__c).
- A new Filter Program Engagement Records section appears. This is where you select which program engagement records to retrieve and store. You only want active engagements related to the cohort record, so filter that now.
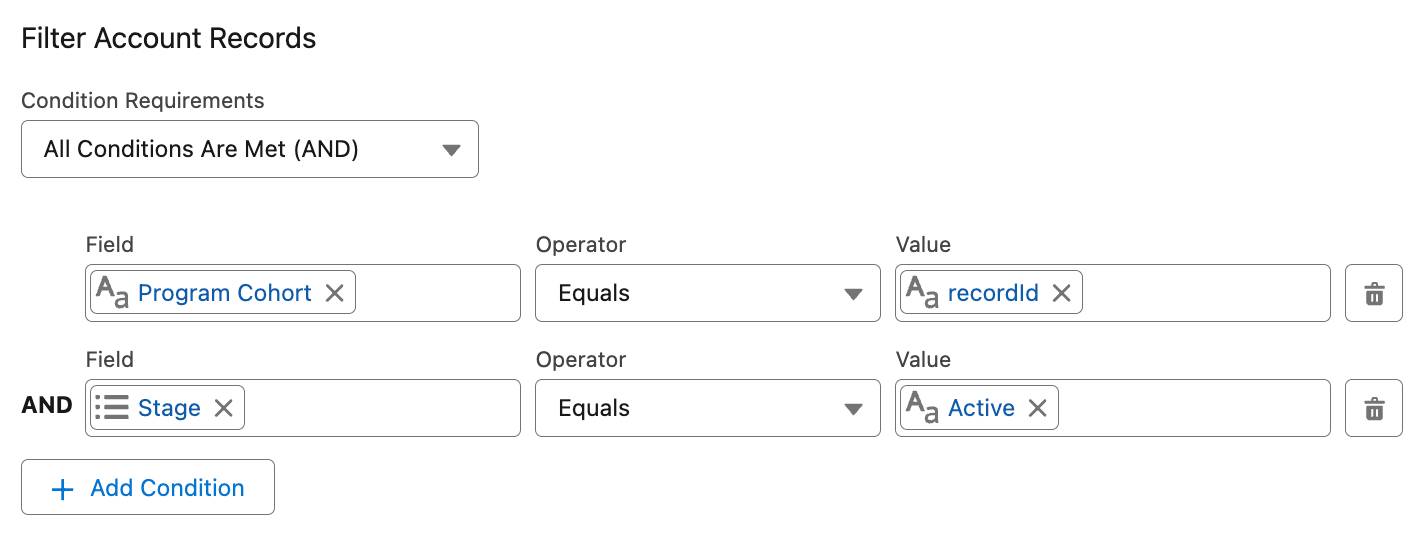
- In the Condition Requirements field, leave the default value of All Conditions Are Met (AND).
- In the first condition row, enter these details to get the records included in the program cohort record you are on when you start the flow. This will be a quick action on a program cohort record and you only want data related to the cohort where you launch the flow.
- Field: Program Cohort (pmdm__ProgramCohort__c)
- Operator: Equals
- Value: Click into the field and then click New Resource.
- Resource Type: Variable.
- API Name:
recordId. This is a special variable API name reserved just for the ID of the record on which you start the flow. Make sure the name is formatted exactly as recordId, with a capital I and lowercase d at the end.
- Description:
Stores the program cohort record ID. - Data Type: Text
- Default Value: Leave this blank.
- Select Available for input.
- Click Done.
- Click + Add Condition.
- In the second condition row, enter these details to filter only program engagements in which the Stage field has an Active value.
- Field: Stage (pmdm__Stage__c)
- Operator: Equals.
- Value: Active.
- In How Many Records to Store, select All Records.
- Click
 on the Get Records pane.

Let’s recap what you just did. You used a Get Records element to find program engagements related to the cohort record where you started the flow, filtering to only program engagements with an Active value in the Stage field.
Get Records is super versatile, and you can configure your filters to get any set of records you want. It’s worth learning about this element and its filters to find new ways to build flows. At the end of this project we will review a few modifications to this flow for other uses.
Save Your Flow
Now that you have one element in your flow, you can save it. As you work, be sure to save your flow frequently so you don’t lose progress.
- Click Save in Flow Builder.
- In the Flow Label field, enter
Email Program Participants (Cohort). The Flow API Name should automatically populate asEmail_Program_Participants_Cohort.
- In the Description field, enter
Emails all program participants with active program engagement records included in a single program cohort. - Save your work.
Loop Through Your Records
Now that you’ve retrieved the data you need with Get Records, you need to set up a loop to perform an action on each record. A Loop element helps us perform the same action for several records.
Add your loop now.
- On the path after the Get Records element, click
 .
.
- Find and select Loop in the Logic section.
- In the Label field, enter
Loop Through Records. The API Name automatically populates asLoop_Through_Records.
- In the Description field, enter
Iterates the action for each of the records from Get Records.
- In the Collection Variable field, select Program Engagements from Get Program Engagements.
- In the Specify Direction for Iterating Over Collection section, select the default, First item to last item.
- Save your work.

Add the Email Alert Action
With the loop in place, it’s time to set up your action: Sending the templated email.
- On the For Each path, click
 .
.
- Click Action in the Interaction section.
- In the Search… field, enter
emailand select the email alert you created, Send Email to Program Participants (Cohort).
- In Label, enter
Send Email. The API Name should automatically populate asSend_Email.
- In the Description field, enter
Sends an email to each program participant with program engagements in the program cohort using the Program Participant Welcome (Cohort) email template.
- In the Record ID field, click the Current Item from Loop Loop Through Records record variable—it has an arrow next to it (
 )—then select Record ID.
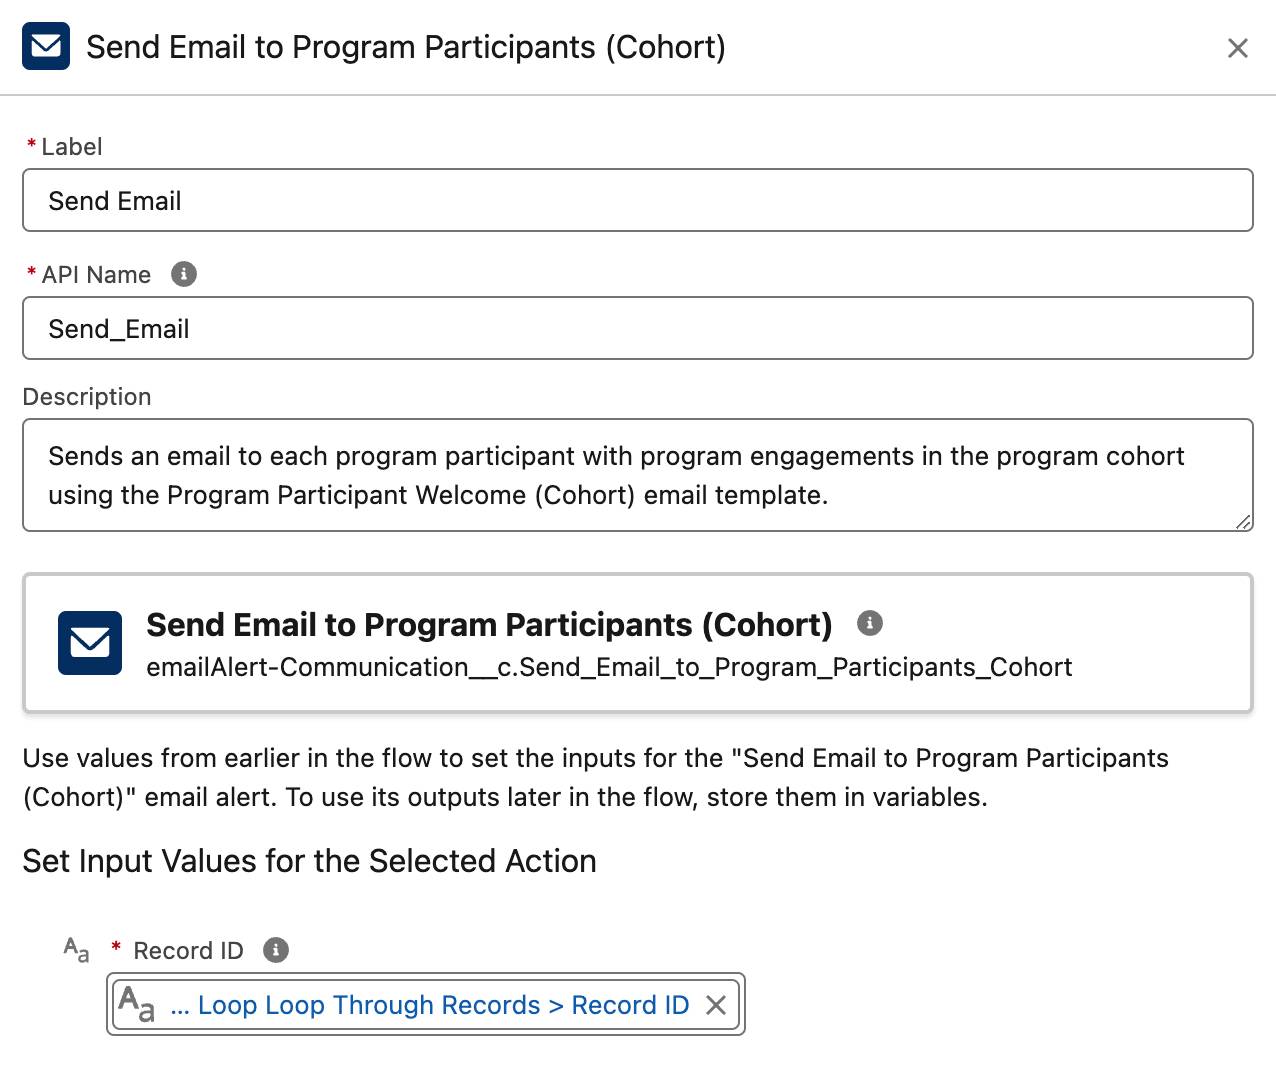
- Save your work.
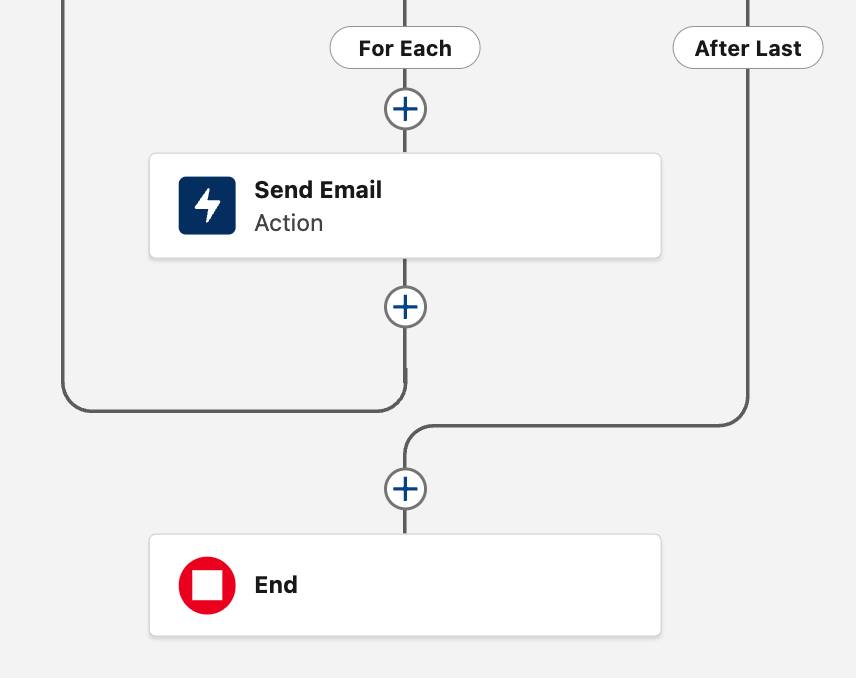
Add a Confirmation Message
By default, when you run a flow like this, you receive a message that says YOUR FLOW FINISHED. That’s correct, but not very reassuring or descriptive.
Add a confirmation message to your flow. If your flow is filling up the page, you can resize the canvas or drag your flow to where you can see the End element.
- On the After Last path, click
 .
.
- Click Screen in the Interaction section.
- In the Label field, enter
Confirmation Message. The API Name field should automatically populate withConfirmation_Message.
- In the Description field, enter
Shows confirmation message that email has sent.
- Click Configure Header and deselect Show Header.
- Drag a Display Text component from the Display section of the Components pane on to the palette.
- In API Name, enter
Confirmed.
- In the text field, enter
Your email has been sent to clients on all active program engagements in this cohort.You could also use a resource here to display content from a variable, don’t do that now.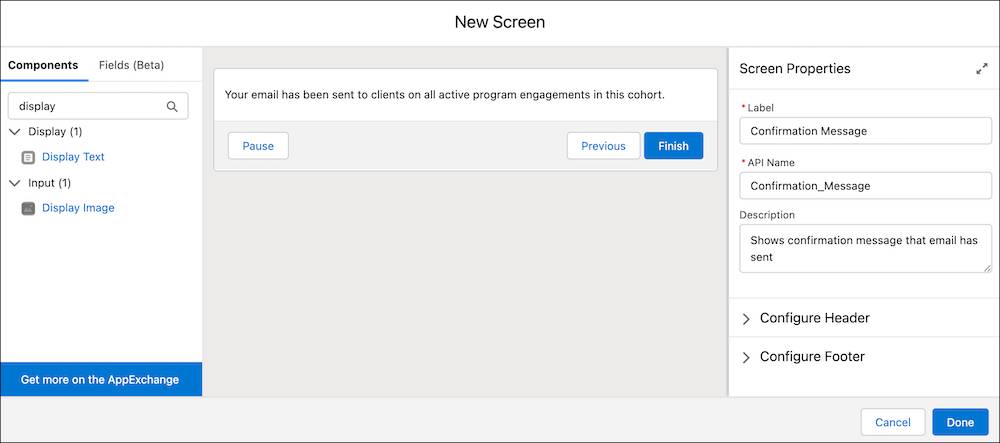
- Click Done.
- Save your work.

Your flow is now complete. To recap, you started by creating the flow and adding the records that store the information needed in the flow, and saved your work. Then you set up a loop for the actions to perform on each record, and followed by adding the specific actions and a confirmation message.
Click Verify here in Trailhead to check your work, then in the next step you activate the flow and add it to the Program Cohort page layout where it can be used.
Resources
- Salesforce Help: Automate Tasks with Flows
- Salesforce Help: Flow Types
- Salesforce Help: Add and Edit Elements in Auto-Layout
- Salesforce Help: Get Records Element
- Salesforce Help: Loop Element
- Salesforce Help: Email Alert Element