Salesforce CLI を使用した地理位置情報アプリケーションの作成
学習の目的
この単元を完了すると、次のことができるようになります。
- CLI を使用して Apex クラスを作成する方法を説明する。
- CLI コマンドを使用して Aura コンポーネントを作成する方法を説明する。
作成する内容
ここでは、機能、つまり地理位置情報アプリケーションを作成するために、ローカルでコードを記述し、スクラッチ組織に同期して、そこでテストします。その過程で、Apex といくつかの Aura コンポーネントを使用します。
Salesforce CLI とスクラッチ組織に引き続き焦点を絞るために、Aura コンポーネントを使用した取引先地理位置情報アプリケーションのコードを用意してあります。
次の図は、コンポーネントのインタラクションの概要を示しています。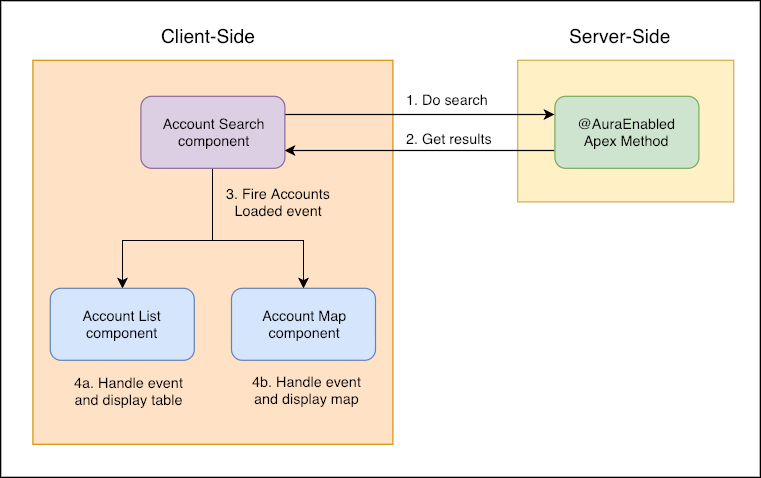
この設計により、アプリケーションは柔軟で管理しやすいものになります。アプリケーションやビジネス要件の進化に合わせて、データを表示するコンポーネントを置き換えることができ、データを照会するコンポーネントを作り直す必要はありません。また、この設計では、これらのコンポーネントを他のアプリケーションで個別に再利用できます。
- 取引先検索コンポーネントは、サーバーサイドアクションをコールして取引先を検索します。
- Apex メソッドは、SOSL 検索結果を返します。
- 取引先検索コンポーネントは、データの他のコンポーネントに通知するイベントを起動します。
- イベントを処理するコンポーネントは、ユーザーにデータを表示します。
取引先検索 Apex コントローラーの作成
このステップでは、Apex コントローラーを作成して Aura コンポーネントが取引先とその位置情報のリストを取得できるようにします。Apex クラスは、Salesforce DX プロジェクトの force-app/main/default フォルダー内の classes というフォルダーに保存されます。CLI を使用して、新しい Apex クラスのスキャフォールディングをすばやく行うことができます。
-
geolocationプロジェクトディレクトリ内で、プロジェクトのルートから次のコマンドを実行します。sf apex generate class --name AccountSearchController --output-dir force-app/main/default/classes
-
force-app/main/default/classes/AccountSearchController.clsを開き、スキャフォールディングコードを次のコードに置き換え、ファイルを保存します。public with sharing class AccountSearchController { @AuraEnabled public static List<Account> searchAccounts( String searchTerm ) { List<Account> accounts = new List<Account>(); if ( String.isNotBlank( searchTerm ) ) { List<List<SObject>> searchResults = [ FIND :searchTerm RETURNING Account( Id, Name, Phone, Website, BillingStreet, BillingCity, BillingState, BillingPostalCode ORDER BY Name LIMIT 10 ) ]; accounts = searchResults[0]; } return accounts; } } - ここで、前の単元で作成したデフォルトのスクラッチ組織に新しいコードをデプロイ (同期) します。
sf project deploy start
project deploy startコマンドからの出力は、次のようになります。これで、スクラッチ組織が AccountSearchController によって更新されました。Deploying v58.0 metadata to test-t7e5za@example.com using the v58.0 SOAP API. Deploy ID: 0Af6t00000AN Status: Succeeded | ████████████████████████████████████████ | 1/1 Components (Errors:0) | 0/0 Tests (Errors:0) Deployed Source =============================================================================================================== | State Name Type Path | ─────── ─────────────────────── ───────── ─────────────────────────────────────────────────────────────────── | Created AccountSearchController ApexClass force-app/main/default/classes/AccountSearchController.cls | Created AccountSearchController ApexClass force-app/main/default/classes/AccountSearchController.cls-meta.xml
取引先が読み込まれた Aura イベントの作成
単一責任の設計原則を使用して、検索結果の表示は、後のステップで作成する取引先地図コンポーネントと取引先リストコンポーネントによって処理されるイベントを起動することによって委任します。
- aura フォルダーにイベントを作成します。
sf lightning generate event --name AccountsLoaded --output-dir force-app/main/default/aura
-
force-app/main/default/aura/AccountsLoaded/AccountsLoaded.evtを開き、スキャフォールディングコードを次のコードに置き換え、ファイルを保存します。<aura:event type="APPLICATION"> <aura:attribute name="accounts" type="Account[]"/> </aura:event> - 新しいコードをスクラッチ組織にデプロイします。
sf project deploy start
project deploy startコマンドからの出力は、次のようになります。Deploying v58.0 metadata to test-t7e5za@example.com using the v58.0 SOAP API. Deploy ID: 0Af6t00000AN Status: Succeeded | ████████████████████████████████████████ | 1/1 Components (Errors:0) | 0/0 Tests (Errors:0) Deployed Source =============================================================================================================== | State Name Type Path | ─────── ─────────────────────── ───────── ─────────────────────────────────────────────────────────────────── | Created AccountsLoaded AuraDefinitionBundle force-app/main/default/aura/AccountsLoaded/AccountsLoaded.evt | Created AccountsLoaded AuraDefinitionBundle force-app/main/default/aura/AccountsLoaded/AccountsLoaded.evt-meta.xml
取引先検索 Aura コンポーネントの作成
次に、これとほぼ同じプロセスを繰り返して、AccountSearch コンポーネントを作成します。Aura コンポーネントファイルは、バンドルにまとめられていて、force-app/main/default/aura フォルダー内のフォルダーに保存されています。Apex クラスと同様に、コマンドラインから Aura コンポーネントのスキャフォールディングを行うことができます。
-
auraフォルダーにコンポーネントを作成します。sf lightning generate component --name AccountSearch --output-dir force-app/main/default/aura
このように、すべての必要なファイルが作成されます。
-
force-app/main/default/aura/AccountSearch/AccountSearch.cmpを開き、内容を次のコードに置き換え、ファイルを保存します。<aura:component controller="AccountSearchController"> <aura:registerEvent name="accountsLoaded" type="c:AccountsLoaded"/> <aura:handler name="init" value="{!this}" action="{!c.onInit}"/> <aura:attribute name="searchTerm" type="String" default="San Francisco"/> <lightning:card title="Account Search" iconName="standard:search"> <div class="slds-form slds-p-around_x-small"> <lightning:input label="Search" variant="label-hidden" value="{!v.searchTerm}" placeholder="Search by name, phone, website, or address" onchange="{!c.onSearchTermChange}"/> </div> </lightning:card> </aura:component>このコンポーネントには、ユーザーが取引先の名前や住所などの検索語を入力する入力項目があり、コンポーネントが初期化されたときや検索語が変更されたときにイベントハンドラーを登録します。
-
force-app/main/default/aura/AccountSearch/AccountSearchController.jsを開き、内容を次のコードに置き換え、ファイルを保存します。({ onInit: function( component, event, helper ) { // proactively search on component initialization var searchTerm = component.get( "v.searchTerm" ); helper.handleSearch( component, searchTerm ); }, onSearchTermChange: function( component, event, helper ) { // search anytime the term changes in the input field var searchTerm = component.get( "v.searchTerm" ); helper.handleSearch( component, searchTerm ); } })クライアント側コントローラーは、コンポーネントの初期化イベントと検索語が変更された場合の処理を実行します。ヘルパーファイルをコールして、ユーザーの入力に基づいて検索を実行します。
-
force-app/main/default/aura/AccountSearch/AccountSearchHelper.jsを開き、スキャフォールディングコードを次のコードに置き換え、ファイルを保存します。({ // code in the helper is reusable by both // the controller.js and helper.js files handleSearch: function( component, searchTerm ) { var action = component.get( "c.searchAccounts" ); action.setParams({ searchTerm: searchTerm }); action.setCallback( this, function( response ) { var event = $A.get( "e.c:AccountsLoaded" ); event.setParams({ "accounts": response.getReturnValue() }); event.fire(); }); $A.enqueueAction( action ); } }) - 新しいソースをスクラッチ組織にデプロイします。
sf project deploy start
定義バンドルがスクラッチ組織にデプロイされています。
Deploying v58.0 metadata to test-t7e5za@example.com using the v58.0 SOAP API.
Deploy ID: 0Af6t00880W7VdBCAV
Status: Succeeded | ████████████████████████████████████████ | 1/1 Components (Errors:0) | 0/0 Tests (Errors:0)
Deployed Source
====================================================================================================================
| State   Name           Type                 Path
| ─────── ────────────── ──────────────────── ──────────────────────────────────────────────────────────────────────
| Created AccountSearch  AuraDefinitionBundle force-app/main/default/aura/AccountSearch/AccountSearch.auradoc
| Created AccountSearch  AuraDefinitionBundle force-app/main/default/aura/AccountSearch/AccountSearch.cmp
| Created AccountSearch  AuraDefinitionBundle force-app/main/default/aura/AccountSearch/AccountSearch.cmp-meta.xml
| Created AccountSearch  AuraDefinitionBundle force-app/main/default/aura/AccountSearch/AccountSearch.css
| Created AccountSearch  AuraDefinitionBundle force-app/main/default/aura/AccountSearch/AccountSearch.design
| Created AccountSearch  AuraDefinitionBundle force-app/main/default/aura/AccountSearch/AccountSearch.svg
| Created AccountSearch  AuraDefinitionBundle force-app/main/default/aura/AccountSearch/AccountSearchController.js
| Created AccountSearch  AuraDefinitionBundle force-app/main/default/aura/AccountSearch/AccountSearchHelper.js
| Created AccountSearch  AuraDefinitionBundle force-app/main/default/aura/AccountSearch/AccountSearchRenderer.js
取引先リスト Aura コンポーネントの作成
次に、データテーブルに取引先を表示する Aura コンポーネントを作成します。表示するデータを特定するために、このコンポーネントは前のステップで作成した c:AccountsLoaded イベントに登録します。
-
auraフォルダーにコンポーネントを作成します。sf lightning generate component --name AccountList --output-dir force-app/main/default/aura
-
force-app/main/default/aura/AccountList/AccountList.cmpを開き、スキャフォールディングコードを次のコードに置き換え、ファイルを保存します。<aura:component> <aura:handler event="c:AccountsLoaded" action="{!c.onAccountsLoaded}"/> <lightning:navigation aura:id="navigation"/> <aura:attribute name="rows" type="Map[]"/> <aura:attribute name="cols" type="Map[]"/> <lightning:card title="Account List" iconName="standard:account"> <lightning:datatable data="{!v.rows}" columns="{!v.cols}" keyField="Id" hideCheckboxColumn="true" showRowNumberColumn="true" onrowaction="{!c.onRowAction}"/> </lightning:card> </aura:component>このコンポーネントは AccountsLoaded イベントをリスンし、イベントデータをテーブルに表示します。ユーザーが検索を行って別の結果が検出されると、リストはそれに応じて更新されます。
-
force-app/main/default/aura/AccountList/AccountListController.jsを開き、内容を次のコードに置き換え、ファイルを保存します。({ onAccountsLoaded: function( component, event, helper ) { var cols = [ { 'label': 'Name', 'fieldName': 'Name', 'type': 'text' }, { 'label': 'Phone', 'fieldName': 'Phone', 'type': 'phone' }, { 'label': 'Website', 'fieldName': 'Website', 'type': 'url' }, { 'label': 'Action', 'type': 'button', 'typeAttributes': { 'label': 'View details', 'name': 'view_details' } } ]; component.set( 'v.cols', cols ); component.set( 'v.rows', event.getParam( 'accounts' ) ); }, onRowAction: function( component, event, helper ) { var action = event.getParam( 'action' ); var row = event.getParam( 'row' ); if ( action.name == 'view_details' ) { var navigation = component.find( 'navigation' ); navigation.navigate({ 'type': 'standard__recordPage', 'attributes': { 'objectApiName': 'Account', 'recordId': row.Id, 'actionName': 'view' } }); } } })クライアント側コントローラーのonAccountsLoaded関数は、イベントデータを<lightning:datatable>コンポーネントで想定される形式に変換します。onRowAction関数は、ユーザーが操作した行の取引先レコードに移動します。
- 新しいコードをスクラッチ組織にデプロイします。
sf project deploy start
リソース
- Salesforce ドキュメント: Salesforce CLI Command Reference (Salesforce CLI コマンドリファレンス)
- Salesforce ドキュメント: Salesforce DX 開発者ガイド
- Visual Studio Marketplace: Salesforce Extensions for VS Code (VS コード向け Salesforce 拡張)
- Salesforce 動画: Salesforce CLI: Harnessing the Power of Salesforce Through the Command Line (Salesforce CLI: コマンドラインによる Salesforce の力の利用)