Explore Salesforce Maps on Desktop
Learning Objectives
After completing this unit, you’ll be able to:
- Identify available features of the Salesforce Maps user interface.
- Explain key differences between routes and schedules.
Hi there! Welcome to the Salesforce Maps user interface, a mapping environment that visualizes your data, enhances sales processes, and helps you boost revenue and productivity. This module assumes that your Salesforce Maps environment has been configured and marker layers have been created as outlined in Salesforce Maps Configuration and Create a Salesforce Maps Marker Layer. Any user with a Salesforce Maps license has access to the Maps application.
Get Oriented
Users can access Salesforce Maps by selecting the Maps tab or navigating to the Salesforce Maps tile from the App Launcher.
Once selected, let’s start our tour of the Maps user interface.
The left toolbar and navigation menu provide access to the following tabs: Layers, Routes, Schedule, and List.
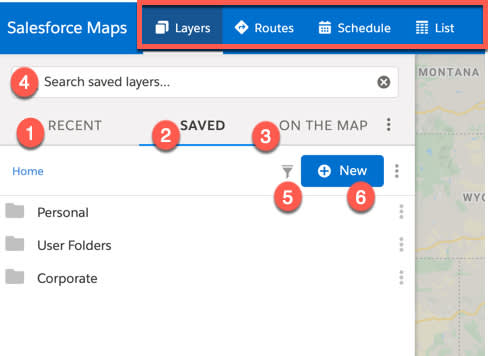
Once the Layers tab is selected, the following options are available.
-
Recent: Displays up to five recently plotted layers and any layers that are set to plot on load.
-
Saved: Provides access to folders, subfolders, and layers. Some users may not see personal and user folders. Access to both are controlled in the Salesforce Maps configuration menu, discussed in the Salesforce Maps Configuration module.
-
Personal folder: Contains private folders and layers unique to an individual user.
-
User folder: Contains personal user folders and follows the Salesforce role hierarchy set forth in your Salesforce org.
-
Corporate folder: A public folder, and access to subfolders are controlled by managed folder permissions.
-
On The Map: Displays all layers currently plotted on the map.
-
Search saved layers: Search for any layer by name.
-
Layer type: Displays all layer types that can be checked or unchecked.
-
New: Displays layer creation options once a folder has been selected.
The other three tabs are:
-
Routes: Displays new routes or can be used to view and edit saved routes.
-
Schedule: Displays new scheduled events and can be used to view saved Salesforce calendar events.
-
List: Provides a list view of any plotted marker layers. Each marker layer displays as its own tab in a list view at the bottom of the map.
Routes and Schedules
Throughout this module you learn about routes and schedules, both designed to help users improve revenue growth by planning efficient customer visits.
How do you determine which tool to use?
There are three fundamental ways in which routes and schedules differ on Maps.
- Schedules sync with the Salesforce calendar to display calendar events and let users add new events. Routes do not create Salesforce calendar events.
- Schedules require all appointments to have a start and end time. Records added to a route don’t require scheduled start and end times, but appointment times and duration can be optionally added.
- Schedules lets users optimize up to a week of appointments at a time. Routes allows users to optimize up to a day of appointments at a time.
Map Toolbar Options
As we move forward with our tour of the Salesforce Maps user interface, notice that the toolbar has additional icons, including:

-
My Position: Plots your current position.
-
Zoom To Fit: Adjusts the map zoom level to display all markers currently plotted on the map.
-
Home: Sets your default map view or lets you go to your default view.
-
Map Types: Displays different map tiles types–such as Esri Street, Esri Topography, Esri Imagery, Google Road, Google Terrain, Google Hybrid, and Google Satellite–that can be set as default within the Salesforce Maps configuration menu for both the desktop and mobile experiences. The system default tile can be changed in the Salesforce Maps configuration menu.
-
Weather: Lets users display different weather overlays.
-
Show Traffic: Plots real-time traffic data.
-
Move the map: Lets users change the map view by dragging the position of the map.
-
Polygon: Lets users draw a freeform polygon.
-
Circle: Lets users draw a circle on the map through click-and-drag functionality.
-
Rectangle: Lets users draw a rectangle on the map through click-and-drag functionality.
-
Point of Interest Search: Searches points of interest, records in marker layers, and records in Salesforce. Searching features are controlled in the Salesforce Maps configuration menu under Global Search settings.
-
Setting Gear icon: Manages default settings for routes and schedule, list view, and Salesforce Maps Data.
Additional Navigation Features
As we travel down the right side of the map, there are a few more options.

-
Pegman street view icon: Allows for drag-and-drop functionality to Google Street view.
-
Zoom control navigation: Allows users to zoom in and out of the map.
-
Full screen view: Displays a full view of the map without the toolbar and left navigation menu.
That completes our tour of the user interface. Now you know how to navigate the map! Let’s look at some common use cases demonstrating how users can employ Salesforce Maps to geographically view data to help them increase productivity and revenue.
Resources
- Trailhead: Lightning Experience for Salesforce Classic Users
- Trailhead: Salesforce Maps Configuration
- Salesforce Help: Compare Maps Route and Schedule
- Salesforce Help: Maps Desktop User Interface
- Salesforce Help: Managing Global Search Settings in Salesforce Maps
- Salesforce Help: Routes and Schedule Settings in Maps
User Interface—Quiz Scenario
Candace Evans is a sales rep at Cloud Kicks. She wants to see all of her open opportunities on the map. To display this information, she opens the Corporate folder and plots the marker layer My Open Opportunities. Next, she puts a shape on the map around a group of accounts. She calls each account, schedules meetings, and then saves each meeting as an event in her Salesforce calendar.